# Set up a Privacy Webhook in Zendesk (/docs/dsr-automation/api-integration/system-specific-setup/webhook-in-zendesk)
## Introduction [#introduction]
Zendesk offers the ability to create Webhooks that can be used along with the Privacy API to automatically create and manage DSR Automation.
In this example, we will create a Webhook that will submit an Erasure request upon receiving a Zendesk ticket coming from the DSR submission service [Mine](https://www.google.com/search?q=saymine.com).
### In the works: The Data Rights Protocol [#in-the-works-the-data-rights-protocol]
Transcend is [working with Consumer Reports](https://innovation.consumerreports.org/first-end-to-end-test-of-data-rights-protocol-v0-8-completed-successfully/) on a [technical standard](https://github.com/consumer-reports-innovation-lab/data-rights-protocol) for securely sharing data rights requests between authorized agents and businesses.
## Setup a Webhook in Zendesk [#setup-a-webhook-in-zendesk]
1. In the Zendesk Admin Center, select the `Apps and integrations` entry in the sidebar.
2. Select `Webhooks > Webhooks`, then `Create webhook`.
3. Choose `Trigger` or `Automation` as a way to connect [(difference between events and triggers)](https://support.zendesk.com/hc/en-us/articles/4408832924314-What-is-the-difference-between-triggers-and-automations-).
4. In the next screen, add a `Name` and `Description` for the webhook.
5. For the `Endpoint URL` field, use `https://multi-tenant.sombra.transcend.io/v1/data-subject-request`
- If you are running a self-hosted Sombra instance, change the base URL from `https://multi-tenant.sombra.transcend.io` to your gateway's URL, which can be found in [your dashboard](https://app.transcend.io/infrastructure/sombra/sombras). You may also need to allow Zendesk's IP ranges to your Sombra gateway.
6. Use `POST` for `Request method` and `JSON` for `Request format`.
7. Select `Bearer token` as the `Authentication method`.
8. Create your API key in your Transcend dashboard, including the `Submit New Data Subject Request` scope.
- More information on authentication to Transcend APIs can be found [here](../../../overview/developer-tools/authentication.mdx#creating-api-keys)
9. If you are hosting your own instance of Sombra, Click `Add header`, and enter `x-sombra-authorization` for the `Header Name`.
- For the `Header Value`, get your Sombra Bearer token API key.
- If needed, rotate your API key:
- Navigate to "Settings > Sombra" on your Admin Dashboard
- Scroll to the "Hosted Sombra Keys" section
- Click on the "Rotate Sombra Keys" button
- Once the keys are finished rotating, you will be presented with your new `INTERNAL_KEY`.
- You will need to copy it down, as it will be lost once the modal is closed.
- After the modal closes, you will be redirected to the login page for the new keys to take effect.
10. Finish by selecting `Create webhook`.
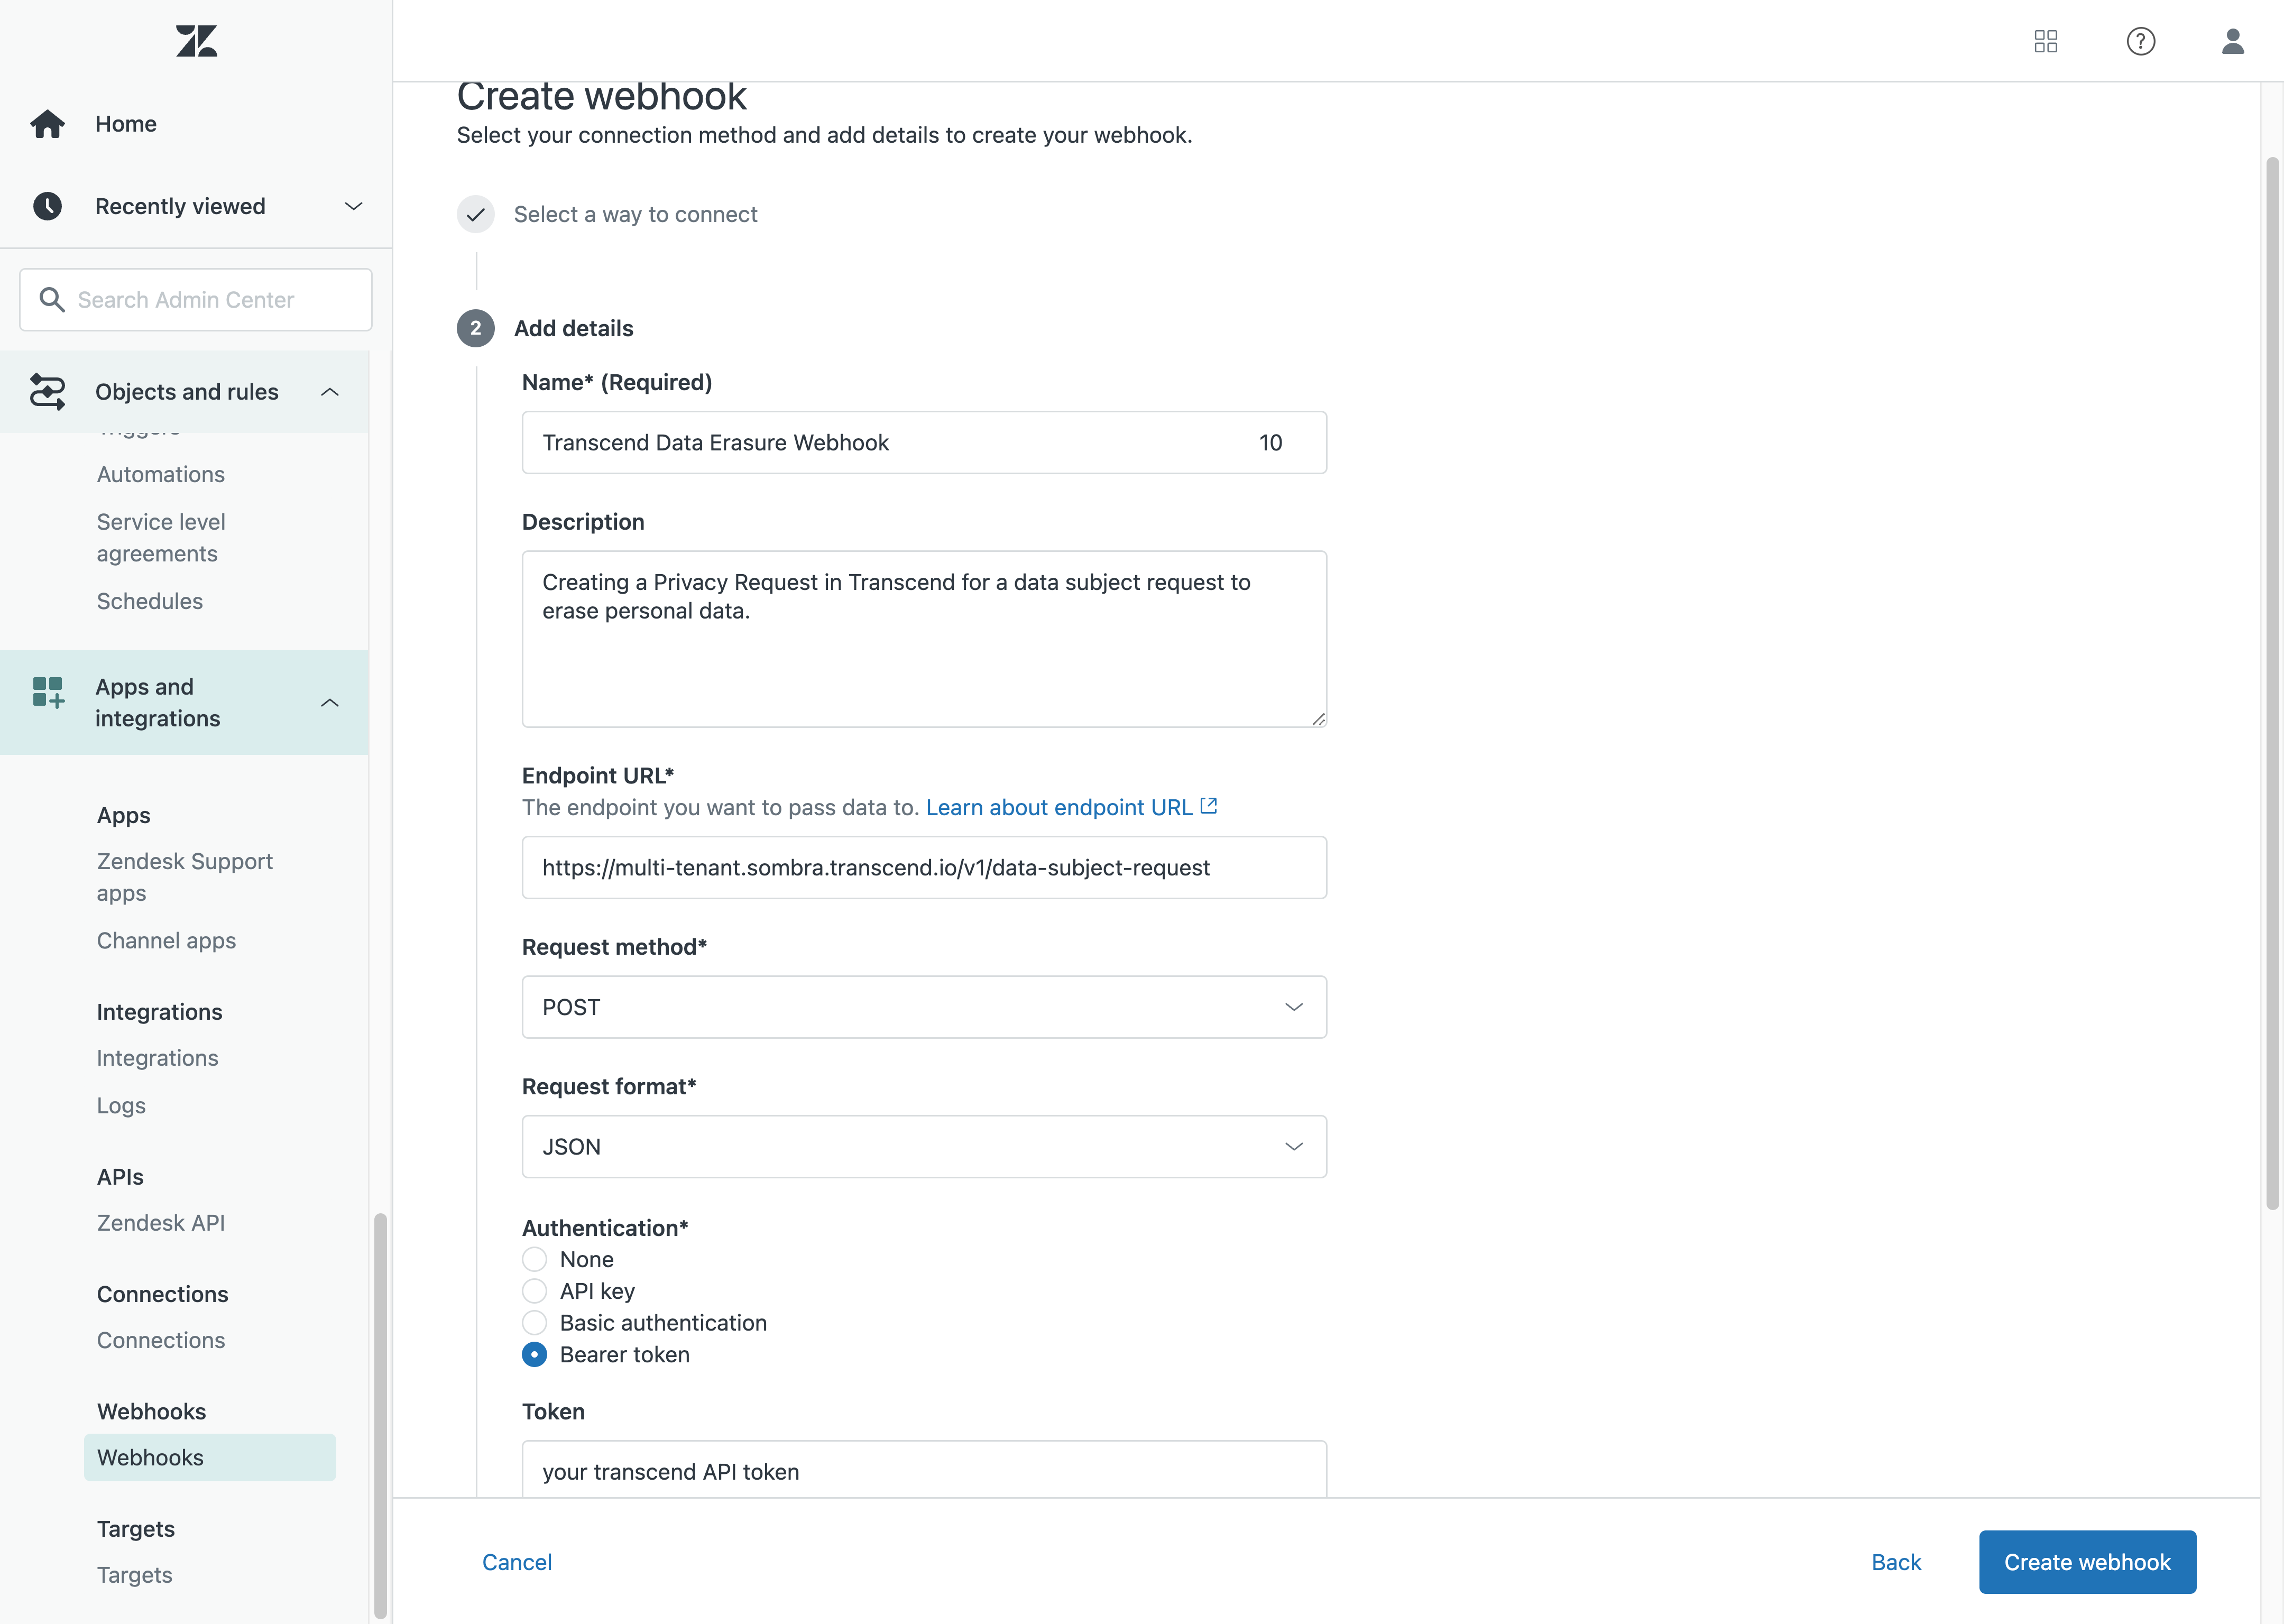
More information about webhooks in Zendesk can be found [here](https://support.zendesk.com/hc/en-us/articles/4408839108378-Creating-webhooks-to-interact-with-third-party-systems#topic_bwm_1tv_dpb)
The full documentation for Privacy API is located [here](../using-the-api-for-data-subject-requests.mdx)
## Create a Zendesk Trigger [#create-a-zendesk-trigger]
1. Go to your Zendesk Admin Center and click on `Objects and rules` in the sidebar.
2. Select `Business rules > Triggers`.
3. Click `Add trigger`.
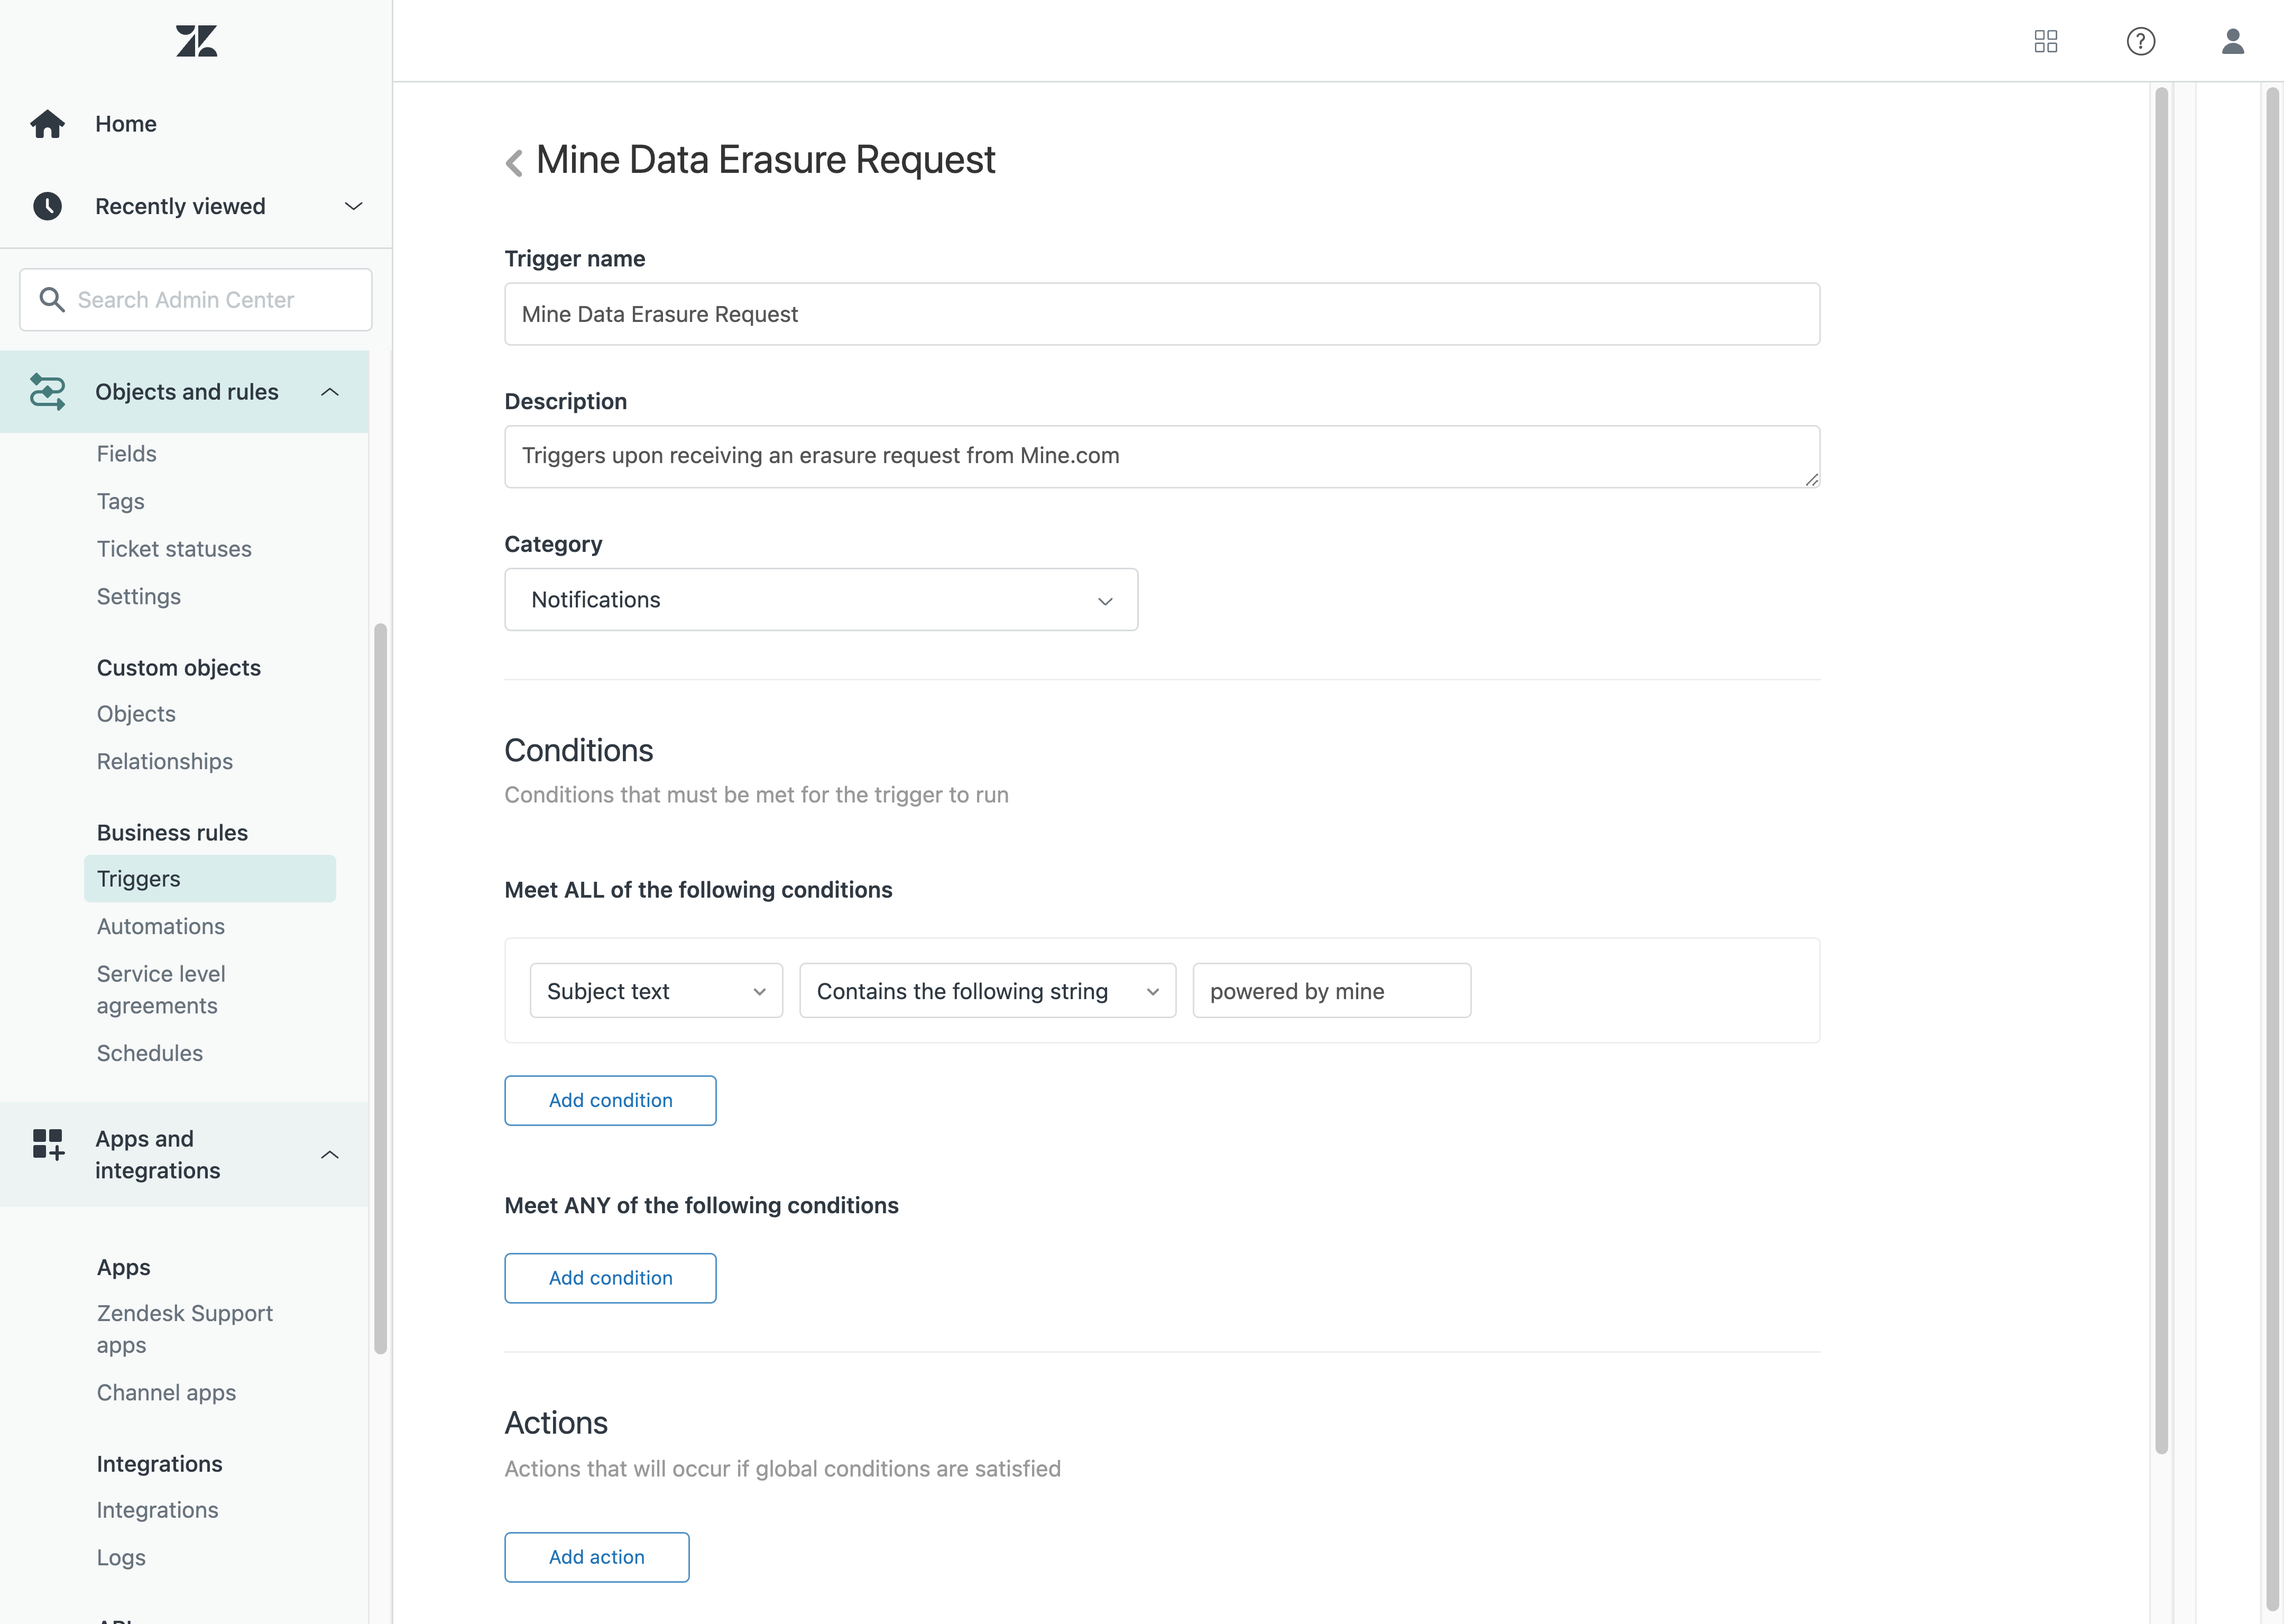
4. Enter a `Name`, `Description` and `Category` for your trigger.
5. Add your trigger conditions using `Add condition`. All conditions need to be met to activate the trigger. For our example of requests coming from Mine, you could create a condition using the following
- First parameter: select `Subject text`
- Second parameter: select `Contains the following string`
- Third parameter: type “powered by mine”.
- See [this documentation](https://support.zendesk.com/hc/en-us/articles/4408893545882#topic_i3y_fkz_1cb) for more information on building trigger condition statements.
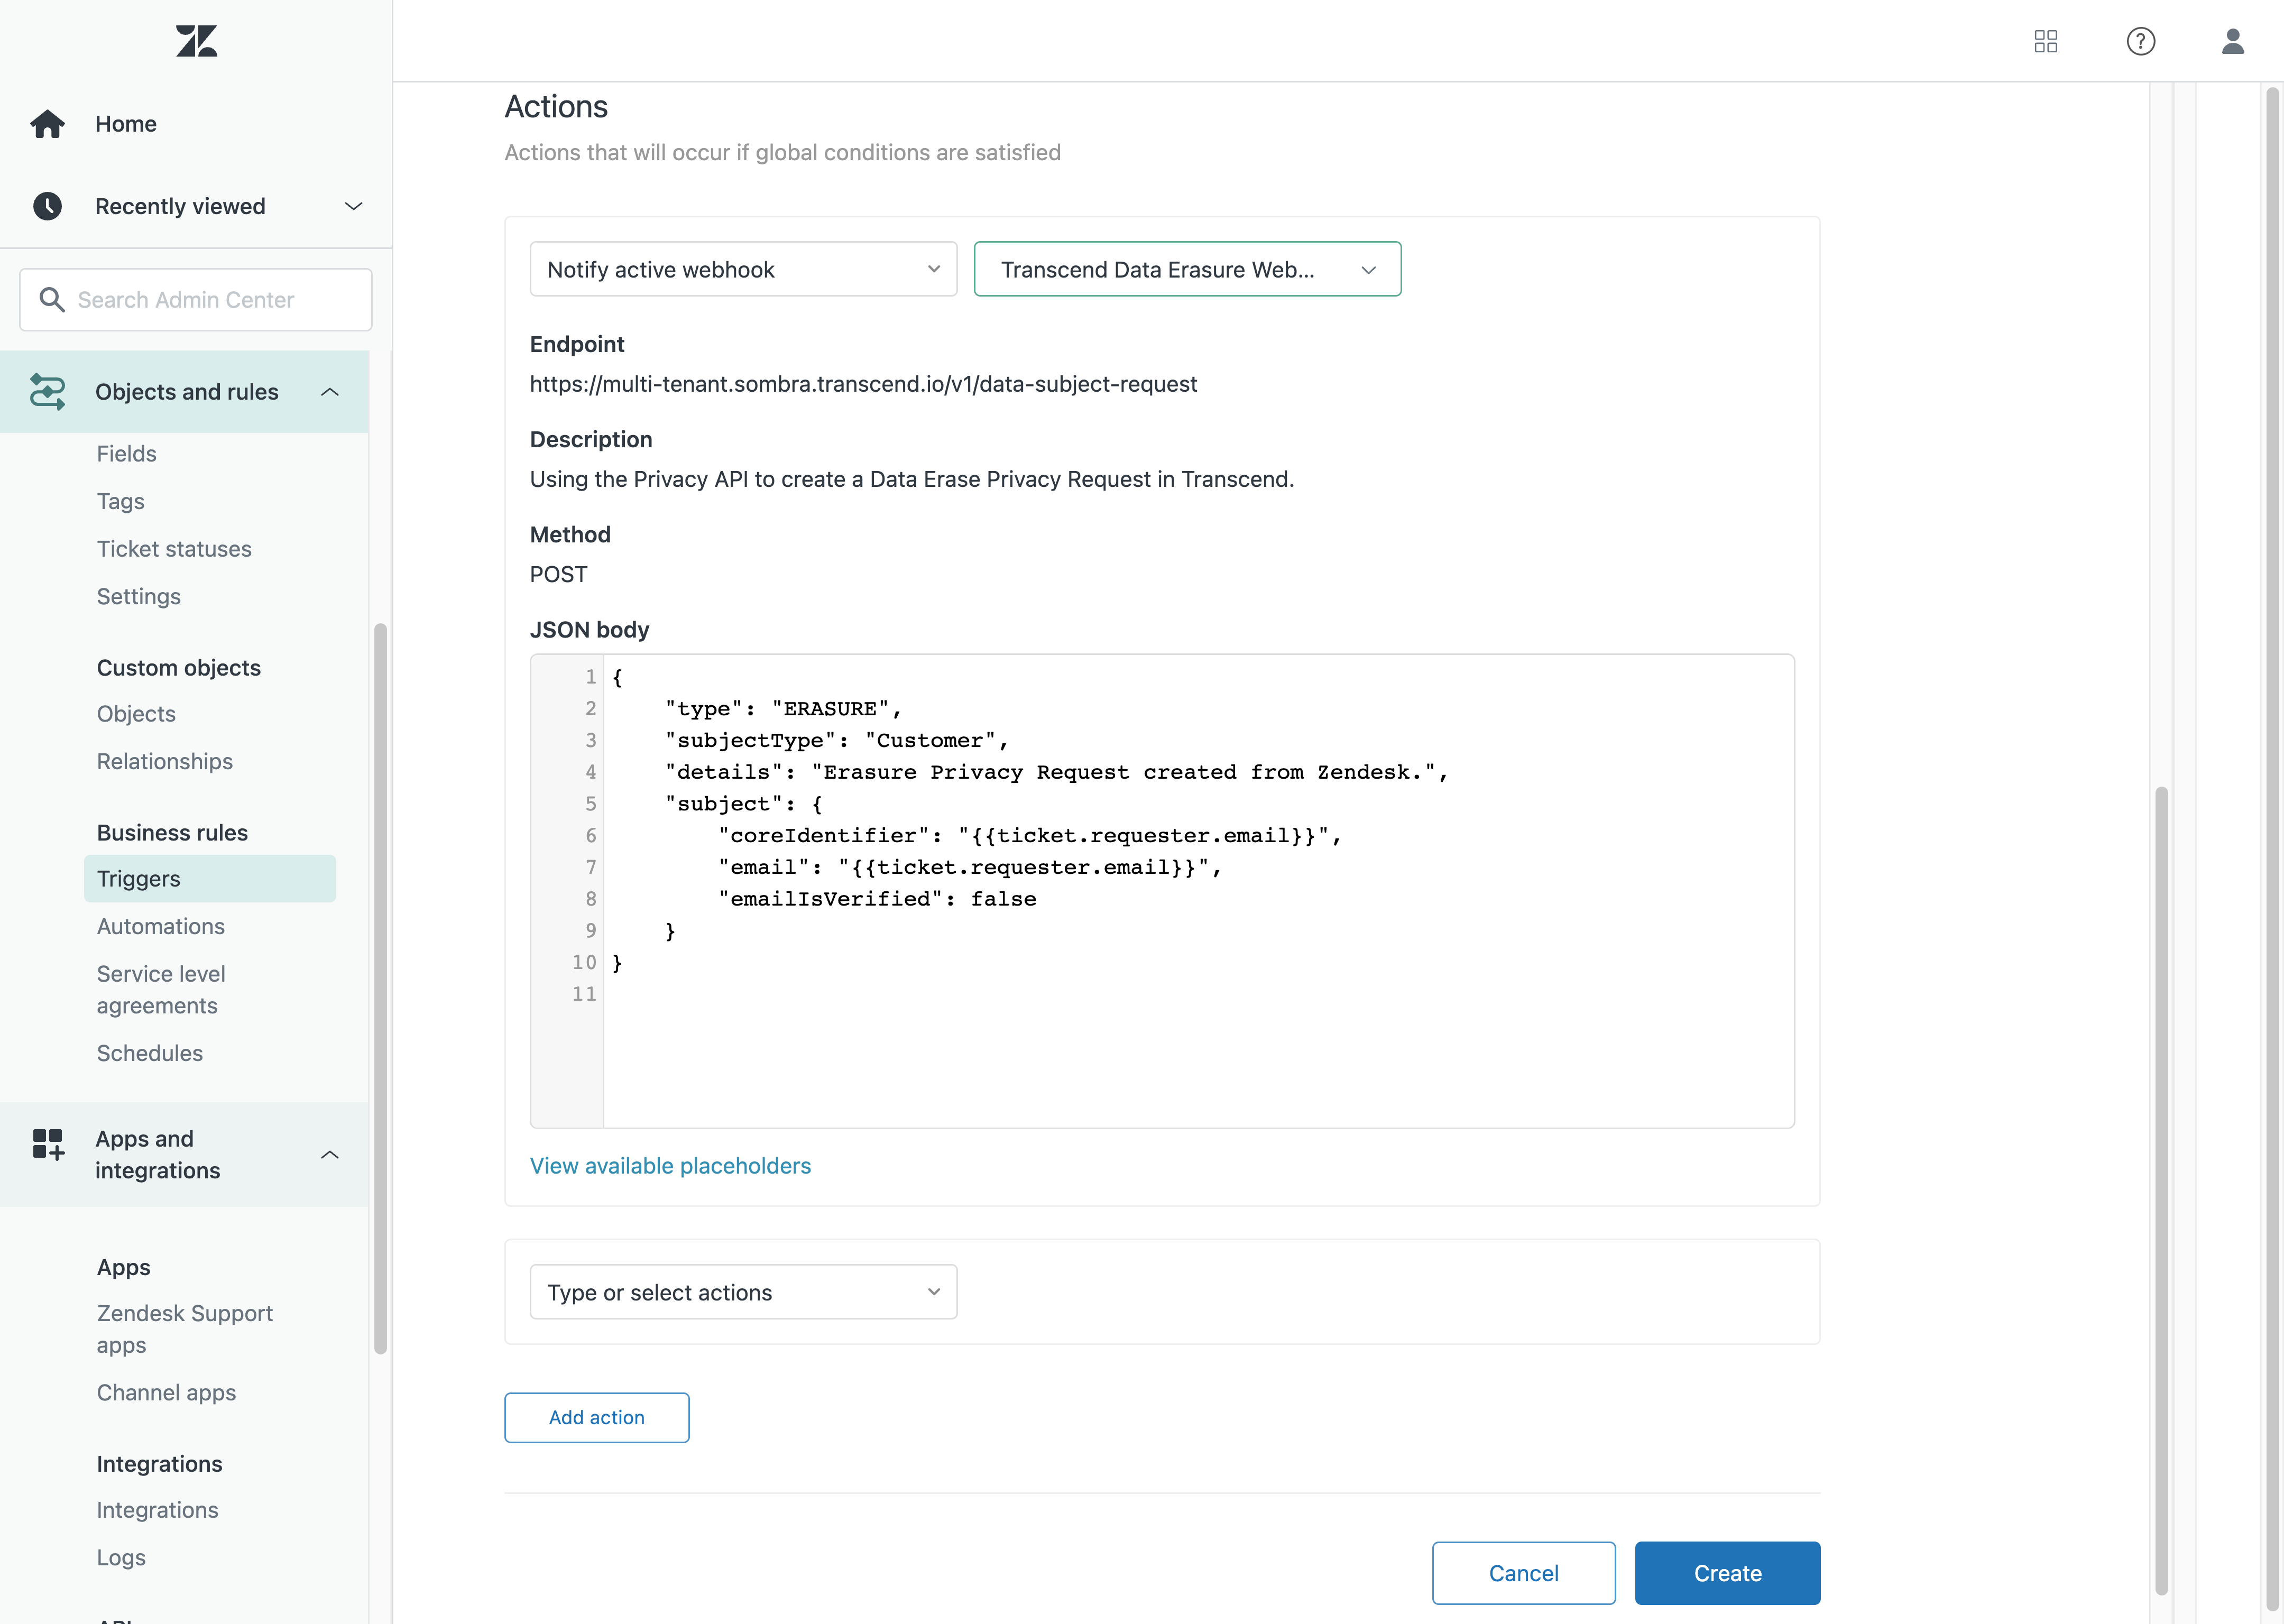
6. Click `Add action` to define what should happen when the trigger fires.
- For `Action`, select `Notify active webhook` and select the Transcend webhook previously created.
- Add JSON body for the API request. See below for a Data Erasure example and [here](../using-the-api-for-data-subject-requests.mdx) for full documentation of the Privacy API.
7. Click `Create`.
## JSON Body for a Data Erasure request [#json-body-for-a-data-erasure-request]
The code below is a simple example of JSON data required to create a Data Erasure ticket in Transcend.
If you are setting up a different type of DSR than Erasure, the `type` field values can be found [here](../using-the-api-for-data-subject-requests.mdx).
Your `subjectType` can be found in the [Privacy Request Settings](https://app.transcend.io/privacy-requests/settings), below the Action settings.
In this example, we mark `emailIsVerified` as false, so your data subject will receive an email confirmation before the DSR workflow can continue as if they submitted a request from the Privacy Center. Additional information on submitting DSRs, deleting, and more can be found [here](../using-the-api-for-data-subject-requests.mdx).
Fields like `ticket.requester.email` are created using Zendesk Fields. See [here](https://support.zendesk.com/hc/en-us/articles/4408886739098-About-ticket-fields) for more documentation on fields.
```json
{
"type": "ERASURE",
"subjectType": "Customer",
"details": "Erasure DSR created from Zendesk.",
"subject": {
"coreIdentifier": "{{ticket.requester.email}}",
"email": "{{ticket.requester.email}}",
"emailIsVerified": false
}
}
```