# Server Webhook integration (/docs/integrations/custom/server-webhook-integration)
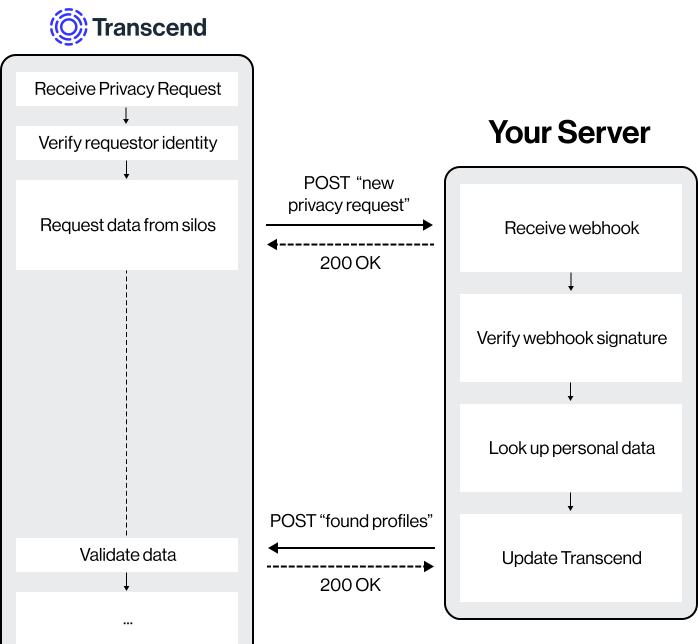
When Transcend executes a workflow, Transcend can send a webhook to one of your servers. Your server can implement some business logic required to fulfill the request and then asynchronously notify Transcend once that request has been fulfilled.
**Check out Custom Functions**
Instead of managing webhook infrastructure, you can execute serverless functions through Transcend. [Read more here](../../custom-functions-overview/introduction-to-custom-functions.mdx).
## What's involved [#whats-involved]
There are four steps to integrating your server with Transcend:
**1. Create the integration on Transcend**
Using the [Transcend Admin Dashboard](https://app.transcend.io/infrastructure/integrations/new?integrationName=server), create a new integration and input the webhook URL that should be notified.
**2. Receive a webhook**
Transcend will send a notification to your server for each new data subject request.
**3. Look up and operate on user data**
Your server will need to find the user specified by the webhook and perform an operation such as retrieving or deleting their personal data.
**4. Notify the Transcend API of completion**
Use our API to notify Transcend when the server has completed processing. For an access request, this means uploading data. For an erasure or opt out request, this means notifying Transcend that the job has been completed.
**Check out our examples for webhook handler implementations**
We have examples on [GitHub](https://github.com/transcend-io/examples). The [JavaScript](https://github.com/transcend-io/examples/tree/master/javascript) example is deployed live at our [demo Privacy Center](https://e-shop-it.trsnd.co/).
## Read the webhook reference [#read-the-webhook-reference]
Before setting up your Server Webhook integration, you may find it help to first read our webhook API reference.
## 1. Create the integration on Transcend [#1-create-the-integration-on-transcend]
1. Go to [Integrations](https://app.transcend.io/infrastructure/integrations/new?integrationName=server) to connect the "Server Webhook" integration type.
2. Click "Add"
3. Give your integration a title (e.g. "Core Backend Application") and optionally set an assignee for the system owner.
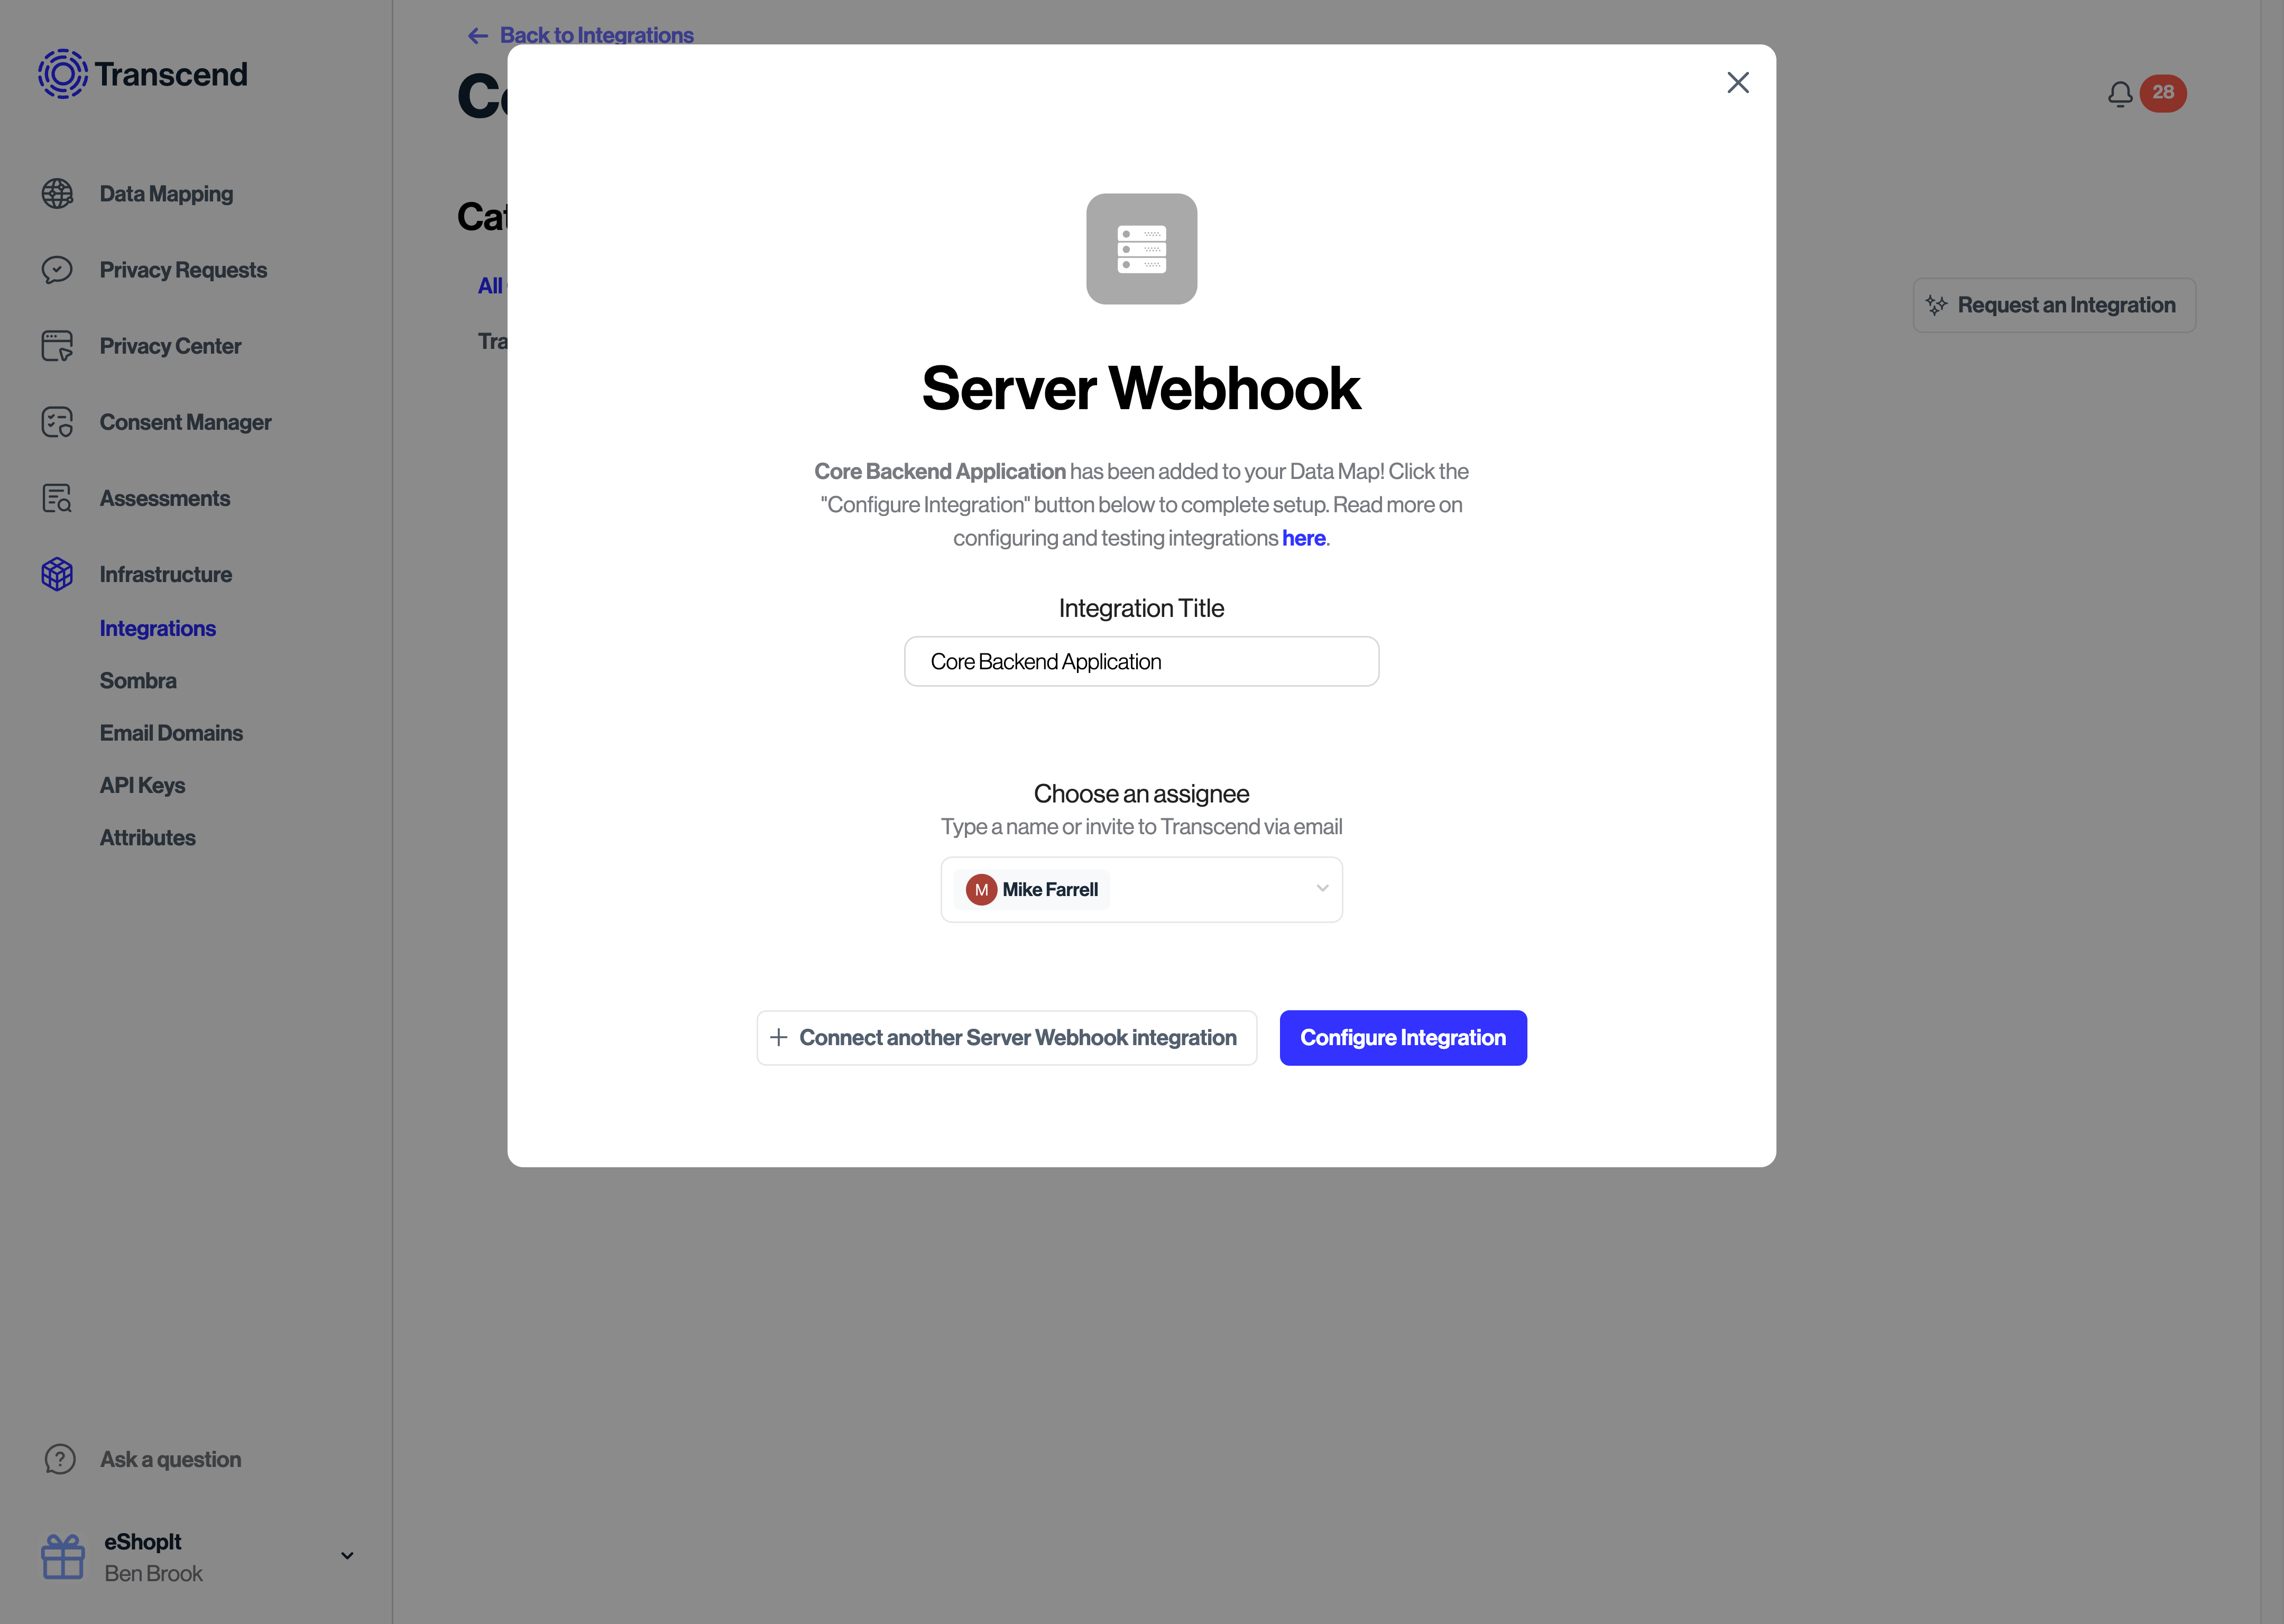
4. Click "Configure Integration" to go this integration's settings.
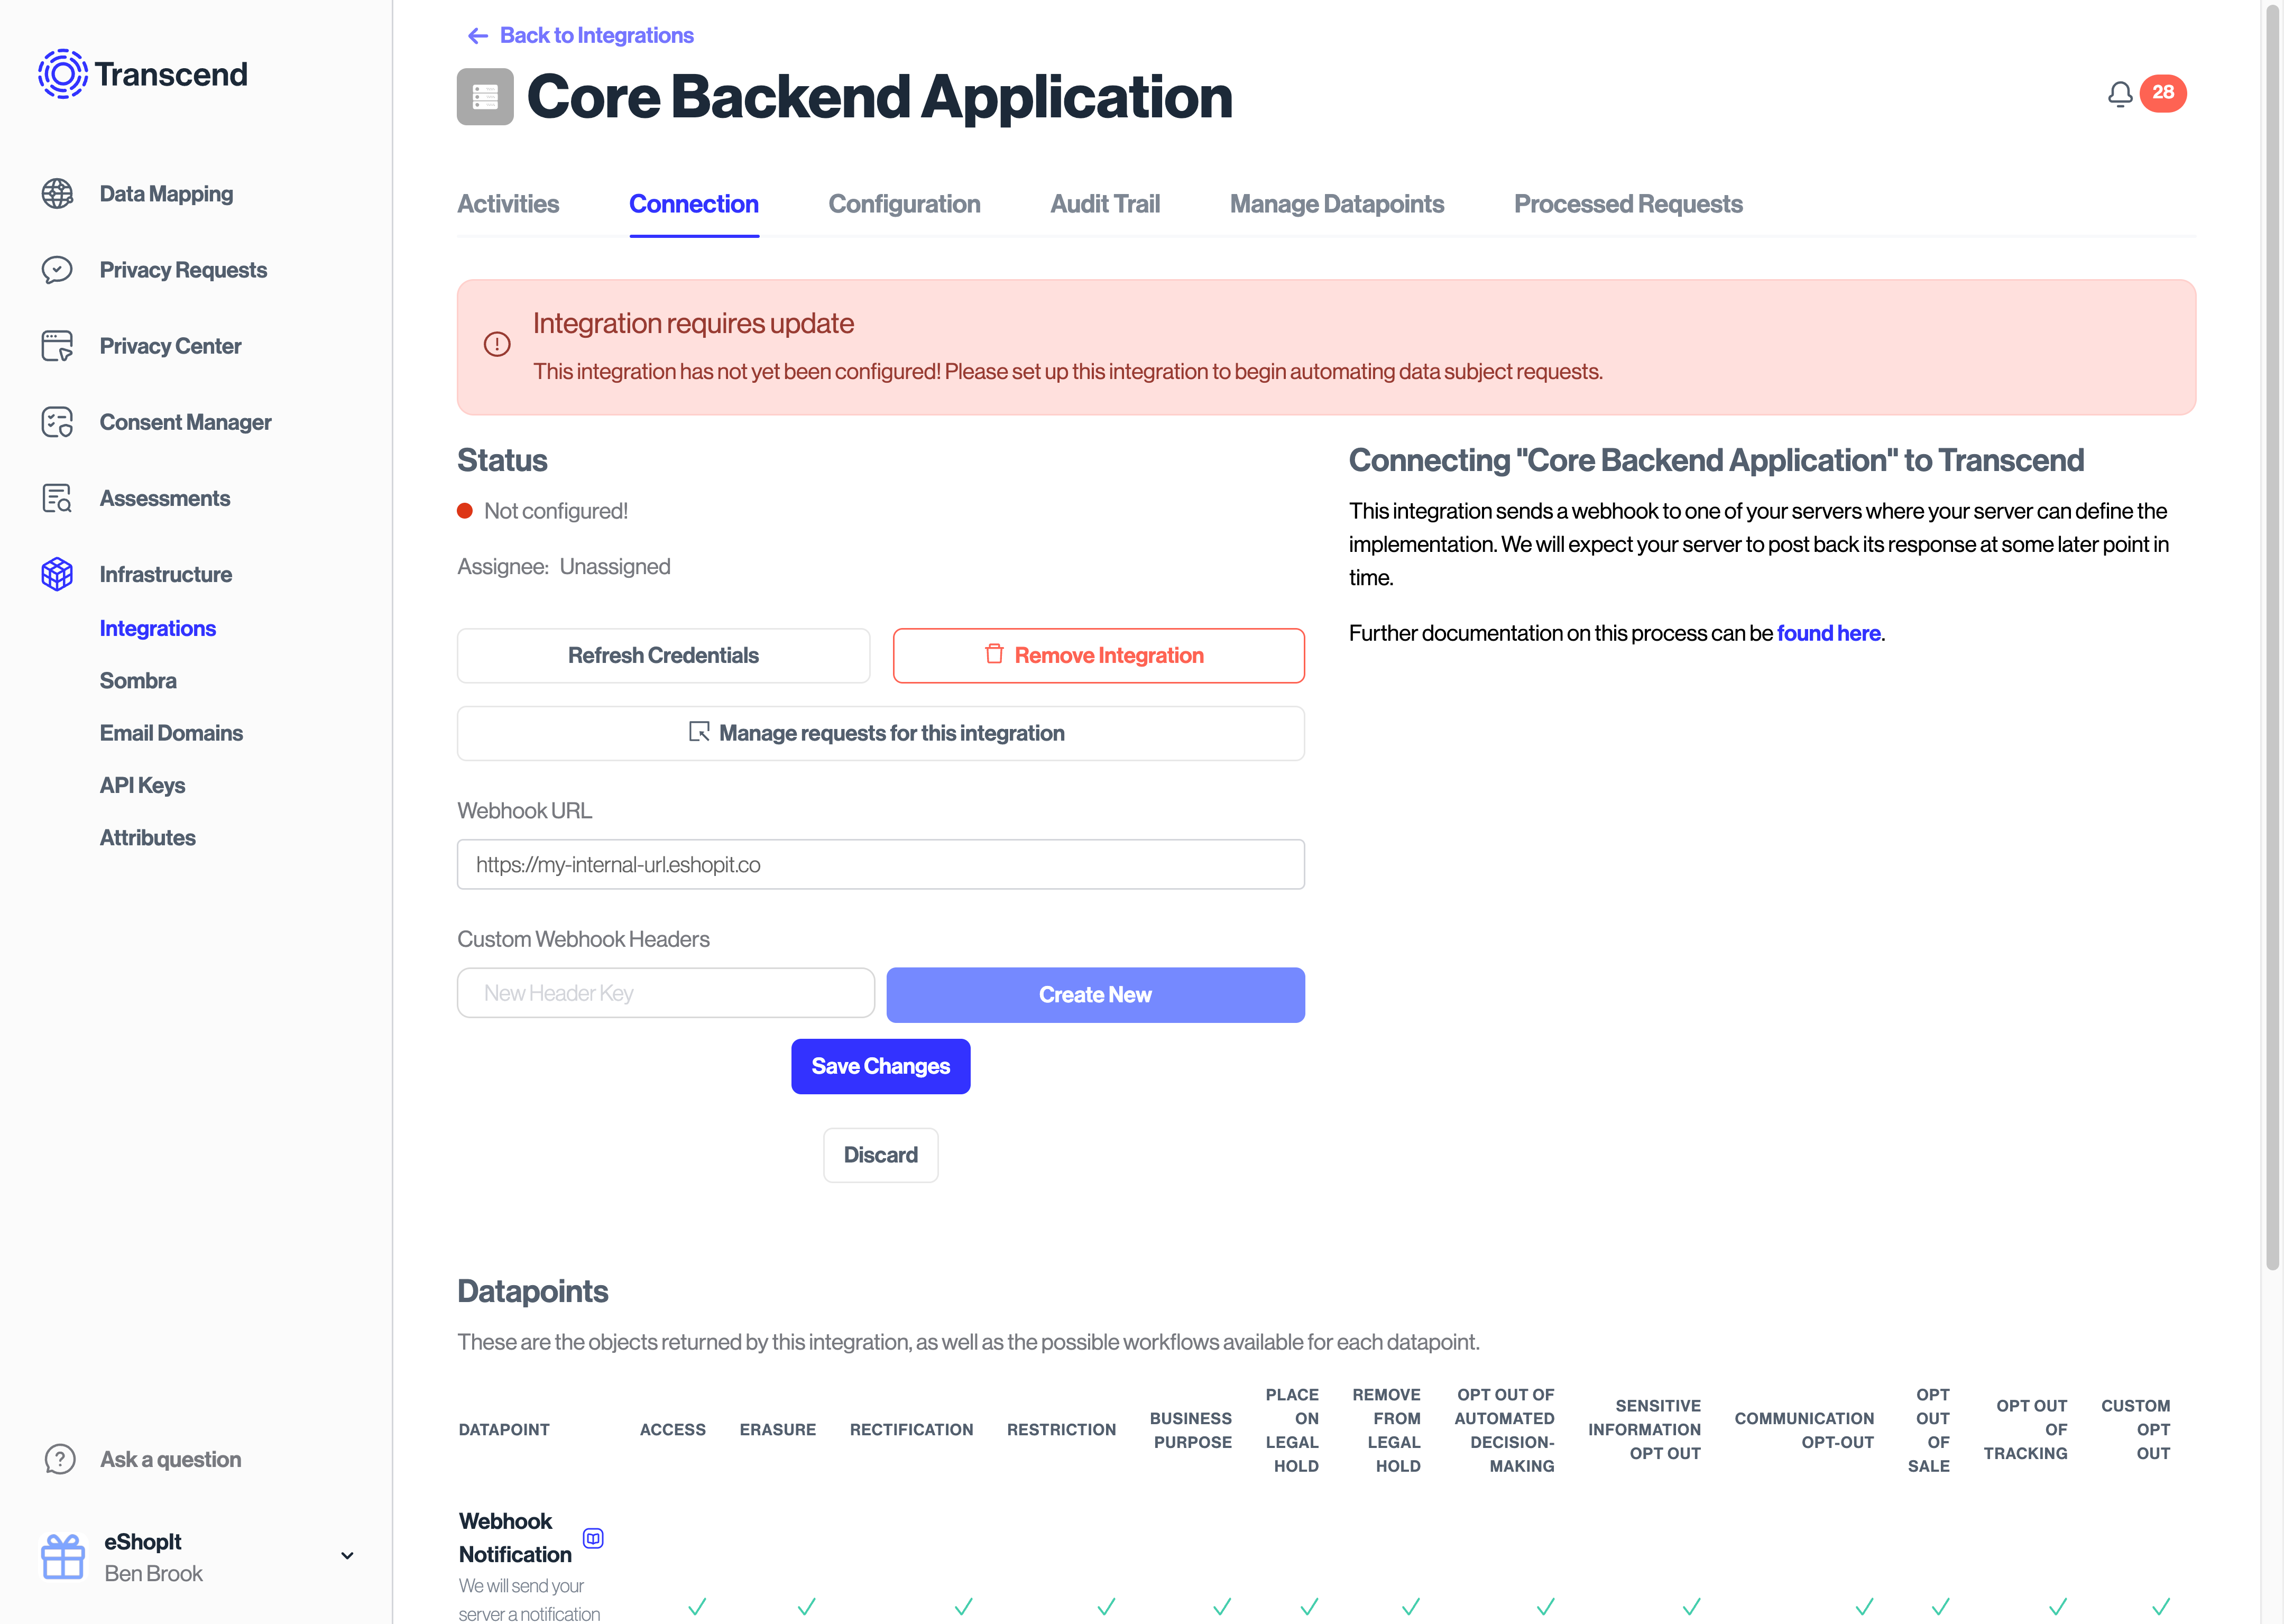
5. Under the "Connection" tab, set the webhook URL that we should notify. You may optionally set request headers you would like to receive as part of the webhook POST request. Hit "Save Changes".
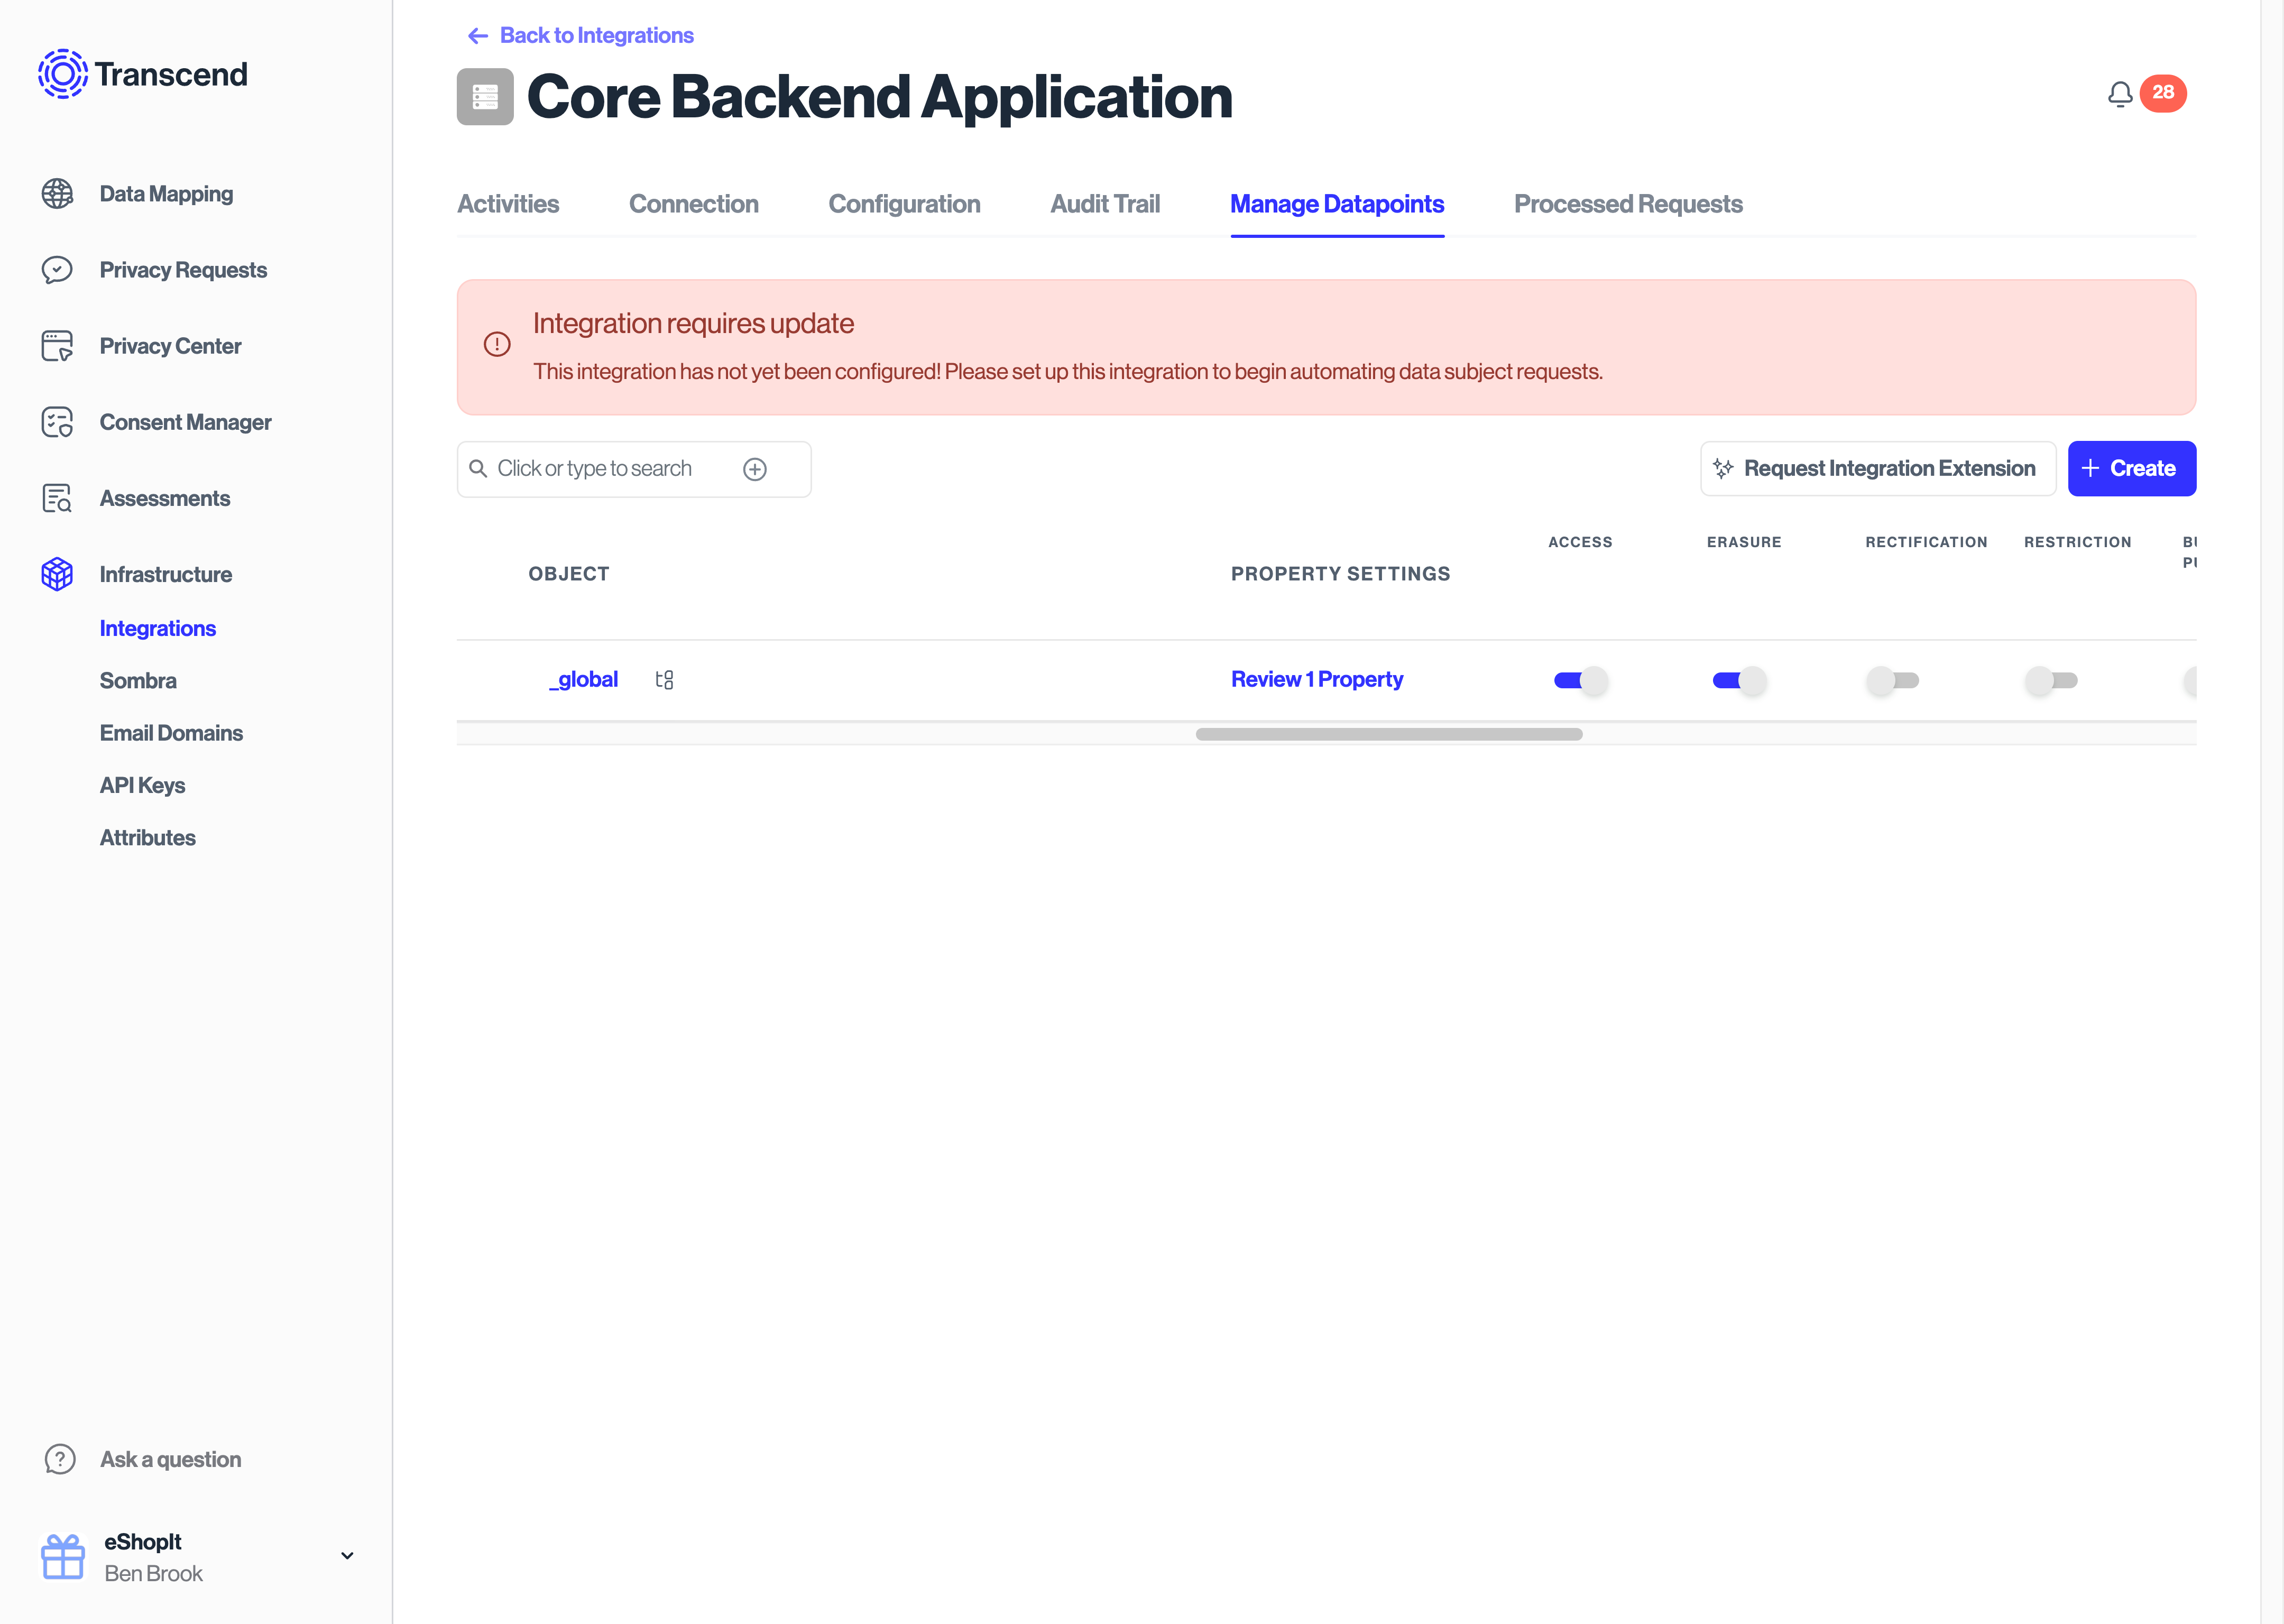
6. Select the "Manage Datapoints" tab to configure what types of requests your server should be notified about. You may also add Datapoints that you wish to operate on. For example, if the server will operate return or delete a user's profile picture, you may add a `profile_picture` datapoint here.
7. To start receiving webhooks, switch the "Live Mode" toggle to "on" in the DSR Automation tab.
## 2. Receive a webhook [#2-receive-a-webhook]
Transcend will send a POST request to the URL from step 1. The route should first validate that the webhook is in fact coming from your Sombra gateway by validating the incoming `x-sombra-token` header.
**See the webhook reference to see the webhook request body JSON.**
Upon receiving the webhook, you should validate that the incoming event type is able to be processed by your server, enqueue the job to be processed and then respond back to the webhook with:
- a status code `200` OK if the request is queued up properly
- status code `401` if the event type is unknown or the signature failed to validate
- status code `204` if no user was found to be processed. You may also respond with status code `200` and report later that no users were found when [Responding to DSRs](../../dsr-automation/api-integration/responding-to-dsrs.mdx).
## 3. Look up and operate on user data [#3-look-up-and-operate-on-user-data]
Use the webhook fields `type`, `extras.profile.identifier` and `extras.profile.type` to implement the event type on your server. This part of the process is going to be a unique to your business. This may involve:
- returning or removing rows from a database
- returning or removing file from a filesystem
- replacing fields containing personal data with anonymized placeholders
Please consult with your Transcend account representative on recommendations or guidelines for this process.
## 4. Notify the Transcend API of completion [#4-notify-the-transcend-api-of-completion]
Once your server has successfully completed the processing of the request, you must send a POST request to Transcend that indicates that processing has been completed. In the case of a Access request, this will also include [uploading data](/docs/api-reference/custom-integration/post-v1-data-silo) associated with the end user.
Please refer to [this guide](../../dsr-automation/api-integration/responding-to-dsrs.mdx) for more information on responding to DSRs.