Identity Enrichment Webhook
When Transcend receives a request, we may not have all the identifiers that we need to look up that user across all your systems. For example, we may start with an email address, and need to find the associated username or user ID for that email. In this guide, we outline what Identity Enrichment is and how Transcend can send a webhook to one of your servers to look up additional identifiers.
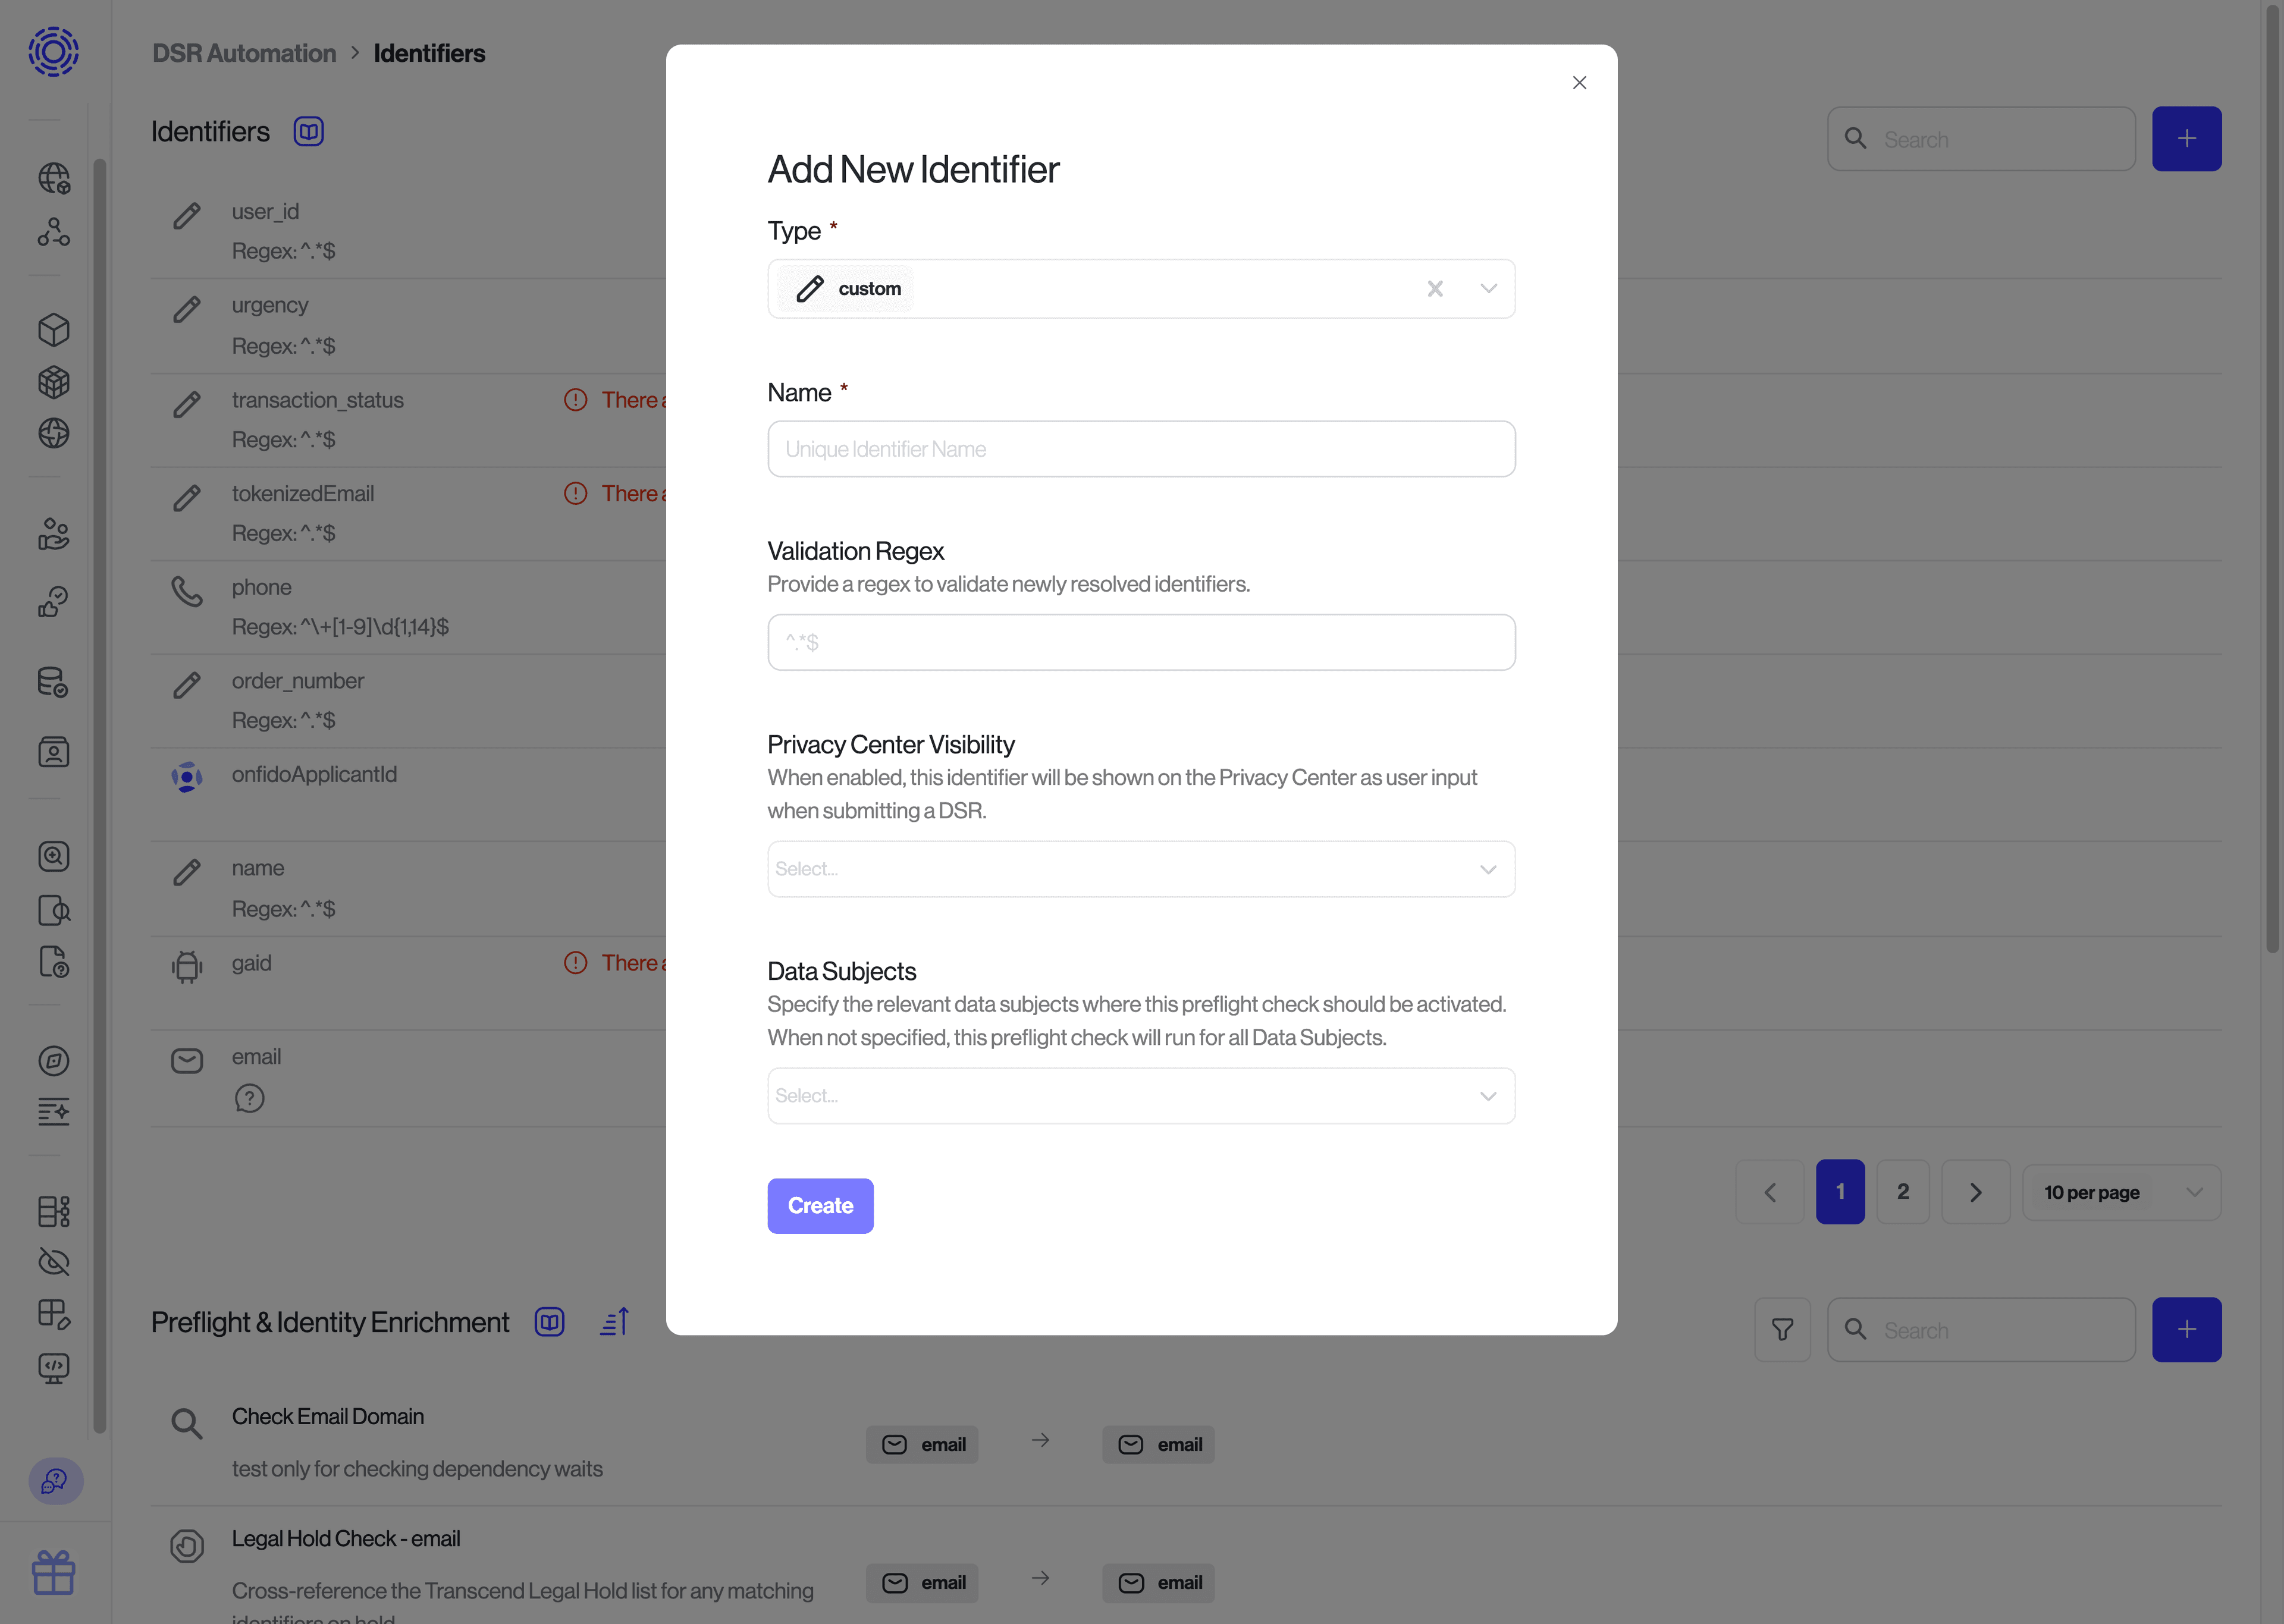
Under the DSR Automation section, Identifiers, make sure each of the identifiers you plan to return is listed. If not, use the + button to define new identifiers.
Note that the identifier's
namethat you configure here has to match with the "name" of the identifier used in your payload.
Go to the Identifiers section under DSR Automation. Add a new preflight check by clicking the blue + button in the top-right-hand corner of the "Preflight & Identity Enrichment" section.
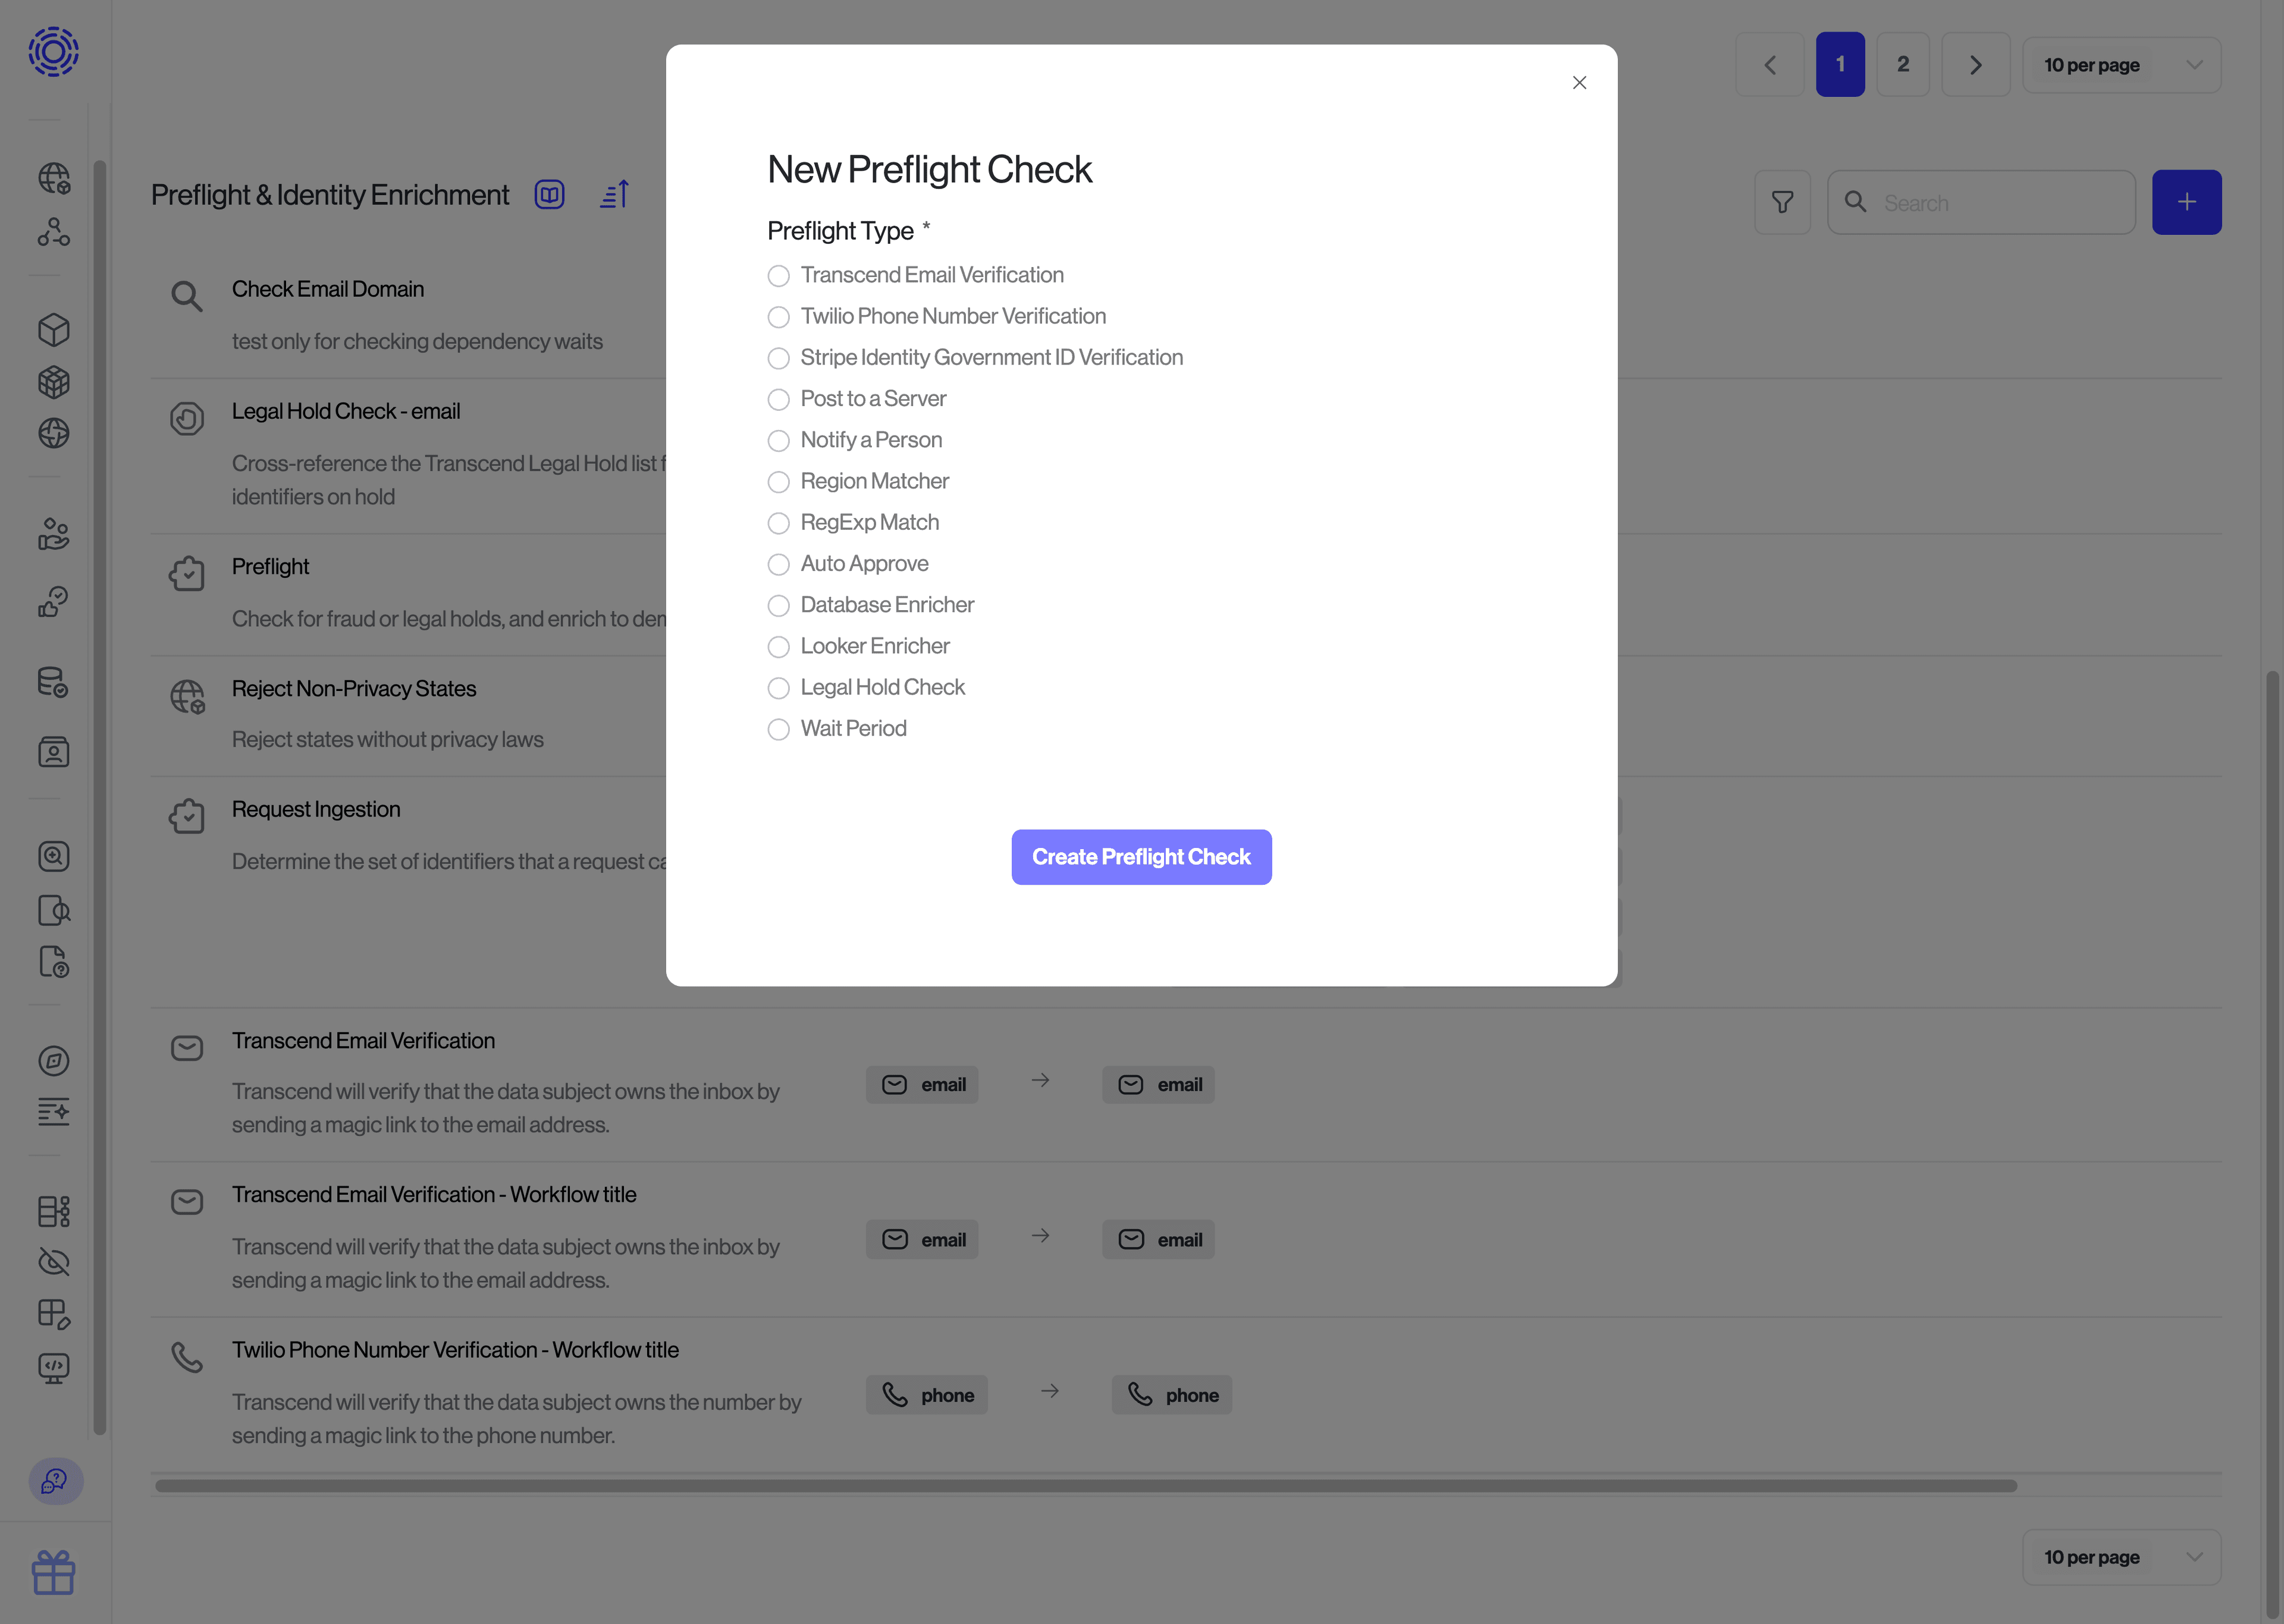
Preflight checks always take in a single identifier (e.g. an email) and can return many identifiers (e.g. emails, advertising IDs, phone numbers, and custom identifiers such as user IDs).
Enter the URL Transcend should send a POST request to, and which type of identifier it should include in the payload (e.g., an email address). We will send you a webhook whenever we receive a request containing that type of identifier.
Select the identifiers you plan to return from your preflight check & hit save!
In order to upload the identifier back to Transcend, you will need to create an API key with the Manage Request Identity Verification scope on the Infrastructure > Developer Tools > API Keys page. Please refer to the creating an API key guide for more information.
Note: if the same server is also used for the Server Webhook Integration, you can use a single API key with scopes for both the integration and identity enrichment.

We have examples on GitHub. The JavaScript example is deployed live at our demo Privacy Center.
Transcend will send a POST request to the URL that you input into the preflight check form above. The route should first validate that the webhook is in fact coming from your Sombra™ gateway by validating the incoming x-sombra-token header. Please refer to this guide for information on verifying the webhook signature.
See the webhook reference.
Request headers:
{
  "x-transcend-nonce": "<A_VALUE_TO_RETURN>",
  "x-sombra-token": "<A_JSON_WEB_TOKEN_TO_VERIFY>",
  "accept": "application/json",
  "content-type": "application/json",
  "via": "HTTPS/1.1 {{yourOrganizationName}}.sombra.transcend.io:5041 (Sombra)"
}
Request body:
{
  "type": "ACCESS", // Could be ERASURE, ...
  "requestIdentifier": {
    "value": "mikebrook@transcend.io"
  },
  "coreIdentifier": {
    "value": "some.user.id" // The globally unique user ID for the user
  },
  "dataSubject": {
    "type": "customer"
  },
  "isTest": false,
  "extras": {
    "request": {
      "details": "",
      "id": "2cde58cd-5405-434e-8c6a-dd71a726d5b3",
      "link": "https://app.transcend.io/privacy-requests/incoming-requests/2cde58cd-5405-434e-8c6a-...",
      "verifiedAt": "2019-04-26T17:55:22.773Z",
      "createdAt": "2019-04-26T17:55:21.723Z",
      "locale": "en",
      "origin": "PRIVACY_CENTER"
    },
    "enricher": {
      "id": "2716d635-f132-45a1-95ae-44a36eae653d"
    },
    "identifier": {
      "id": "63289ec9-113a-4559-a3e5-0b2de30a2743",
      "name": "email",
      "type": "email"
    },
    "requestEnricherId": "6a3cdc8d-581f-43e3-aa7e-a3edc07109d0",
    "organization": {
      "id": "aaba371a-1ca0-4c55-9231-a1d8088a0e7d",
      "name": "{{yourOrganizationName}}",
      "uri": "{{yourOrganizationName}}"
    }
  }
}
You can grab the identifier to enrich from the webhook body at requestIdentifier.value. If your route expects multiple types of identifier inputs, you can determine which identifier needs to be notified by pulling out the field extras.identifier.name.
Additionally, you will want to save the x-transcend-nonce from the headers. You will need it to upload the enriched identifiers later.
Once you have all of the information you need to perform the enrichment, you can queue a job to asynchronously process this enrichment request and respond to the webhook with status code 200 to indicate that the webhook was received successfully.
If your server finds no data and wants to avoid scheduling a job, you can instead return status code 204 to the webhook, and the request will continue.
- Look up the additional identifiers that you wish to return. These identifiers must be predefined on the Admin Dashboard under Identifier settings.
- Upload these identifiers to your internal Sombra application at
POST /v1/enrich-identifiers, with the headerx-transcend-noncefrom earlier, and a request body containing the enriched identifiers like so:
{
  "enrichedIdentifiers": {
    "googleAnalyticsInternalId": [
      {
        "value": "SOME-GOOGLE-ANALYTICS-ID"
      }
    ],
    "gpadvid": [
      {
        "value": "b20f48d8-9f50-447a-a446-1d398a9f9b1b"
      }
    ]
  }
}
The enrichedIdentifiers object has a nested object for each identifier. The key of each nested object should match the identifier name specified in the Identifiers settings.
The identifier value has a maximum length of 16,384 characters.
You can check out the code example below of this process:
// external modules
import * as jwt from 'jsonwebtoken';
import rp from 'request-promise';

const MOCK_DB = {
  1234: {
    phone: '+18001234567', // required format
    username: 'mfred',
    email: 'mikebrook@transcend.io',
  },
  5678: {
    phone: '+18002143567',
    username: 'fredm',
    email: 'fredM@transcend.io',
  },
};

/**
 * Async process to enrich identities + upload to Transcend through Sombra
 */
async function scheduleEnricher(identifier, nonce) {
  // Look up the additional identifiers that you wish to return
  const extraIdentifiers = MOCK_DB[identifier];
  return rp({
    url: `${SOMBRA_URL}/v1/enrich-identifiers`,
    method: 'POST',
    headers: {
      authorization: `Bearer ${transcendApiKey}`,
      'x-transcend-nonce': nonce,
      'x-sombra-authorization': `Bearer ${sombraApiKey}`,
    },
    json: true,
    body: {
      enrichedIdentifiers: extraIdentifiers
        ? {
            phone: [{ value: extraIdentifiers.phone }],
            username: [{ value: extraIdentifiers.username }],
            email: [{ value: extraIdentifiers.email }],
          }
        : // specify empty object for enricher to
          // continue without uploading new identifiers
          {},
    },
  });
}

/**
 * Enricher resolver
 */
async function enricherController(req, res, next) {
  try {
    // 1. Authenticate the incoming webhook and get the verified JWT
    let signedBody;
    try {
      signedBody = await verifyAndExtractWebhook(req.headers['x-sombra-token']);
    } catch (error) {
      // If the webhook doesn't pass verification, reject it.
      return res.status(401).send('You are not Transcend!');
    }
    const nonce = req.headers['x-transcend-nonce'];
    // 2. Grab the identifier from the verified JWT
    //    This body looks different depending on what type of identifier it is.
    const requestIdentifier = signedBody.value;
    // 3. Schedule the enricher
    scheduleEnricher(requestIdentifier, nonce);
    // 4. Respond with a 200 to acknowledge that you've received the request
    res.status(200);
  } catch (err) {
    next(err);
  }
}
When you expose your route to the internet, you must be certain that only Sombra can send authenticated requests.
Endpoint reference: Add info to a DSR before processing
There may be cases where you need to cancel a DSR, or place it on hold for human review. For example, the data subject may be on some special list (anti-fraud, legal hold, do not delete), or their account is in a state where it cannot be deleted at this time.
Using a preflight check, you can automatically cancel the request before it begins processing. Instead of returning a list of identifiers, you can instead specify the request status to transition the DSR to that status. You may optionally include an email template ID in the response, such as an email that explains why the request is canceled. If you include an email template ID, Transcend will send that email to the user.
POST /v1/enrich-identifiers
| Value of status | Use to... |
|---|---|
ON_HOLD | Place the request on hold for review (e.g., the user is suspected of fraud) |
CANCELED | Cancel the request altogether (e.g., the user failed the anti-fraud check) |
To respond with a status, simple response with status: <STATUS> in the request body with status code 200.
{
  "status": "CANCELED" // or "ON_HOLD"
}
You can also specify the email template to use when canceling the request
{
  "status": "CANCELED",
  "templateId": "93d31e79-04c4-493d-8f16-38a9d9da5053"
}
OR by title:
{
  "status": "CANCELED",
  "templateTitle": "My Custom Template"
}
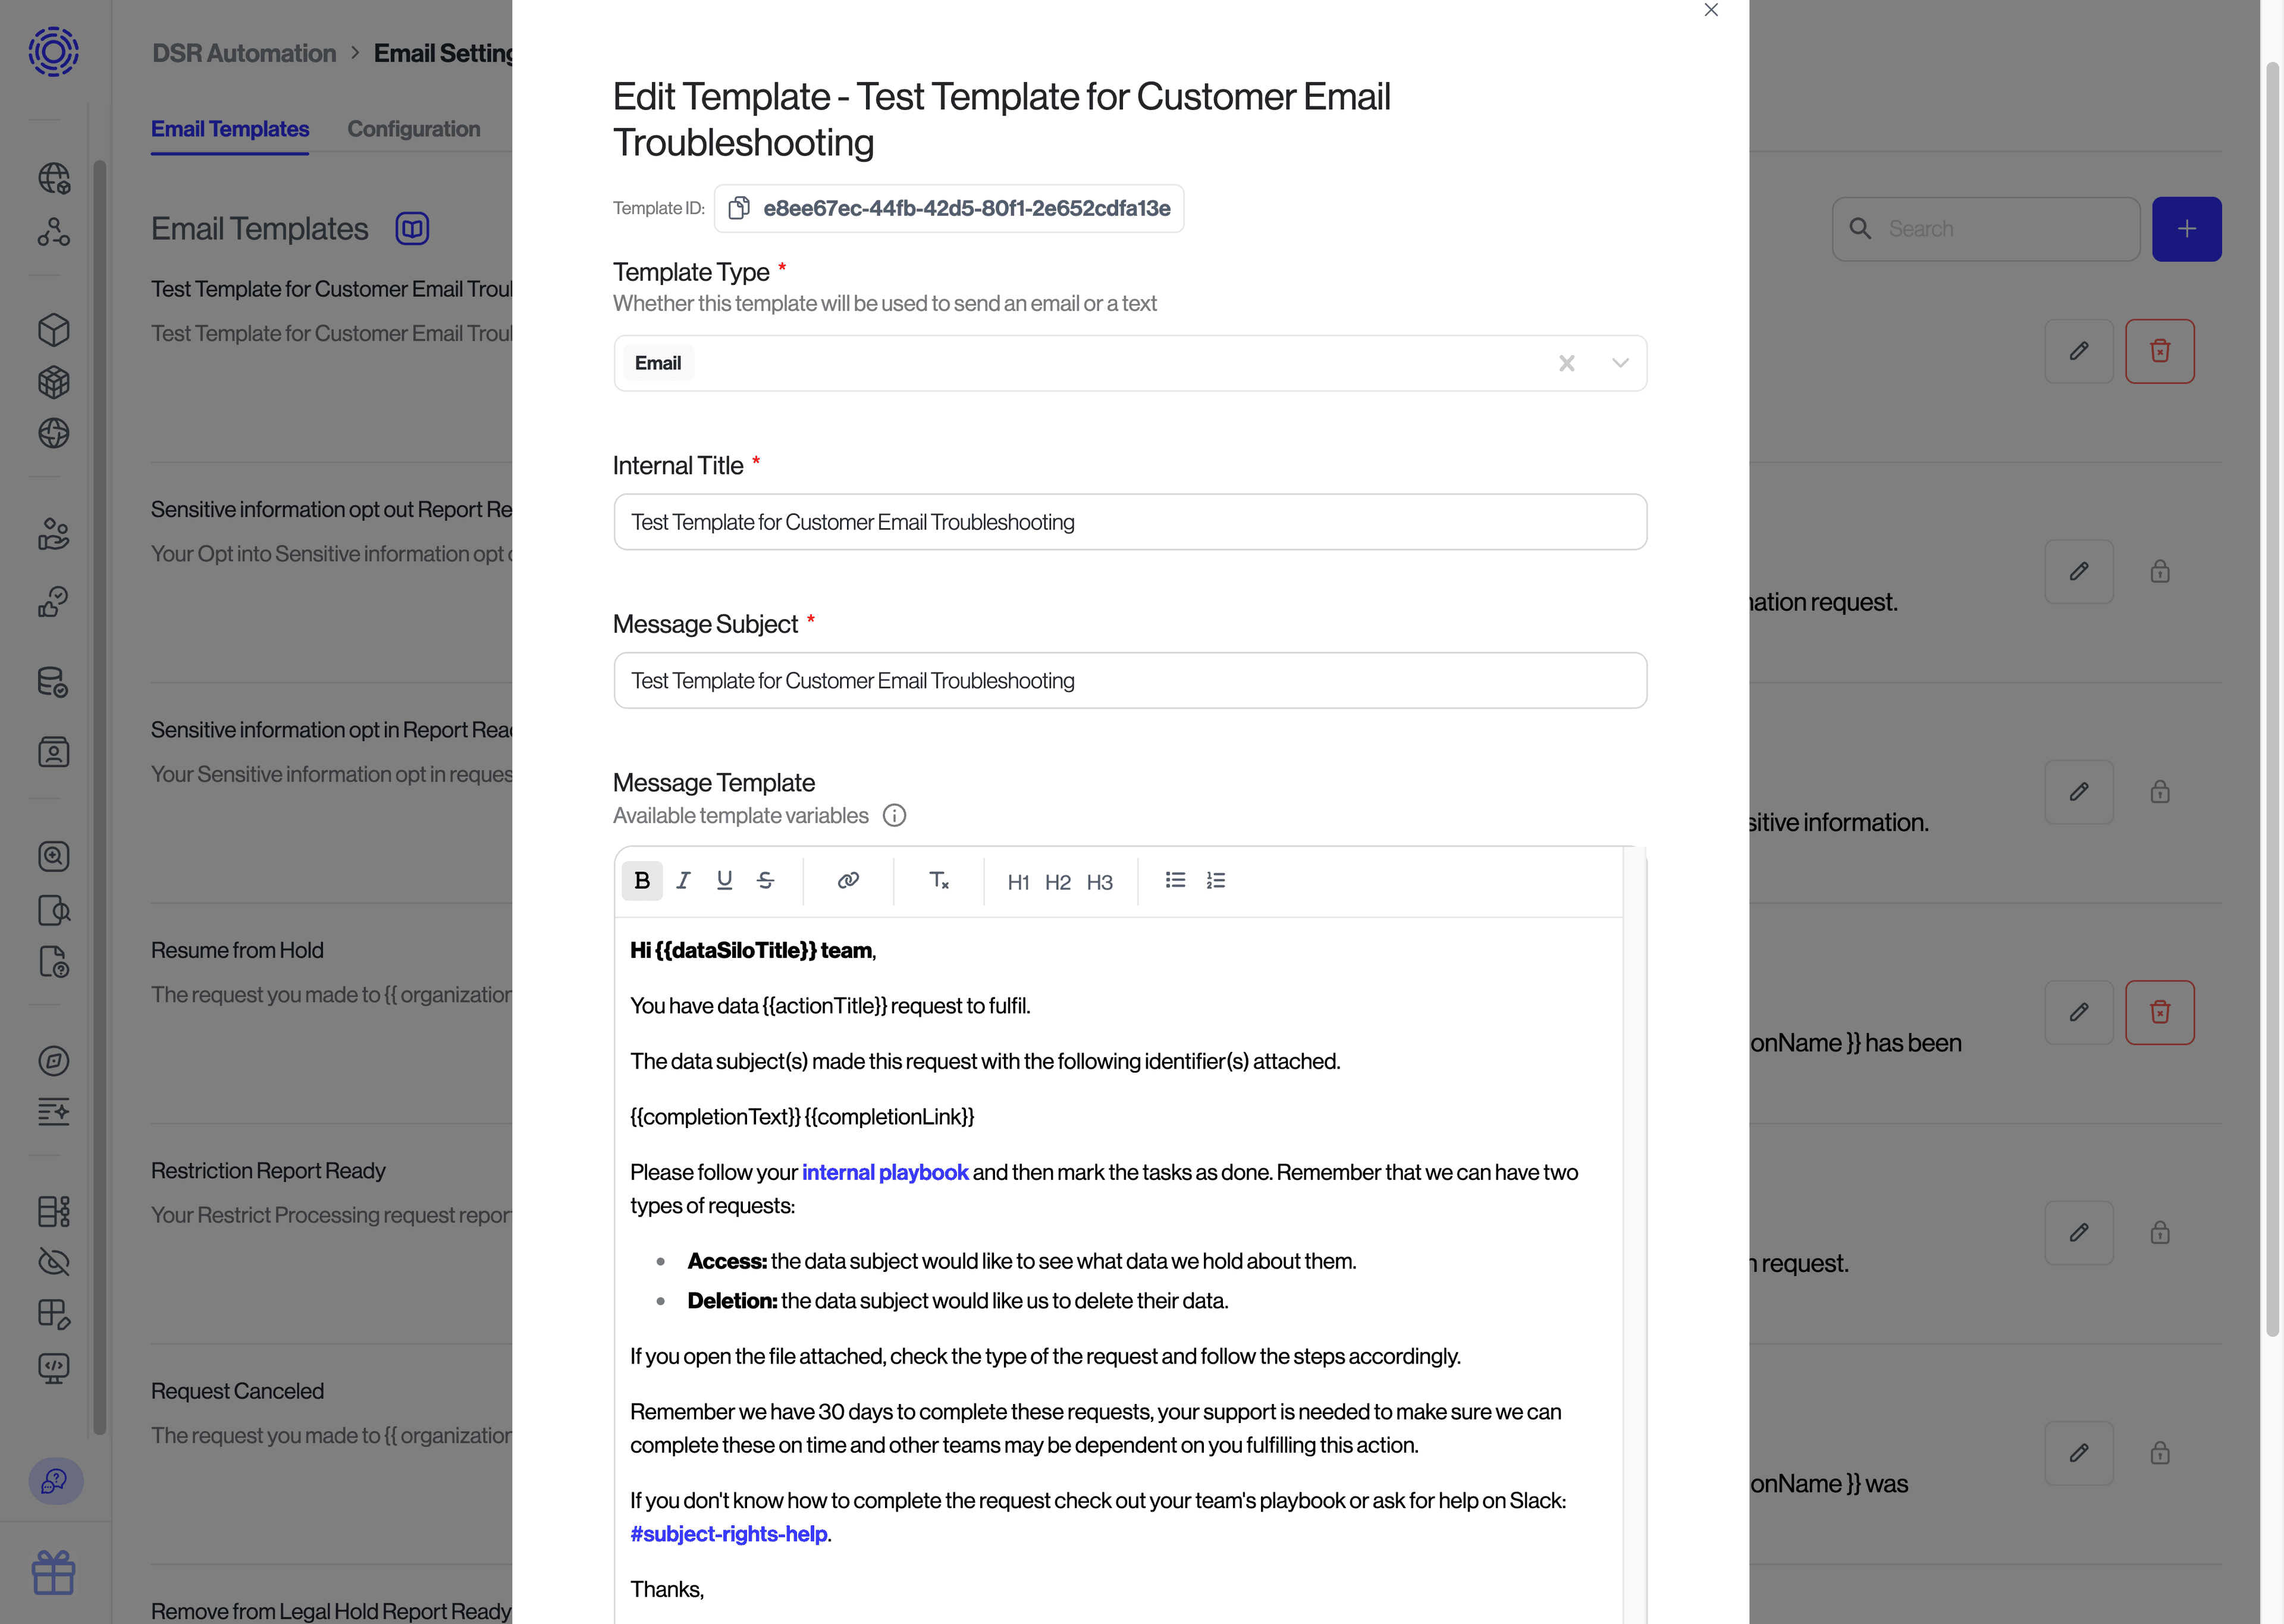
To find the ID of the template you would like to specify, navigate to the template settings page, click the pencil icon for the template you wish to use, and copy the ID.
Note: the default template will be used if none is provided.