Uploading DSRs via CSV
Transcend's bulk import tool allows for uploading DSRs into Transcend from another source. This is helpful to bring a backlog of DSRs into Transcend or take bulk action on existing DSRs.
You can use the upload functionality to create and initiate a DSR in Transcend to support many use cases, but here are some common examples:
- Upload new requests that were received from another source (ex: a "privacy@" email inbox). If you regularly receive DSRs to a destination outside of Transcend, like a team email or a ticketing system, you can bulk import them into Transcend for automated processing.
- Migrate outstanding requests, or a record of past requests to Transcend from another system. If you have a historical record of completed DSRs in another system, you can import them to keep a complete record in Transcend. Additionally, if you have outstanding requests in another system, they can be imported into Transcend for automated processing.
- Initiate or restart previously completed DSRs to reflect recent changes in data systems or workflows. In some cases, you may want to reprocess completed requests so they process against the latest integrations and workflows. You can export the applicable DSRs from the Transcend Request Dashboard and re-import them to process again.
When importing a CSV file of DSRs into Transcend, there are some fields which are required, and some which are optional. The fields within the CSV file are used to specify core information about the request such as the data subject type, action type, and the data subject identifiers. Additionally, you can customize the request behavior to include things like email verification, email communications to the data subject, specific data systems to include, and more.
When importing DSRs to Transcend via CSV, there are some validation rules:
Regarding column names:
When a CSV is uploaded to Transcend, a match will be made from the column title to the respective field or entity in Transcend. For example, a column titled ‘email’ will map to the email address identifier in the DSR. It is important to ensure each column is named and formatted in a way the import will recognize. Please see theColumn Namecolumn in the table below for the exact column titles to use in the CSV upload.
| Field | Description | When to Include the Field with an Import | Column Name | Field Formatting |
|---|---|---|---|---|
| Data subject type | The data subject type is a categorization of the person making the request (ex: customer, employee, etc.).This field should be mapped to one of the available data subject types in the Request Settings of the Transcend Admin Dashboard. | Required. This should be included with every request to be uploaded. | Data Subject Type | A string.Ex.: consumer |
| Data subject request type | The request type, also known as the data action, represents the user’s data choice (data deletion, marketing opt-out, data report, etc.)This field should be mapped to one of the available data actions in the Request Settings of the Transcend Admin Dashboard. | Required.This should be included with every request to be uploaded. | Request Type | Snake Case, All Capital letters.Ex: CONTACT_OPT_OUT |
| Data subject’s email address | This is the data subject’s email address, and is typically used to initiate a DSR. | Required.This column should be included with CSV for upload.(You may leave the field empty if other identifiers are included with the request row.) | email | Email address format validatedEx: example@transcend.io |
| Request core identifier | This is an identifier associated with a data subject request. This is likely going to be the same as the data subject’s email address in most cases. | Optional.You may want to include a column in the CVS with Core Identifier if you use a core identifier value that is different from the data subject’s email address (not common). | Core Identifier | String formatEx: example@transcend.io or 2349234907 |
| Data System(s) | You can optionally specify one or many data systems to be actioned with the request.If this column is not included in the CSV for upload, or the field is left empty, the request will be actioned against all data systems configured for the data subject type + data action workflow.You can find the UID as part of the URL path when selecting a single data system from the Integrations page in the Admin Dash. | Optional.You may want to specify a single data system with the request if you’ve added a new system and would like to action a list of completed requests to the new data system(s). | Data Systems | UID of the data system.Ex: cttbv9ec-1r09-421a-9952-9895999314fgIf you are listing more than one data system, separate the UUIDs with a comma. |
| Email Verification Status | This allows you to specify whether the email address for the data subject is already verified, or if the user should be prompted to verify their email address once the request is created.If you set Email Verification to be FALSE, an email will be sent to the data subject asking them to click a magic link to verify their email address. This email is initiated after the requests are uploaded into Transcend.If you leave this column out of the CSV for upload, the request will be treated as though the email address is already verified (no additional email sent to data subjects).Default behavior is Email Is Verified: TRUE if left empty or skipped. | Optional.You should use this field if you explicitly want to ask users to verify their email address as part of the request process. | Email Is Verified | Can be either TRUE or FALSE |
| Send Emails? (Silent Mode) | You can specify whether or not emails should be sent to the data subject as the DSR progresses through the workflow. Said another way, you can configure whether the request is on silent mode or not.The default behavior if this column is not included in the CSV for upload, or if the field is empty is requests will be sent in silent mode - meaning data subjects will not receive email communications as configured for the workflow. | Optional.Use this field when you want to disable emails from sending to data subjects for the requests that are getting uploaded. In this case, set Silent Mode to FALSE to send emails to users. | Silent Mode | Can be either TRUE or FALSE |
| Ignored Data System(s) | You can optionally specify one or many data systems to be skipped as part of this request.If this column is not included in the CSV for upload, or the field is left empty, the request will be actioned against all data systems configured for the data subject type + data action workflow. | Optional.You can skip certain data systems from processing as part of the request if there is a need to action the request against most, but not all integrations. | Ignored Data Systems | UID of the data system.Ex: cttbv9ec-1r09-421a-9952-9895999314fgYou can find the UID as part of the URL path when selecting a single data system from the Integrations page in the Admin Dash.If you are listing more than one data system, separate the UUIDs with a comma. |
| Skip Enrichment Checks | You can optionally choose to skip any configured enrichment steps that are part of the DSR workflow.When this column is left out of the CSV for upload, or the field is left empty, enrichment checks will not be skipped - meaning all configured enrichment steps will be actioned for the uploaded request. | Optional.Include this field in the CSV to be uploaded when you want to skip enrichment or preflight checks. This may be applicable if the request list to be uploaded already includes all relevant identifiers that would normally be obtained through an enrichment step, or if configured fraud checks should be skipped. | Skip Enrichment Checks | UID of the enricher.Ex: cttbv9ec-1r09-421a-9952-9895999314fgIf you are listing more than one enricher, separate the UUIDs with a comma. |
| Custom Identifiers | Custom identifiers are all the created identifiers other than email and core identifier. You can optionally include a column in the CSV for upload with any additional identifiers that may be needed.You can find all available identifiers under DSR Automation > Identifiers in the Admin Dash.When this column is left out or the field is empty, no additional identifier would be included with the DSR. | You should include a column for each custom identifier that would normally be ingested with the request when it is created. For example, if data subjects normally enter their phone number when initiating a DSR through the Privacy Center, the phone number is used across one or many integrations, you would want to include a column for the phone number identifier and ensure this field is filled out for all requests to be uploaded.Alternatively, you can include a column for additional identifiers when they are available to you already and you are skipping enrichment with this upload. | This should be the name of the identifier as written and displayed in the Identifiers section of the Admin Dash.Example: userID or Contact_ID | A string.Example: 309234082 or user2323 |
| Request Details | A free-text note that is attached to the request. This can be used to record additional context such as the origin of the request or the reason for the import.The value you provide is automatically prefixed with Imported from CSV - when saved on the request. For example, if you enter Requested via phone, the request details will read Imported from CSV - Requested via phone. | Optional.Include this field when you want to annotate each request with additional context, such as the source of the request or the reason for the bulk import. | Details | A free-text string.Ex: Requested via phone call |
| Language | The locale or language for the request. This controls the language used in any email communications sent to the data subject.If this column is not included or the field is left empty, the request will use the organization's default language. | Optional.Include this field when uploading requests for data subjects who should receive communications in a specific language. | Language | A locale code string.Ex: en-US or fr-FR |
| Is Test Request | Marks the request as a test request. Test requests are processed through the full workflow but are flagged so they can be easily identified and filtered out of production data.If this column is not included or the field is left empty, requests default to non-test (production) requests. | Optional.Include this field when you want to verify the upload workflow end-to-end without affecting production data. | Is Test Request | Can be either TRUE or FALSE |
| Request ID | Allows you to specify a custom unique identifier for the request. This can be useful when re-importing requests that were previously exported from Transcend, so they retain the same ID.If this column is not included or the field is left empty, Transcend will automatically generate a unique ID for each request. | Optional.Include this field when re-importing previously exported requests and you need to preserve the original request ID. | Request ID | A valid UUID.Ex: a1b2c3d4-e5f6-7890-abcd-ef1234567890 |
| Country | The ISO country code for the data subject's region. This can be used to apply region-specific processing rules or to record where the request originated.If this column is not included or the field is left empty, no region will be associated with the request. | Optional.Include this field when you need to record the data subject's country for regional compliance or processing rules. | Country | An ISO 3166-1 alpha-2 country code.Ex: US, DE, or GB |
| Country Sub Division | The ISO subdivision code for the data subject's state, province, or region within a country. Used in conjunction with the Country field to specify a more granular region.If this column is not included or the field is left empty, no subdivision will be associated with the request. | Optional.Include this field alongside the Country field when you need to specify the data subject's state or province, such as for US state-level privacy laws (e.g., CCPA for California). | Country Sub Division | An ISO 3166-2 subdivision code.Ex: US-CA or DE-BY |
| Created At | Allows you to specify a custom creation date for the request. This is useful when migrating historical requests from another system and you want to preserve the original request date.If this column is not included or the field is left empty, the request will use the current date and time as its creation date. | Optional.Include this field when migrating historical requests and you want to preserve the original date the request was received. | Created At | A valid date string.Ex: 2025-01-15T12:00:00Z or 2025-01-15 |
| Skip Waiting Period | Allows you to bypass the configured waiting period for uploaded requests. The waiting period is typically a grace period before a request begins processing, giving the data subject time to cancel.If this column is not included or the field is left empty, the waiting period will not be skipped and requests will follow the standard configured waiting period. | Optional.Include this field when you want uploaded requests to begin processing immediately without waiting for the configured grace period. This is common when importing requests that have already been verified externally. | Skip Waiting Period | Can be either TRUE or FALSE |
| Partition | Specifies which consent partition the request should be associated with. Partitions are used to segment consent records across different brands, products, or business units within the same Transcend organization.If this column is not included or the field is left empty, the request will not be associated with a specific partition. | Optional.Include this field when your organization uses consent partitions and the uploaded requests should be scoped to a specific partition. | Partition | The name of a configured consent partition. Must match one of the partitions configured in your organization.Ex: brand-us or product-eu |
| Custom Attributes | If your organization has configured custom attribute keys that are enabled on requests, these will appear as additional optional columns in the CSV upload. Attributes allow you to tag requests with custom metadata such as department, priority, or business justification.For multi-select attribute keys, you can specify multiple values in a single cell by separating them with commas. | Optional.Include columns for any custom attributes you want to attach to the uploaded requests. Available attributes depend on what is configured in your organization's request settings. | The column name should match the attribute key name exactly as it appears in your organization's attribute settings. | A string. For multi-select attributes, use comma-separated values.Ex: Legal or High,Urgent |
Here is a sample template that can be used as a reference.
| Data Subject Type | Request Type | Core Identifier | Email Is Verified | userID | |
|---|---|---|---|---|---|
| (required) | (required) | (required) | (required) | (optional) | (custom identifier - optional) |
| Customer | ERASURE | 1234 | example@transcend.io | FALSE | 12345 |
| Customer | ACCESS | 5677 | test@transcend.io | FALSE | 67899 |
You can download a sample CSV file to start with here.
Once you have a formatted CSV that includes all the requests to be uploaded, follow these steps to import the CSV file into Transcend:
- Navigate to DSR Automation → Incoming Requests
- Click the “Upload Requests from CSV” button to initiate the import
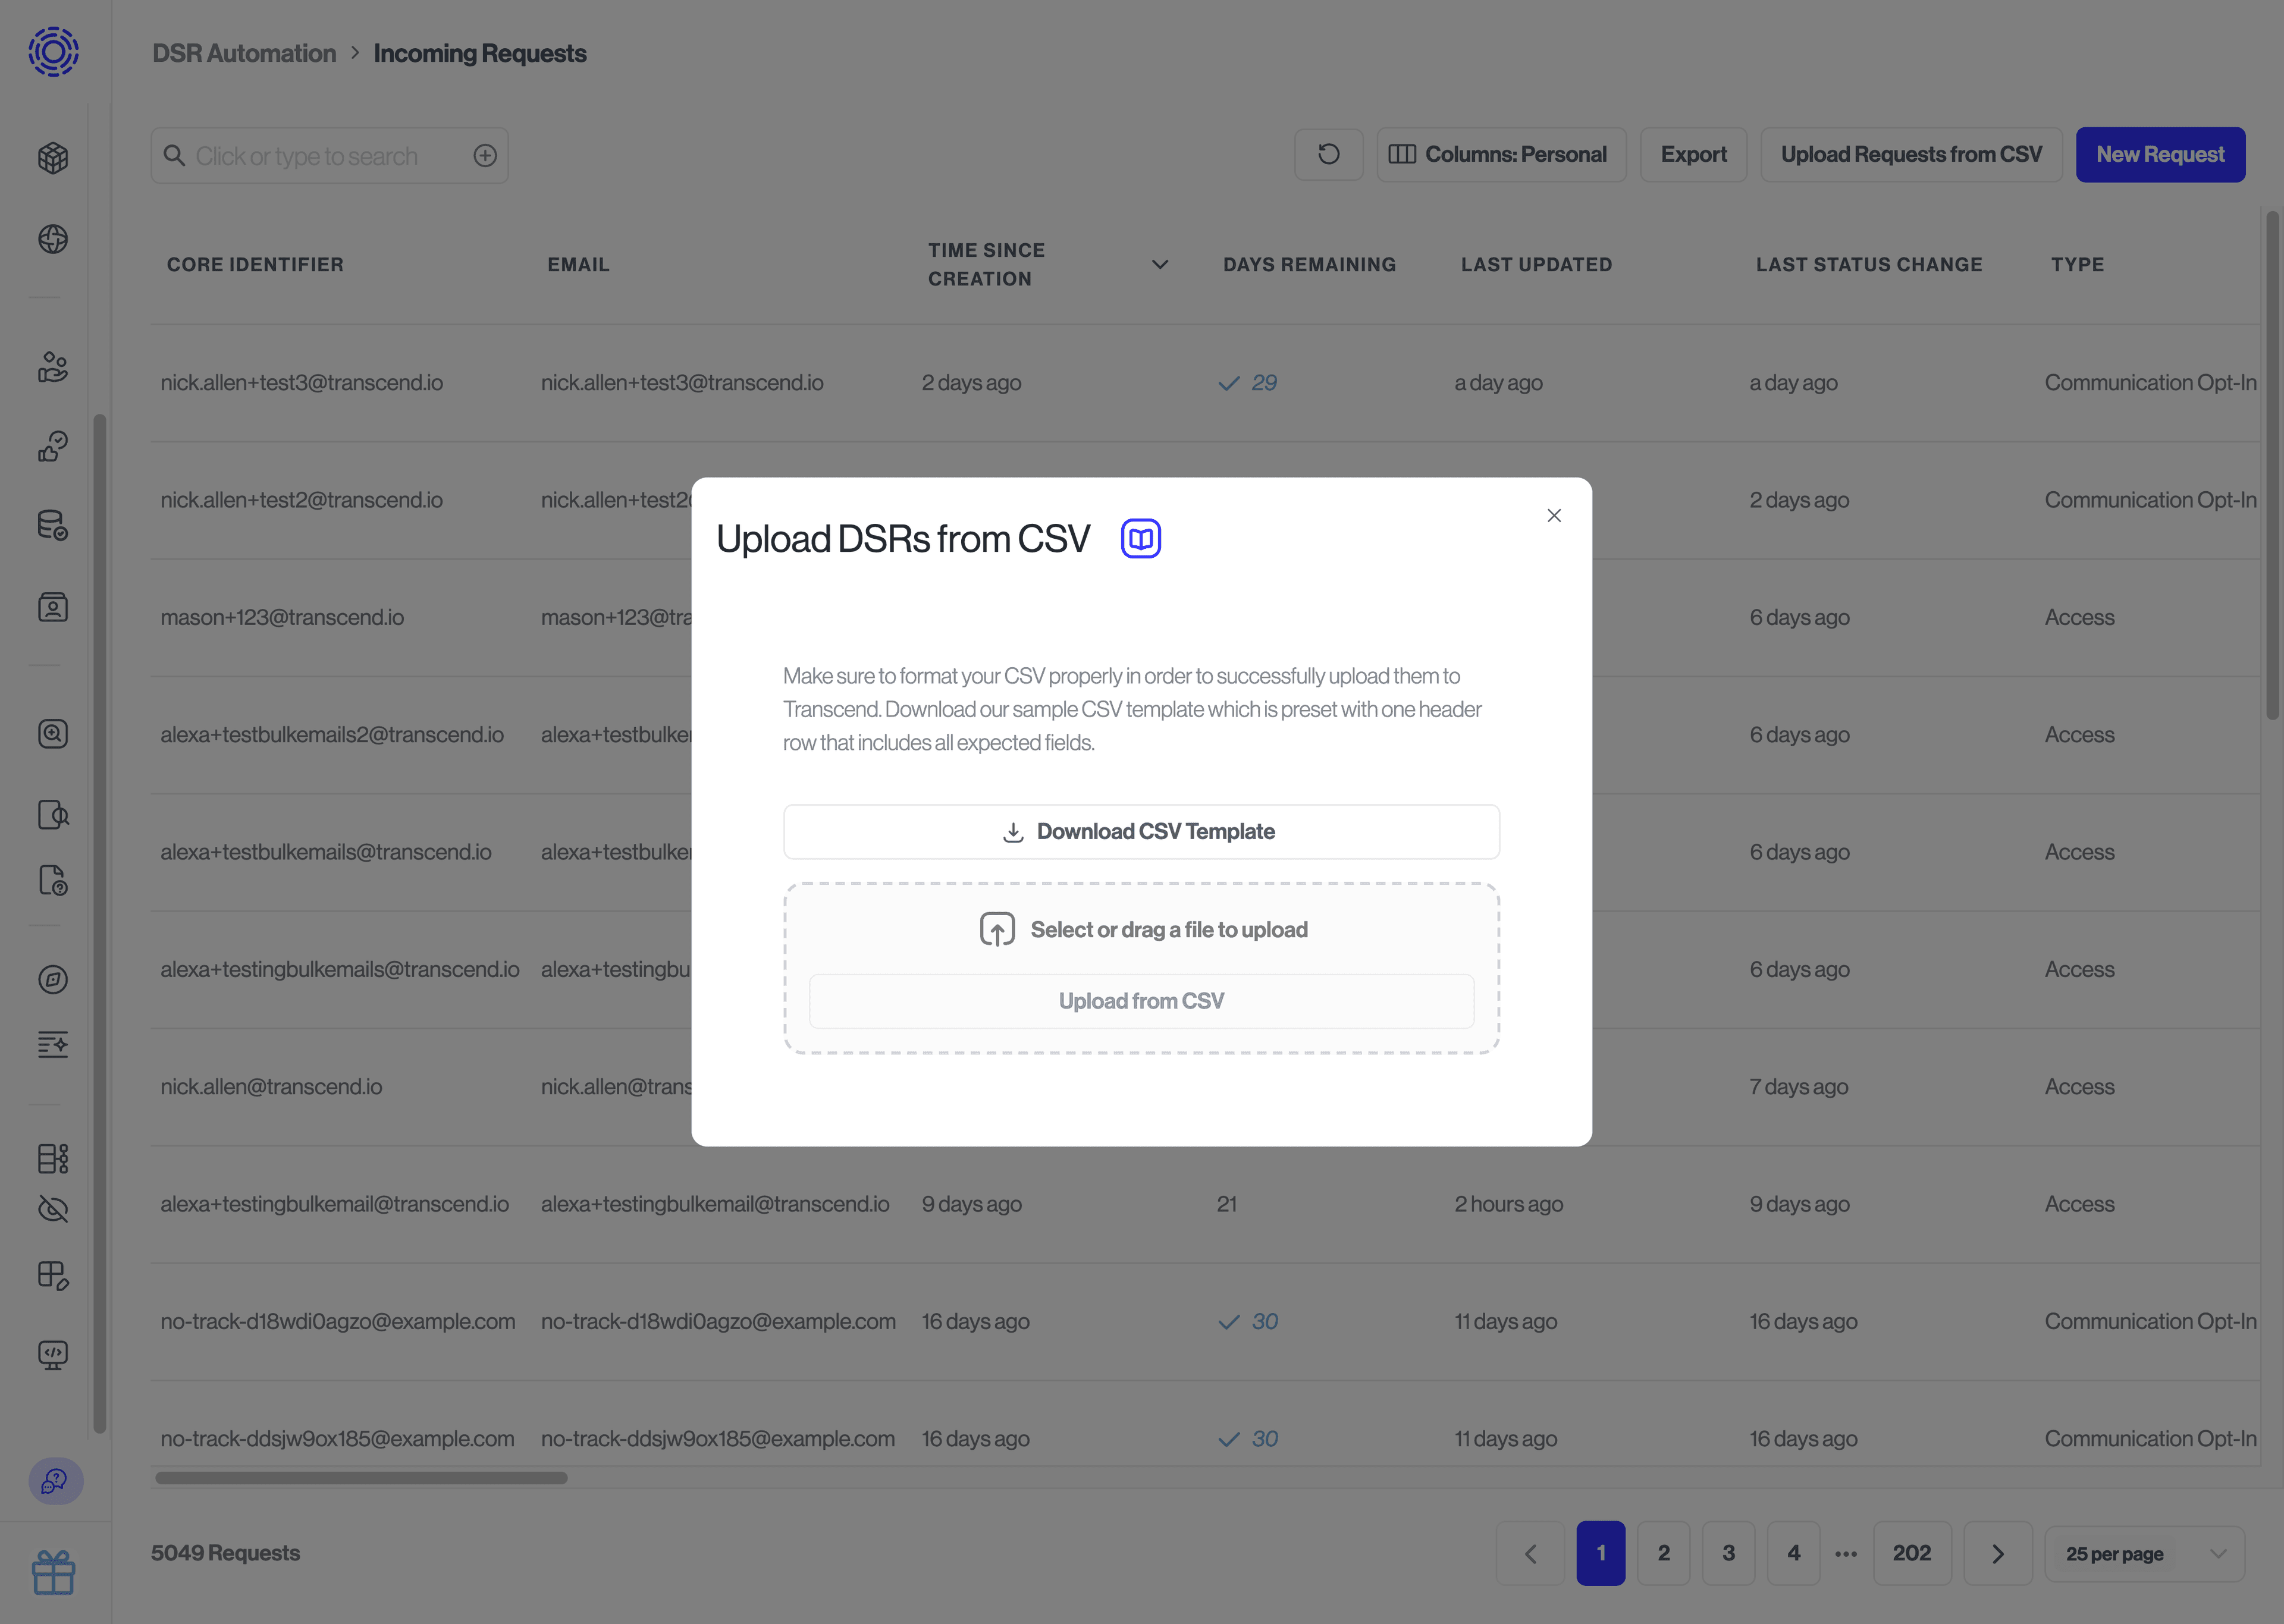
- Select the CSV to upload
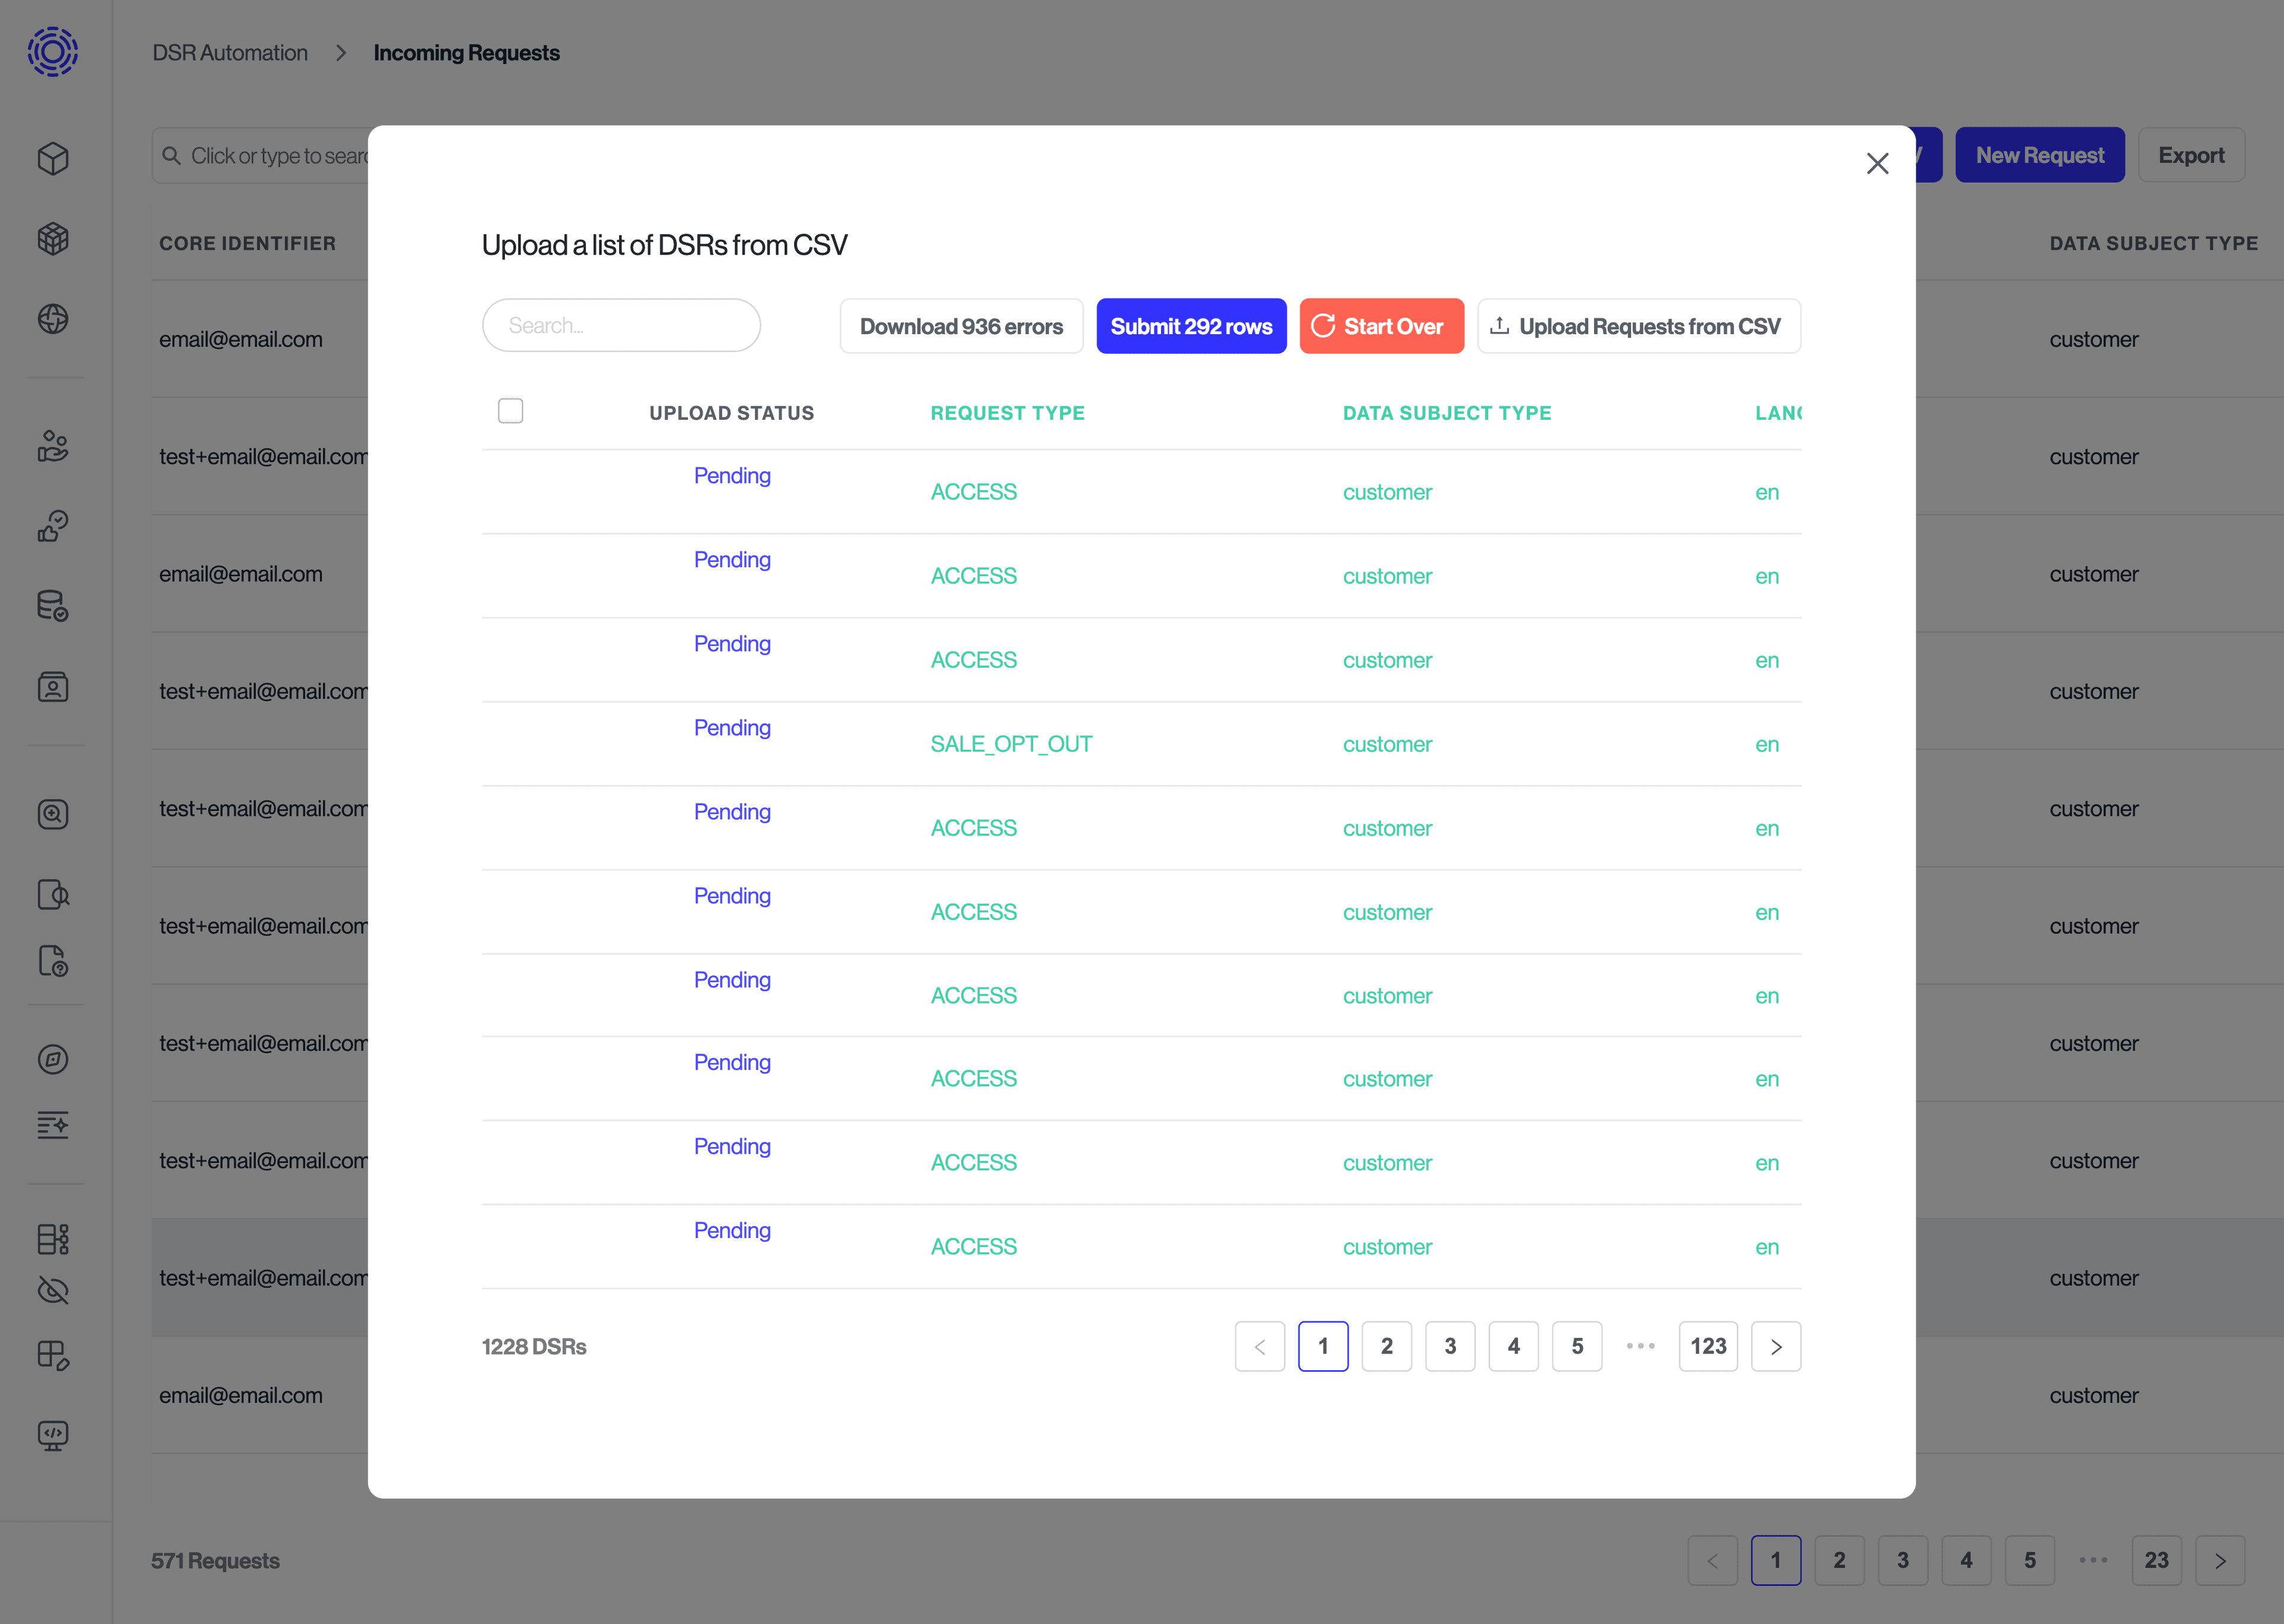
- Preview all the columns for upload. If all columns are green and the “Upload Status” is Pending the upload can proceed.
- If there is an error, or any of the columns are red, there is a formatting error in the name of one of the columns or with a field value itself. Click the “Download errors” button to see the specific error(s) and how to resolve them.
- Once you have corrected the errors, you can reupload the problematic rows.
- Click on the "Submit x rows" button to submit all the error-free rows
Once the requests have been imported, you can process them just like you would any other request.