Looker Integration
Transcend’s Looker integration provides a low-code or no-code option to setting up data access requests for internal data and configuring data subject identity enrichment to supplement DSRs with additional identifiers stored in internal databases and warehouses.
Transcend’s Looker integration can be set up to fulfill access requests for your organization’s internal data. If your organization uses Looker as a data warehouse or data visualization tool, you can connect Transcend directly to Looker to action access/right to know requests for all internal data through one integration. This is a great option if you don't want to connect an internal database directly to Transcend, have limited engineering resources, or if your organization stores data in many systems that can be aggregated into a single Looker instance.
The integration works by looking for a specifically named folder in Looker and running the "Looks" in the folder. In this way, you can set up the queries needed to fulfill an access request specific to your organization's data directly in Looker and the integration will execute those queries when a DSAR is received.
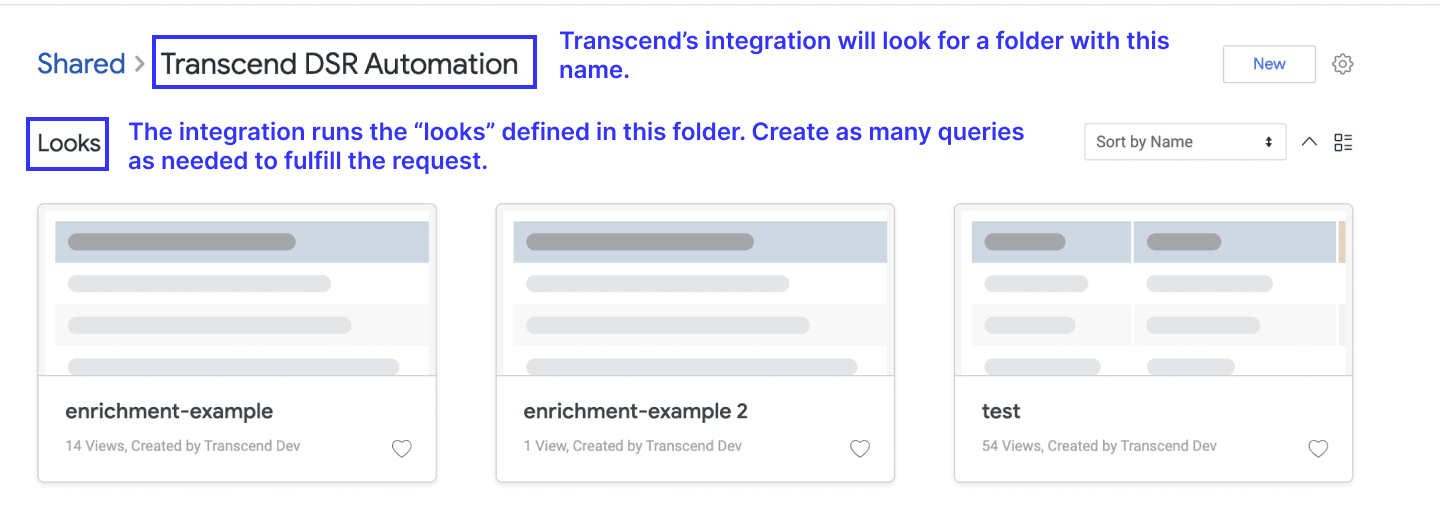
Create a folder named Transcend DSR Automation. The naming for this folder is important, as the integration will look for this specific folder name.
Create a "Look" inside this folder for each query you would like executed for an access request. Note: You can create as many "Looks" as needed to fulfill a complete access request for a data subject. The integration will run every look in this folder.
Add a filter to each query generated with the template variable {{endUserEmail}}. The integration will replace the template variable with the identifier from the request. This ensures that the integration will only return data filtered to the correct user. Any "looks" that do not have this parameter will not be run by the integration. As an example, let's say the data to query contains a field called consumer_email. A filter for the query may look like: model.consumer_email": "{{endUserEmail}}.
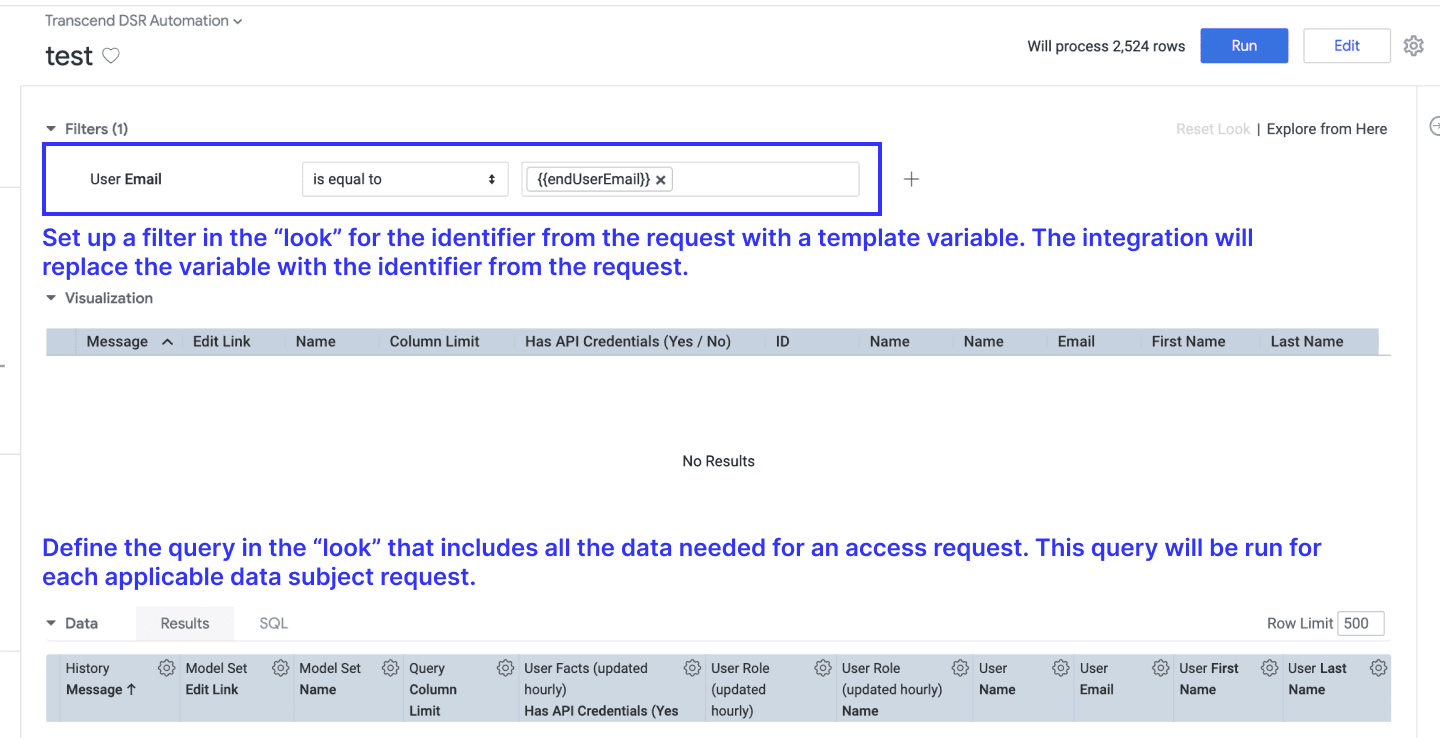
After the "look" is configured to return all the data needed for an access request, use the steps listed below to connect the Looker integration in Transcend. From there, you can manage the datapoint for access requests and ensure the data system is configured to allow requests from the desired data subjects.
Once Looker is set up with the specific folder and looks defined for access DSRs or DSR identity enrichment, you can connect the integration in Transcend and start actioning requests.
- [Best practice] Create a dedicated user for the integration.
- From your Looker dashboard, navigate to Admin > Users
- Create a new user. The new user should have access to only the Transcend DSR Automation folder. This security practice ensures that Transcend can only access looks and queries necessary to fulfill data subject requests. For tips on how to manage access to content in Looker, please see this article.
- Obtain Client ID and Client Secret integration credentials.
- Select the dedicated Transcend user.
- Navigate down to API3 Keys and select the button to Edit.
- Create a new set of keys and copy them into the integration connection form.
- Obtain the domain and port integration credentials.
- You only need to enter this information if your Looker instance is self-hosted.
- Use your Looker URL to determine the domain and port (not all domains will include a port). For example, if you host a looker instance at
lookerInstance.companyName.com:9090, your domain iscompanyName.com:9090.
- Use your Looker URL to determine the domain and port (not all domains will include a port). For example, if you host a looker instance at
- If your instance of Looker is not self-hosted, please leave the default value.
- You only need to enter this information if your Looker instance is self-hosted.
- Find the subdomain for your instance.
- The subdomain can be found using your Looker instance URL when logged in. For example, if your company is not self-hosting, and the URL for your company's Looker is
https://mycompany.looker.comthe subdomain ismycompany. - If your company is self-hosting and the URL is
lookerInstance.companyName.com:9090, the subdomain islookerInstance.
- The subdomain can be found using your Looker instance URL when logged in. For example, if your company is not self-hosting, and the URL for your company's Looker is
- Connect the integration. We recommend submitting a few test DSRs to ensure the queries are configured properly and returning the information you expect.