Workday integration
The Transcend and Workday integration is a comprehensive solution designed to streamline and enhance data privacy and compliance management within the realm of human resources. By integrating Transcend's privacy management platform with Workday, organizations can seamlessly automate and manage data subject access requests in compliance with the GDPR. This integration facilitates a more efficient and transparent approach to handling personal data, empowering businesses using Workday to navigate complex privacy landscapes and uphold the highest standards of data protection for their employees and stakeholders.
Transcend’s Workday integration can be set up to fulfill access requests for your organization’s internal data. The integration works by taking a data subject’s email address as an identifier and querying it against Workday using WQL queries and APIs. By harnessing WQL and APIs, Transcend optimizes the automation of data subject access requests, aligning with global data protection regulations. For erasure requests, in order to be GDPR compliant, customers must use Workday's Data Purge which will purge all the data for the data subject.
Before proceeding, please ensure that your Workday user has the following Security Permissions:
- Security Configurator
- Security Administrator
- Report Administrator
These permissions should allow the user to create security groups, an integration system user, and calculated fields.
The following instructions below is a step by step guide on how to get the credentials from Workday and connect your Workday environment to Transcend.
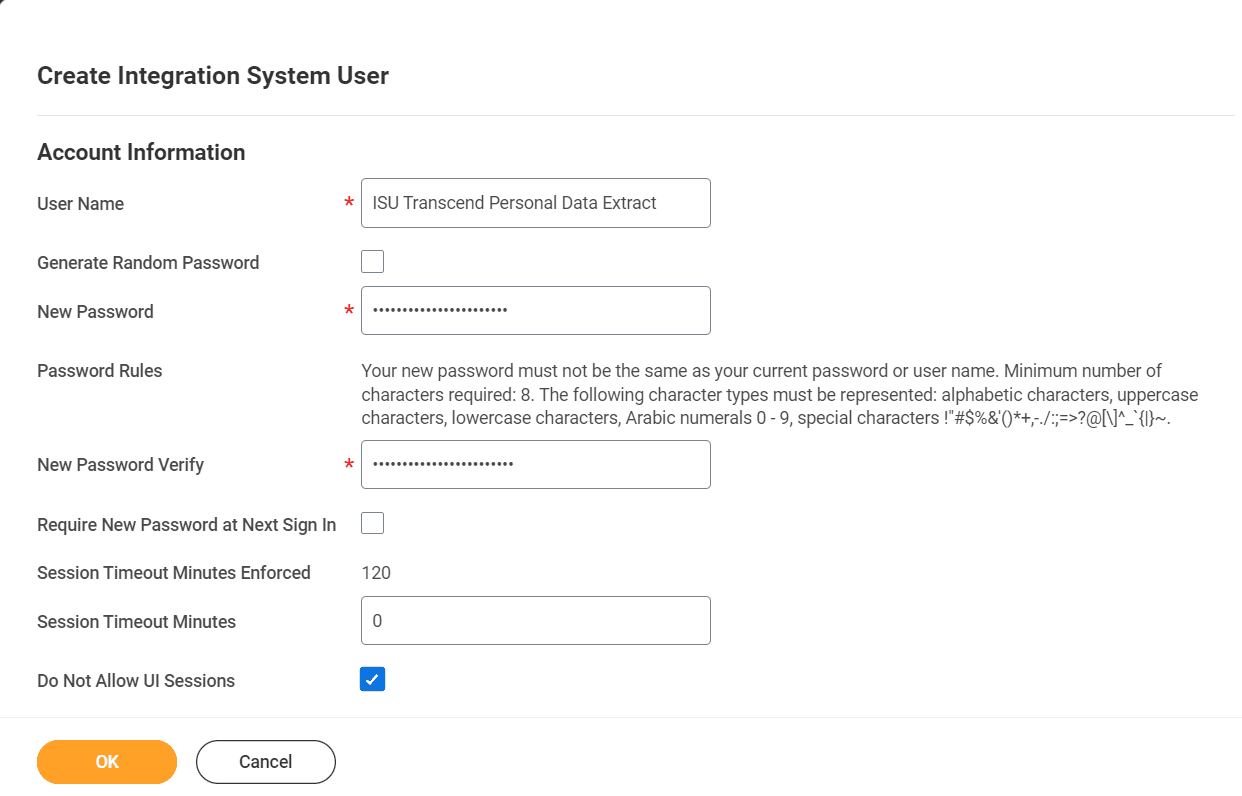
- Create an ISU by navigating to “Create Integration System User” from the Workday search bar and select the task. Give the ISU a username in the form of: ISU [intended use], e.g.
ISU Transcend Personal Data Extract. - Create a password but do not store it as Transcend will be authenticating with an API Client (OAuth 2.0). Check the “Do not allow UI sessions” box and click OK.
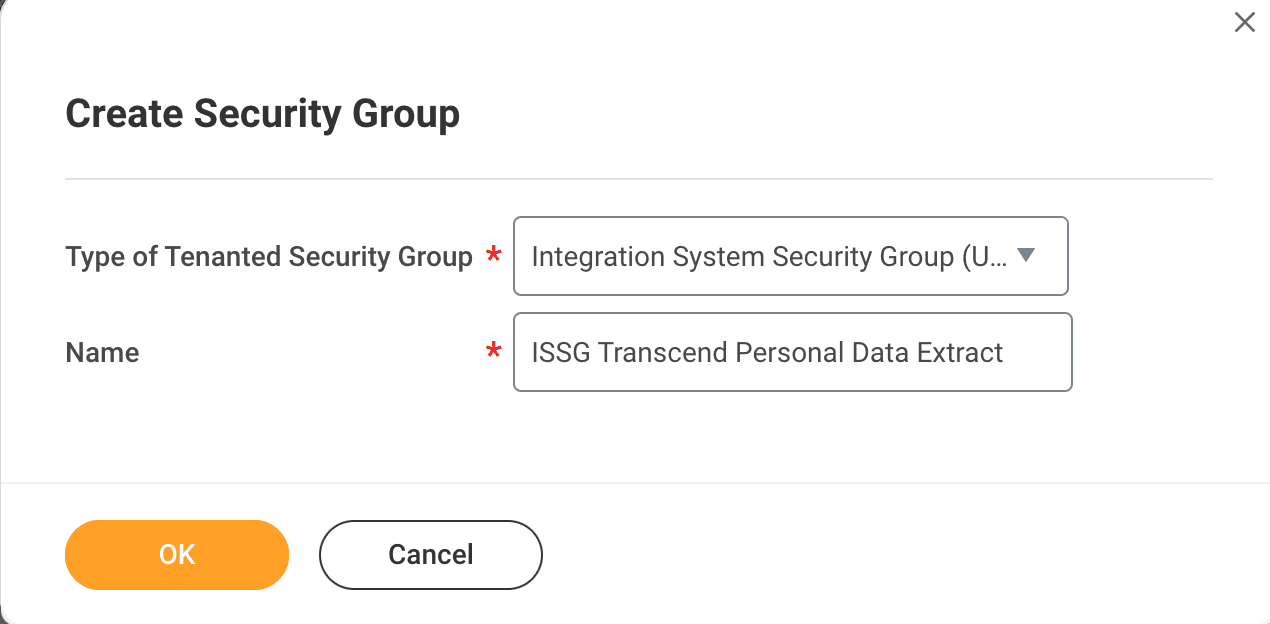
- Create a security group by searching for the task “Create Security Group”. Select “Integration System Security Group (Unconstrained)” as the type.
- Give the security group a name in the same form as above but using the ISSG prefix, e.g.,
ISSG Transcend Personal Data Extract. - Click OK.
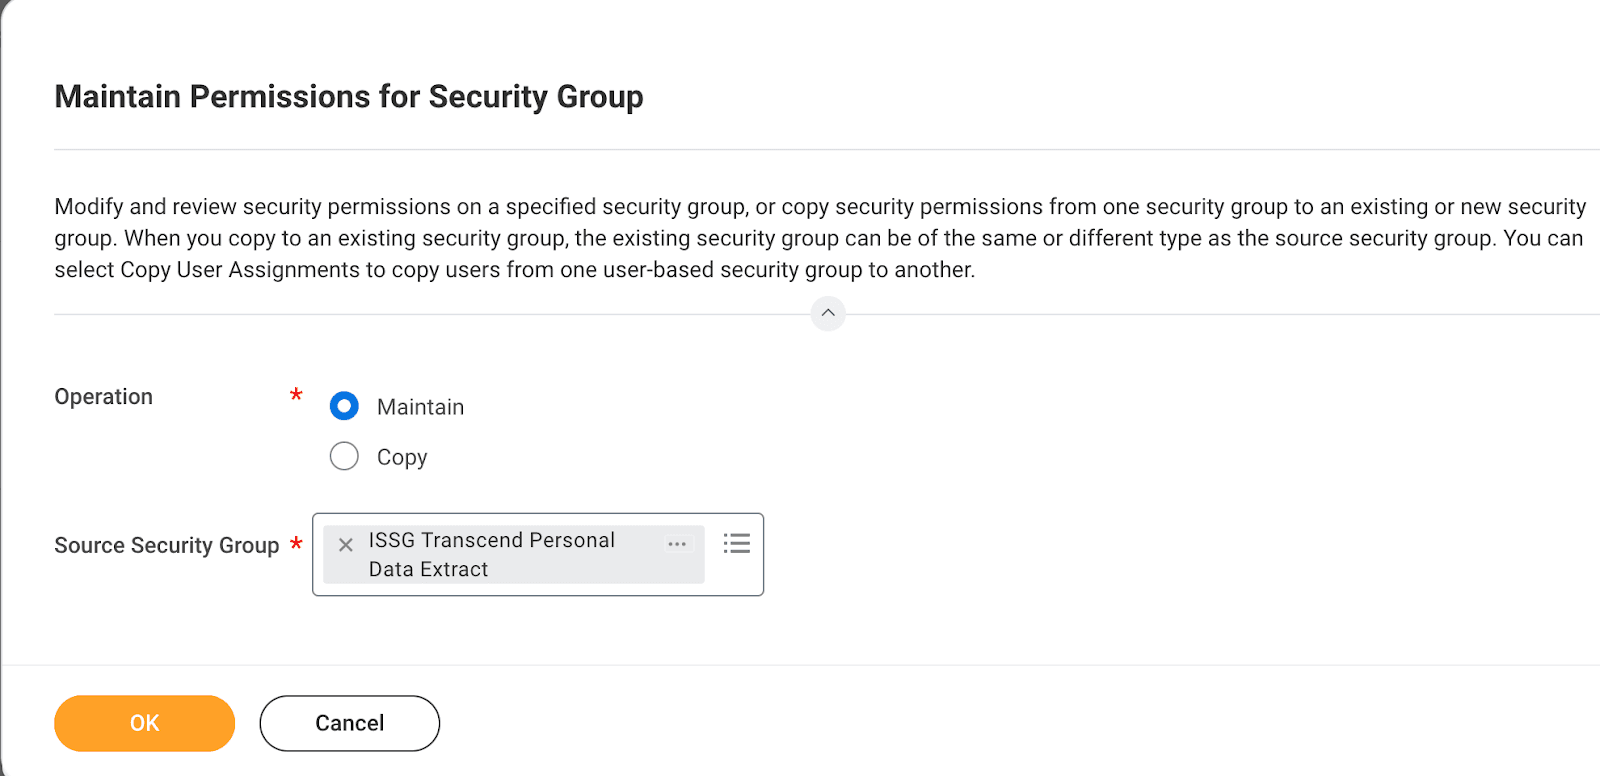
- Navigate to "Maintain Permissions for Security Group" from the Workday search bar.
- Enter the name of the Security Group created previously and click OK.
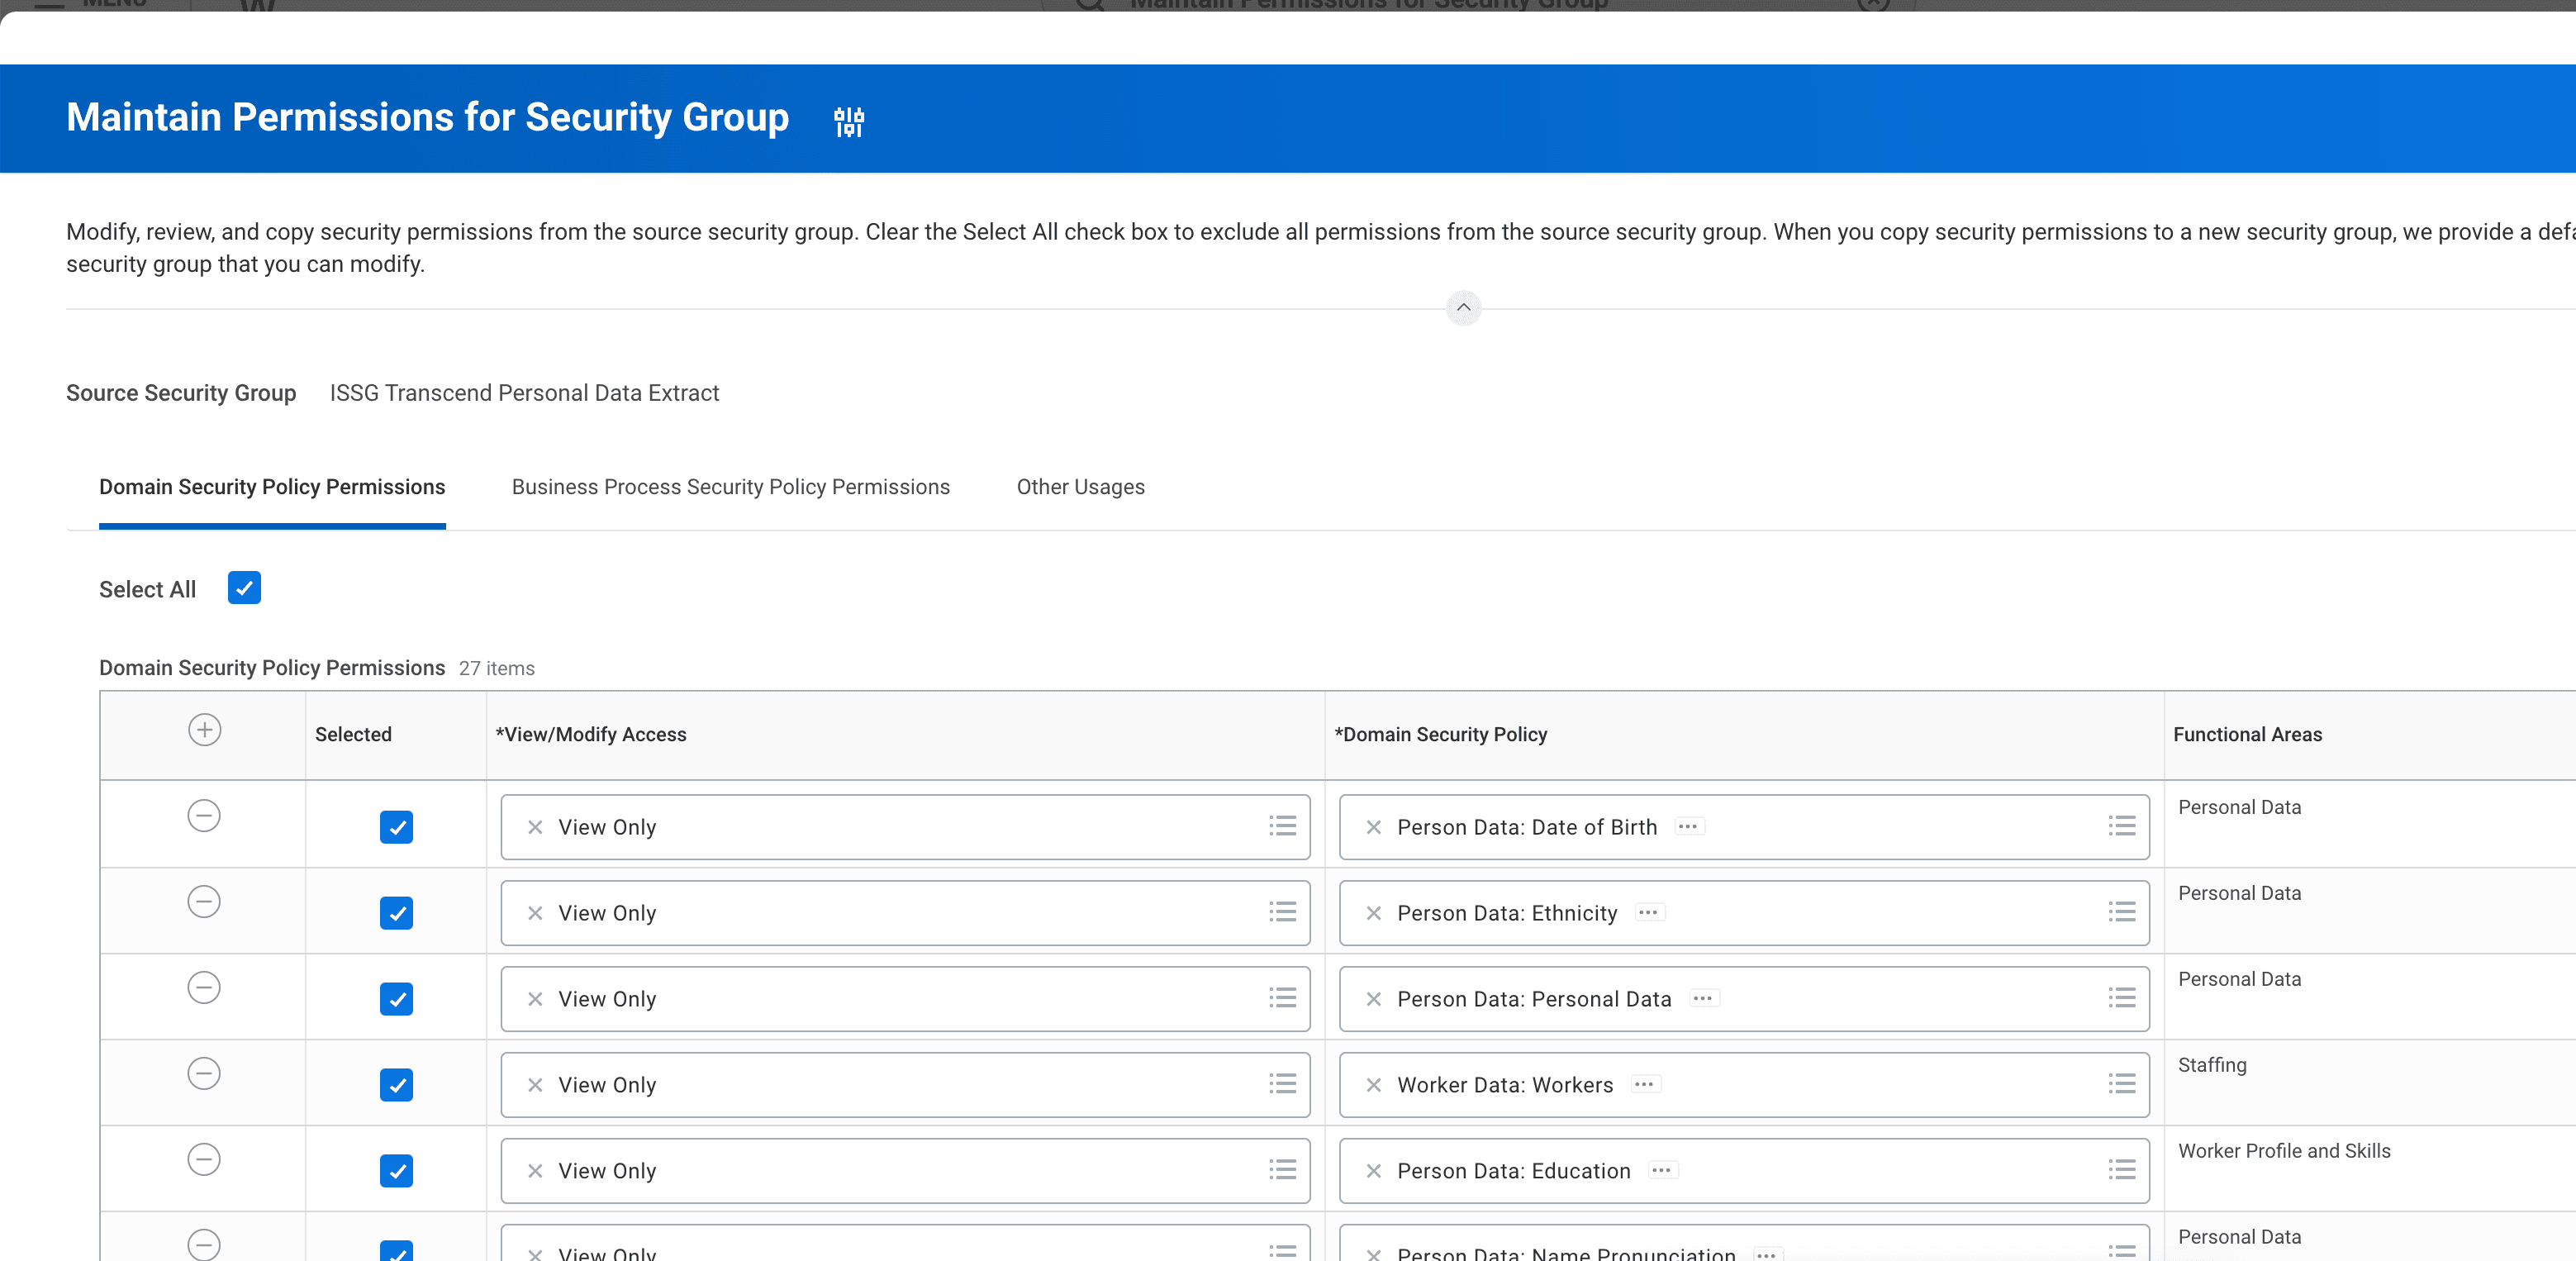
- Assign all necessary security domains as follows by giving “View” permissions to the following domains:
- Person Data: Name Pronunciation
- Person Data: Home Contact Information
- Person Data: Personal Data
- Person Data: Home Address
- Person Data: Ethnicity
- Person Data: Education
- Person Data: ID Information
- Person Data: Date of Birth
- Integration Event
- Person Data: Personal Photo
- Worker Data: Workers
- Worker Data: Current Staffing Information
- Worker Data: Public Worker Reports
- Person Data: Work Contact Information
- WQL for Workday Extend
- Candidate Data: Personal Information
- Worker Data: Compensation by Organization
- Indexed Data Source: Workers
- Person Data: Person Reports
- Custom Report Creation
- Reports: Pay Calculation Results for Worker
- Person Data: Name
- Person Data: Home Contact Information
- Person Data: Personal Information
- Person Data: Social Networks
- Worker Data: Payroll
- Worker Data: Payroll (Company Specific) – USA (And any other applicable countries)
- Worker Data: Payroll (Pay Group Specific)
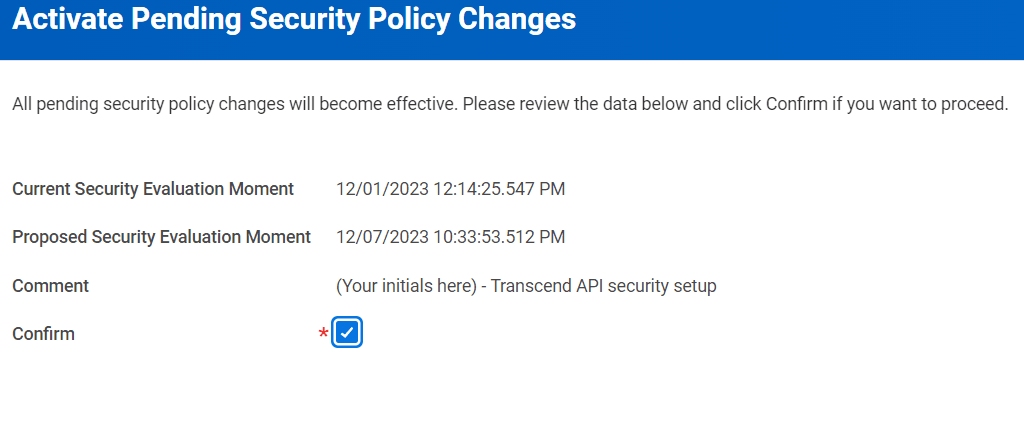
- Navigate to "Activate Pending Security Policy Changes" from the Workday search bar. Add a comment explaining what the security changes you are making are for and press OK.
- Note: None of the security you have configured will be activated until this step is completed so make sure to repeat it each time you update your ISSG permissions in step 3.
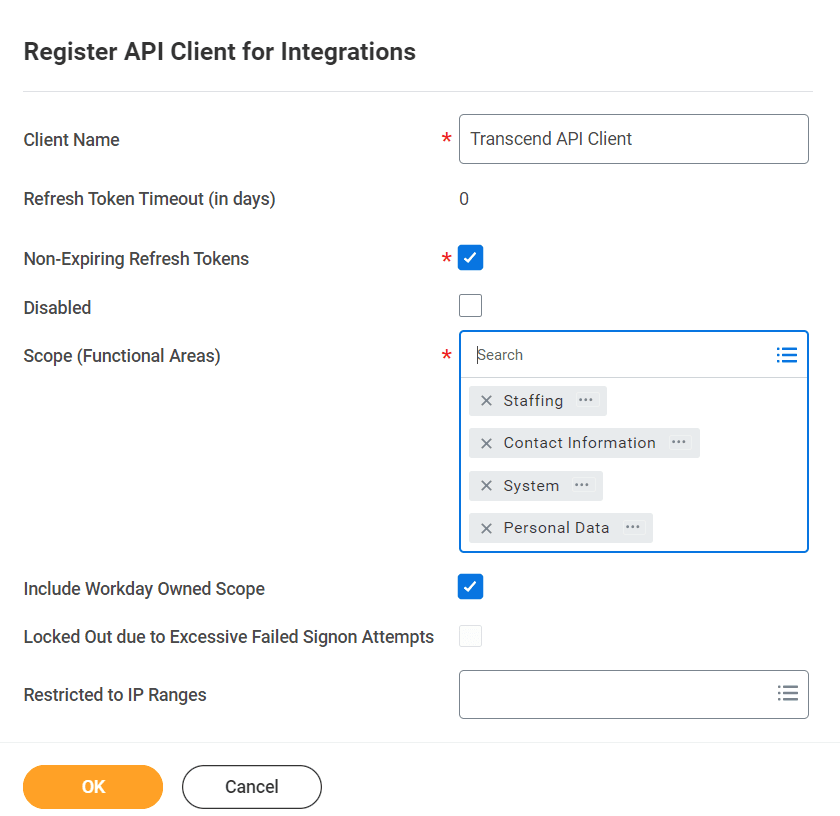
- Navigate to "Register API client for Integrations" from the Workday search bar. Give the client a name (doesn’t matter what you choose).
- Select Non-Expiring Refresh Tokens and select the following scopes:
- Staffing
- Contact Information
- System
- Personal Data
- Recruiting
- Core Payroll
- Payroll Interface
- USA Payroll (and any other applicable countries)
- Check the box "Include Workday Owned Scope" and press OK.
- You will see your newly created API client. Copy the Client Secret and Client ID and store them securely as you will need it to connect to the Workday integration in Transcend.
- Note: If you forget to store the Client Secret or lose it, you can generate a new one by going to the related actions of your API client and selecting API Client > Generate New Client Secret.
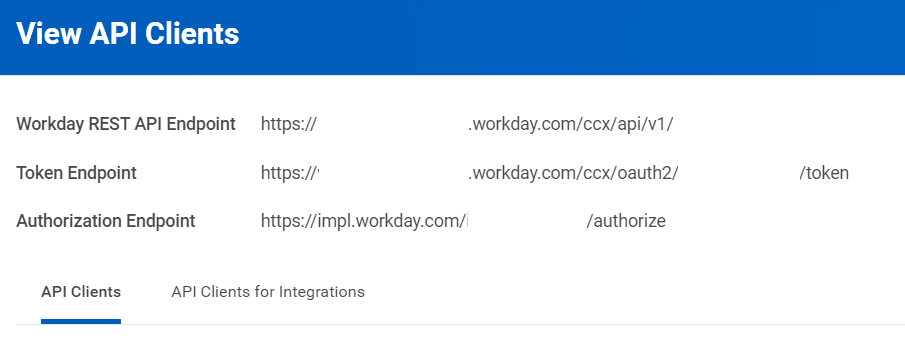
- Navigate to "View API clients" from the Workday search bar. At the top, you will see the base REST API endpoint.
- The host name and tenant name is embedded in the Workday REST API Endpoint:
https://{host name}.workday.com/ccx/api/v1/{tenant name}
- Retrieve the host name and tenant name and store them securely as you will need it to connect to the Workday integration on Transcend.
- Continuing from the previous step, navigate to the "API Client for Integrations" tab.
- Next to the name of the API Client you have created from step 6, click on the three dots next to view related actions.
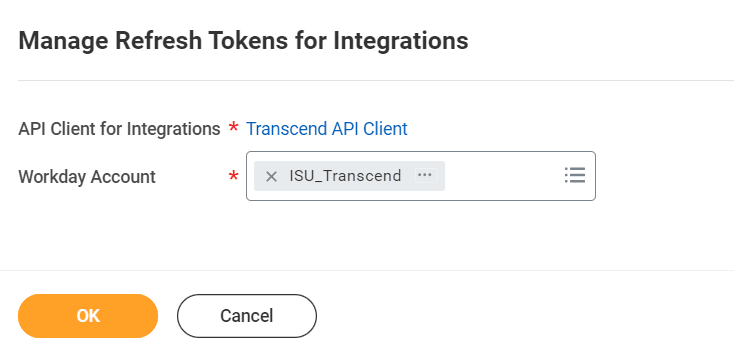
- Navigate to API Client > Manage Refresh Tokens for Integrations.
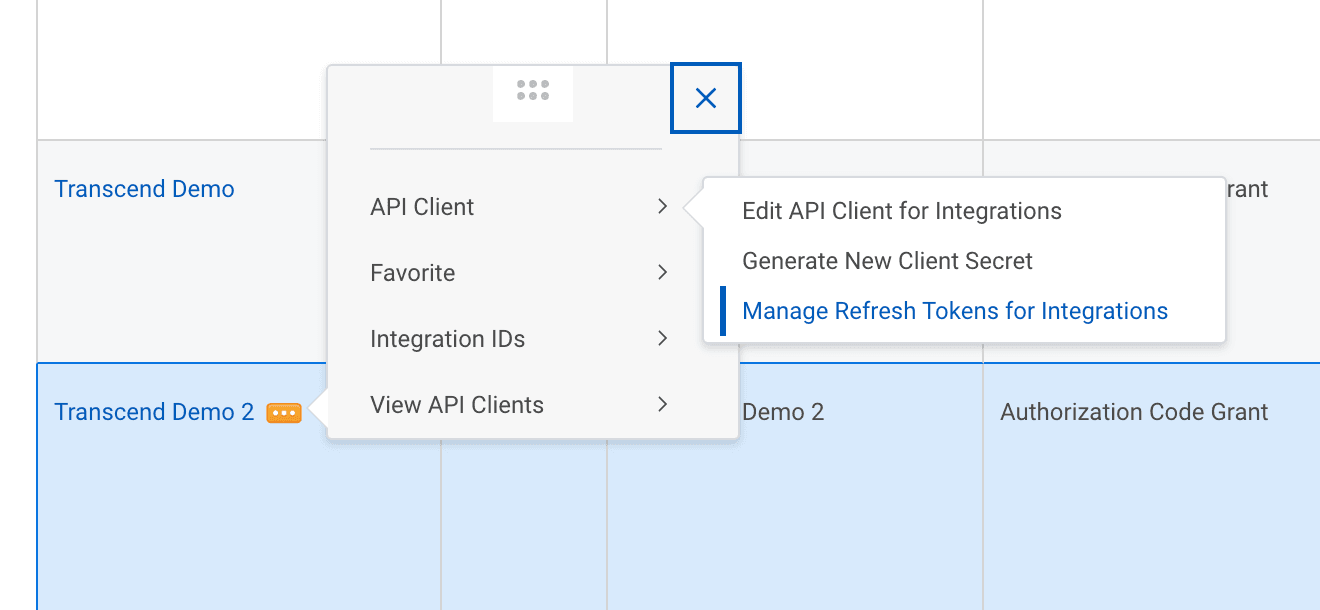
- Select the ISU you created in step 1 and press OK.
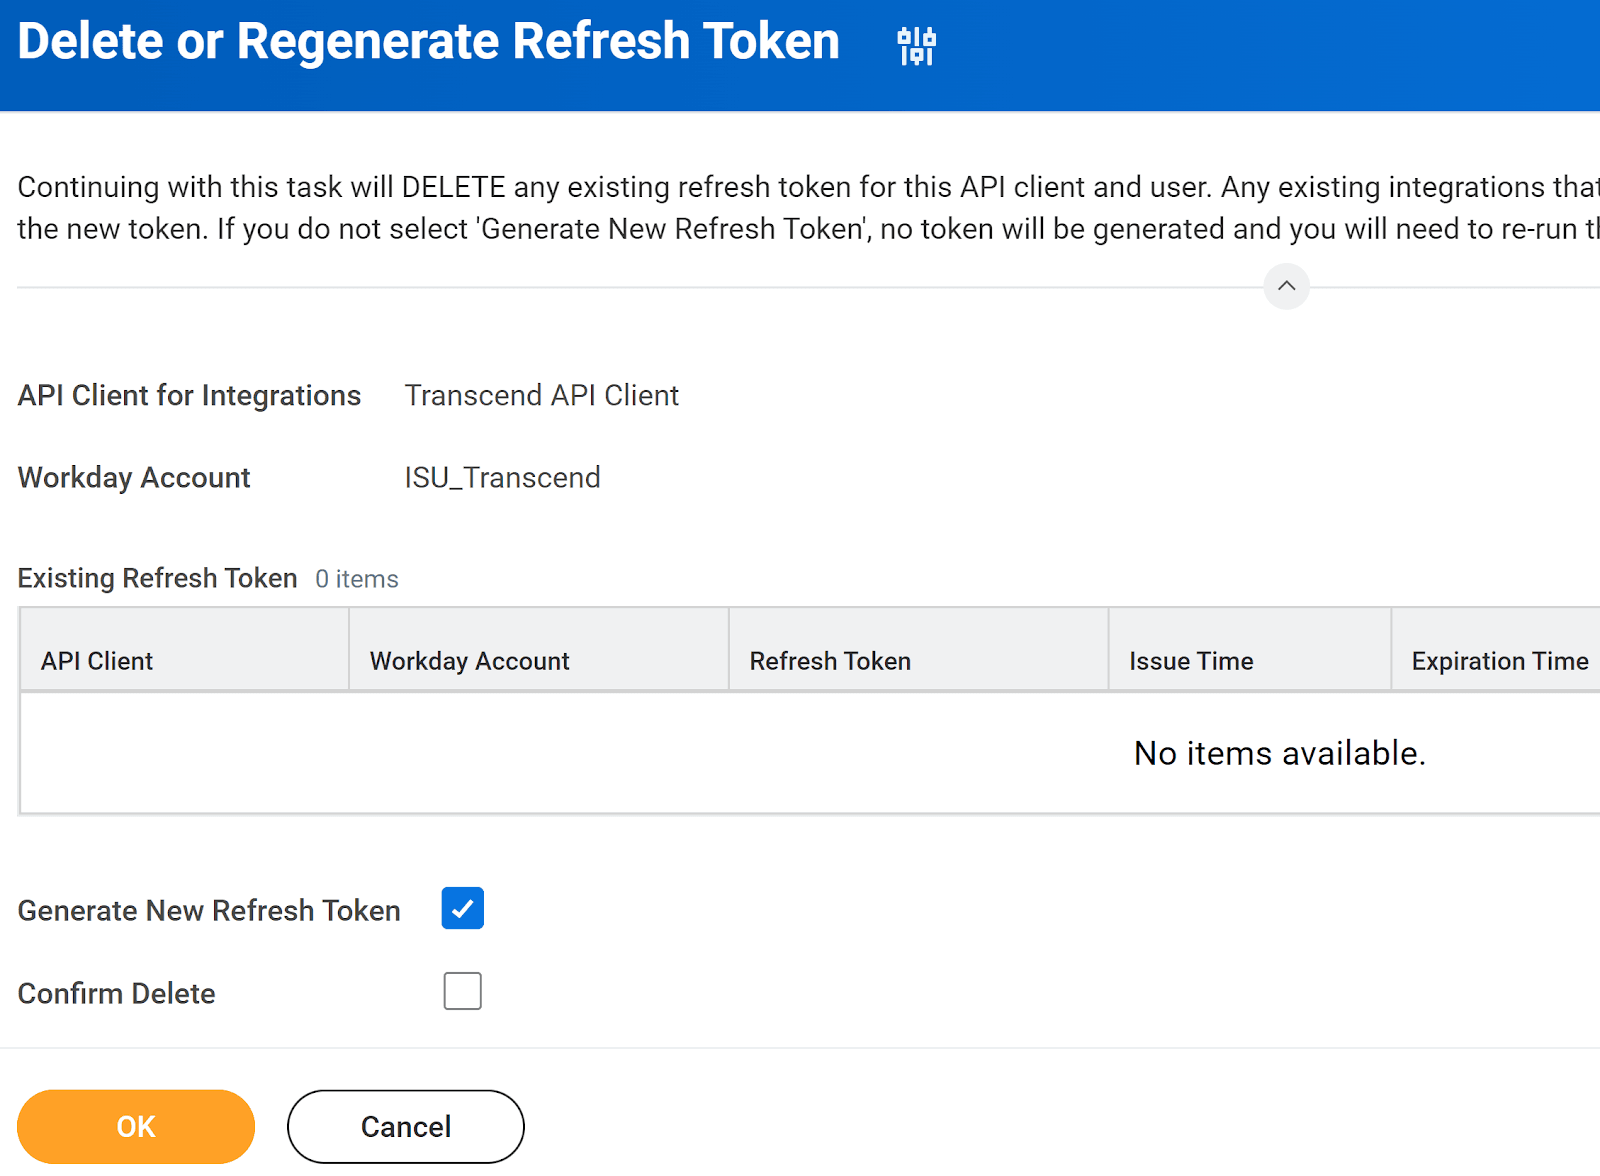
- On the next page, select the Generate New Refresh Token box and press OK.
- Copy the newly created Refresh Token and store it securely as you will need it to connect to the Workday integration on Transcend.
In order for Transcend to query non-primary email identifiers, three calculated fields need to be created in your Workday account.
The first calculated field will be a True/False calculated field to determine the primacy and usage of the email.
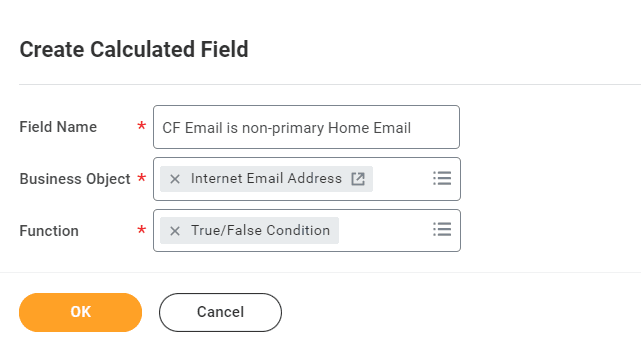
- In the Workday search bar, type “Create Calculated Field”. Create a calculated field as follows:
- Field Name: Enter "CF Email is non-primary Home Email".
- Business Object: Choose “Internet Email Address”.
- Function: Select “True/False Condition”.
- Click OK.
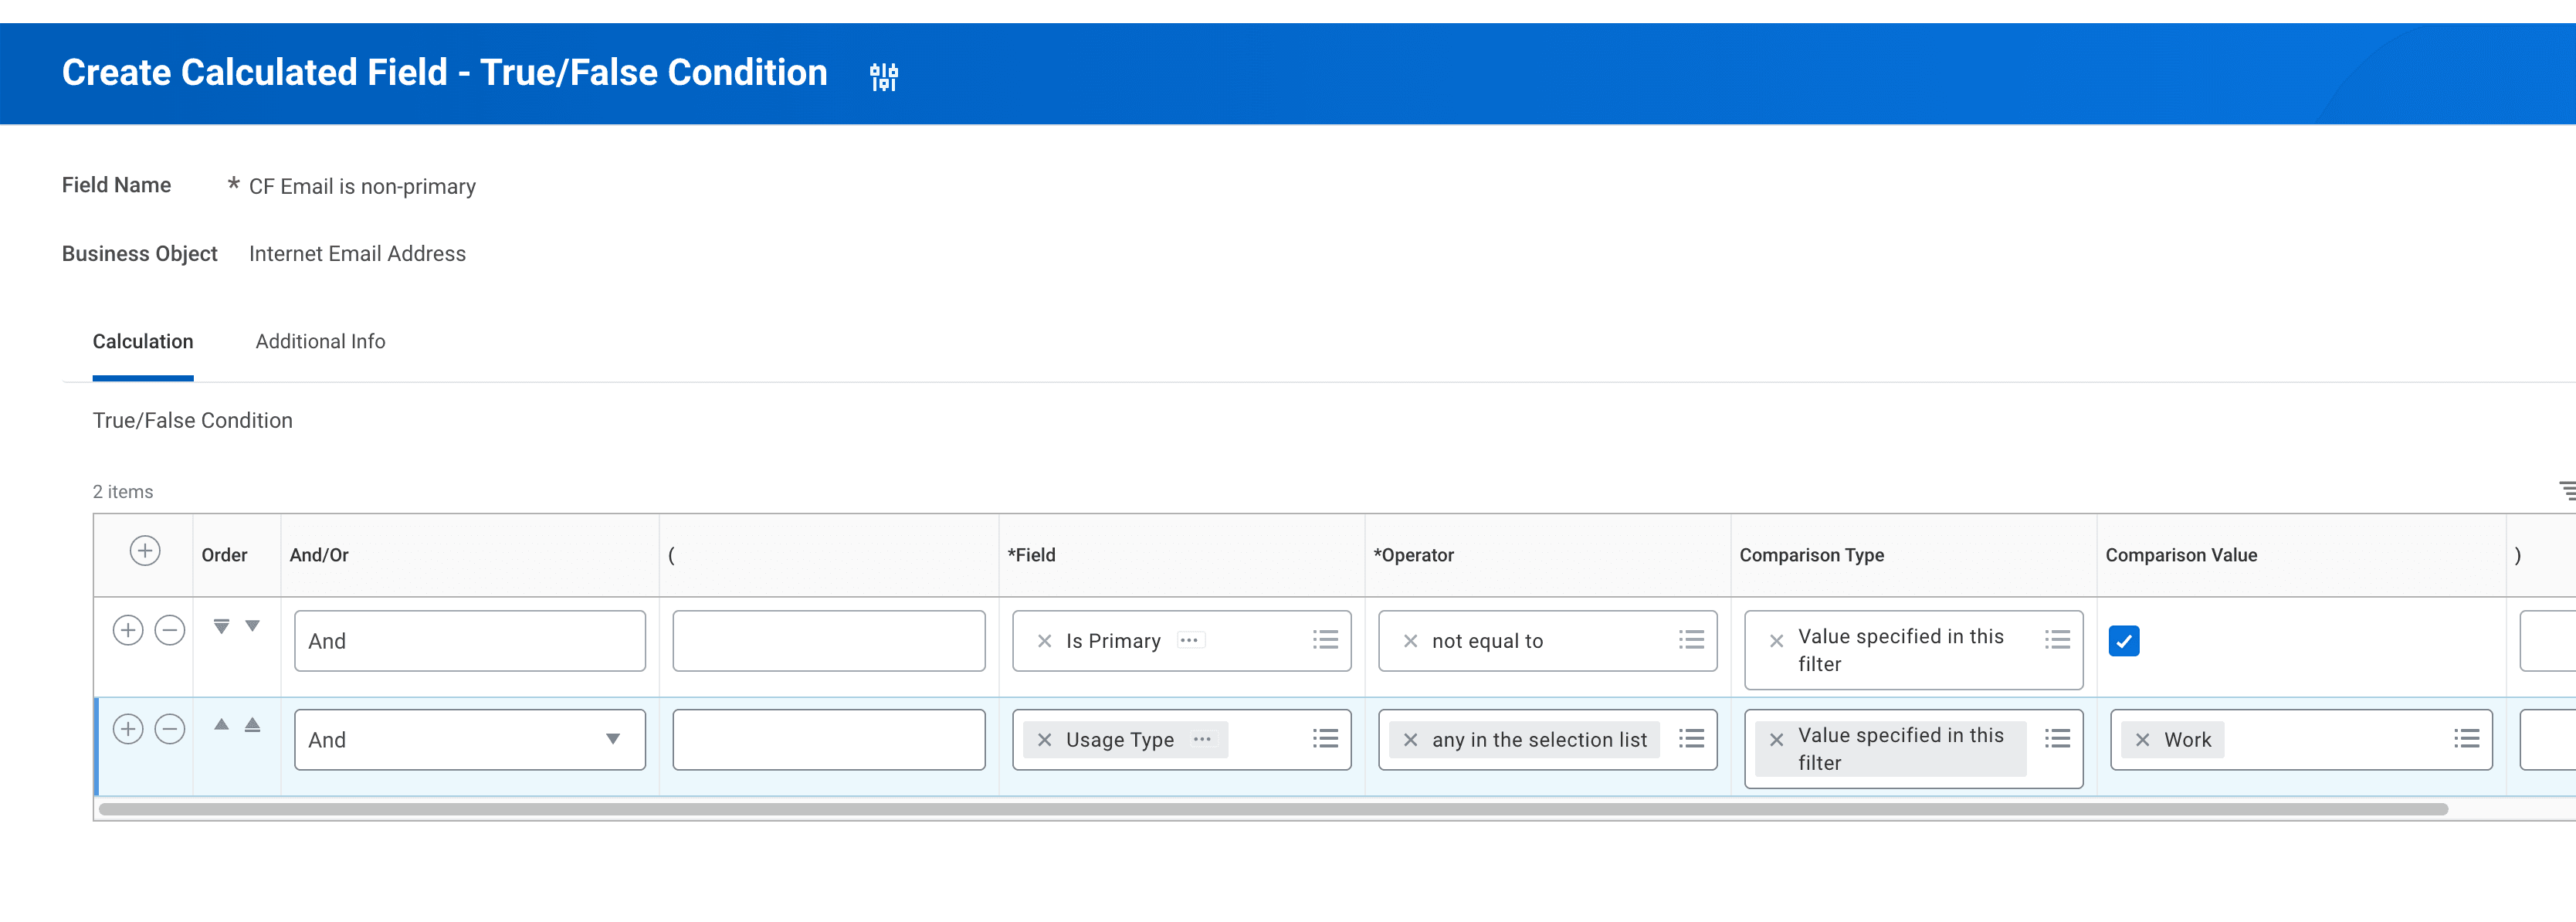
- On the next page, enter the value “Is Primary” as the field in the Field column. Note that there are two “Is Primary” options. Ensure you use the “Is Primary” field that specifies in its description that it “returns true if the communication method has any primary usage.”
- Select “not equal to” in the Operator column and “Value specified in this filter” in the Comparison Type column. Check the checkbox in the comparison value column.
- Add a row and select “Usage Type” in the Field column.
- Select “any in the selection list” in the Operator column and “value specified in this filter” in the Comparison Type column.
- Select “Home” or “Work” or a different usage type as your needs dictate in the Comparison Value column.
- Navigate to the Additional Info tab and add a description for the calculated field. e.g., “Returns true if the email address is non-primary and of usage type: Home.“ Click OK.
The second calculated field will be to extract the worker’s email based on the true/false field that was just created
- In the Workday search bar, type “Create Calculated Field”. Create the second calculated field as follows:
- Field Name: Use a descriptive name, e.g., “CF Worker's Non-Primary Home Email”.
- Business Object: Select “Worker”.
- Function: Select “Extract Single Instance”.
- Click OK.
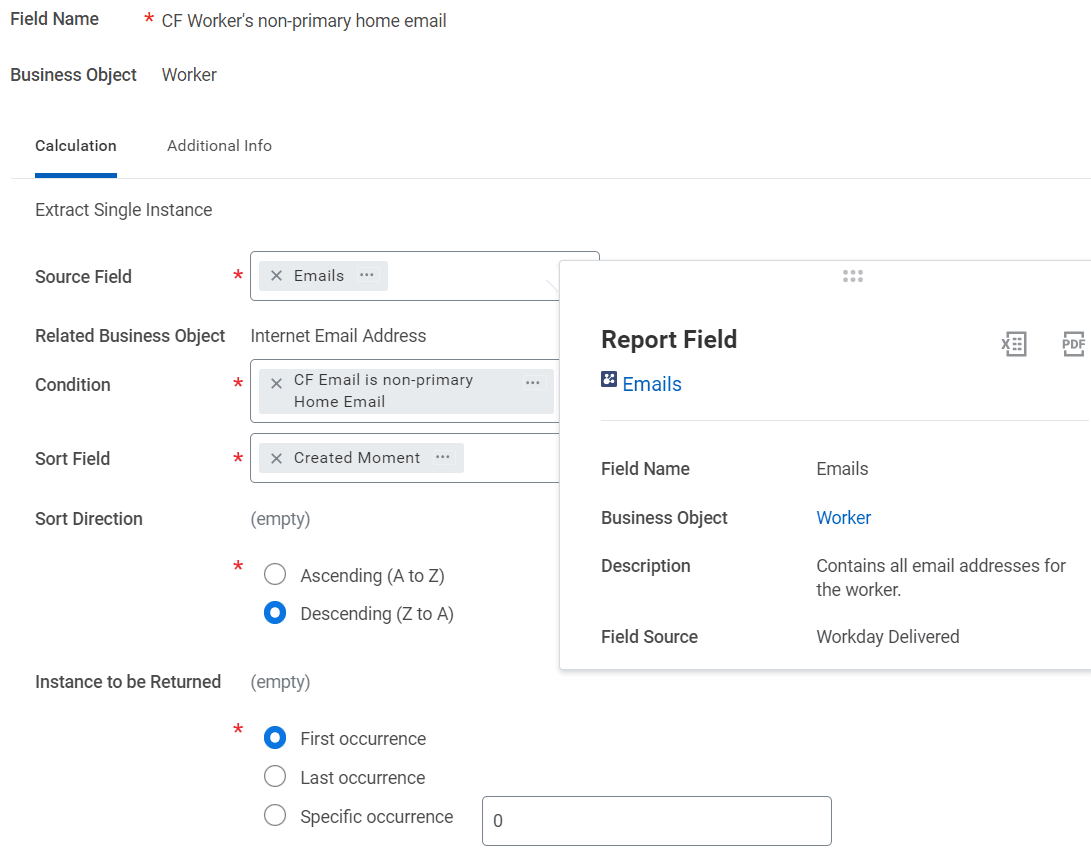
- On the next page, select “Emails” as the Source Field.
- Select the True/False calculated field created previously as the Condition.
- For the Sort Field select “Created Moment”.
- In the Sort Direction, select Descending (this will ensure it returns the most recent email if multiple match the conditions above).
- Navigate to the Additional Info tab and write a brief description.
- Click OK.
What we have done so far is create a true/false calculated field that determines if a given email meets our criteria, and we have used that in another calculated field to get us the email we want. The issue is, the calculated field returns the email object, not the text of the email (some-email@example.com). To do this we will need to create one more calculated field to transform extracted email into a text field that’s queryable.
The final Calculated Field will return the Email as text.
- In the Workday search bar, type “Create Calculated Field”. Create the second calculated field as follows:
- Field Name: Append “as text” to the end of the previously calculated field name (e.g., “CF Worker's Non-Primary Home Email as text”).
- Business Object: Select “Worker”.
- Function: Select “Concatenate Text”.
- Click OK.
- Add the previous calculated field to the row.
- Navigate to the Additional Info tab and write a description.
- Expand the Advanced section and paste the text “cf_Non_Primary_[Usage]_Email_As_Text” into the WQL Alias text box, filling in the usage as “Work” or “Home”.
Repeat the above steps for each usage type needed by Transcend (Work and Home at a minimum). Once these steps are completed, the Transcend team will be equipped to query workers based on their non-primary email addresses.
Go to your Integrations to add the "Workday" integration type.
Copy and paste the following credentials that should have been retrieved in the above steps:
- Workday Hostname (See Retrieve Endpoints)
- Tenant Name (See Retrieve Endpoints)
- Client ID (See Register API Client for Integrations)
- Client Secret (See Register API Client for Integrations)
- Refresh Token (See Generate Refresh Token)
Click Connect to create the integration.
Once data is purged in Workday, there is no way to retrieve it, nor can Workday get it back if you open a case with them. It is permanently gone. It is recommended that you perform any data purging first in Sandbox to verify it worked as you expected before performing data purging in your production environment. Also note that you cannot purge data for the following:
- In-progress Staffing Events
- Future Dated Events
- In-progress Payrolls
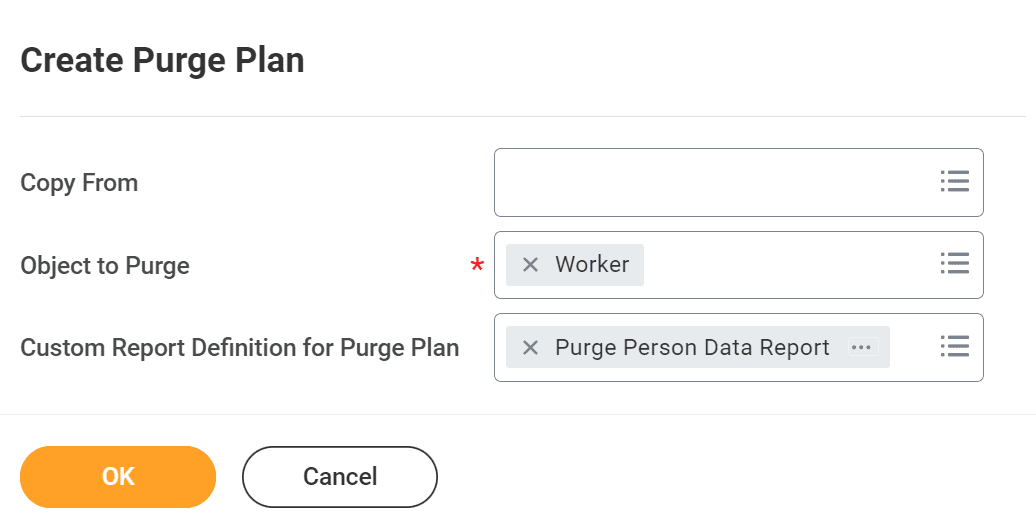
Search for the task “View Purge Plan” and determine if any of them will suit your needs. You may skip the rest of this step if there is an existing option for purging worker data. If not, proceed to search for the task “Create Purge Plan”. Select worker as object to purge, and Purge Person Data Report for the custom report selection.
Click OK. On the next page, give your purge plan a name and select what data you want purged:
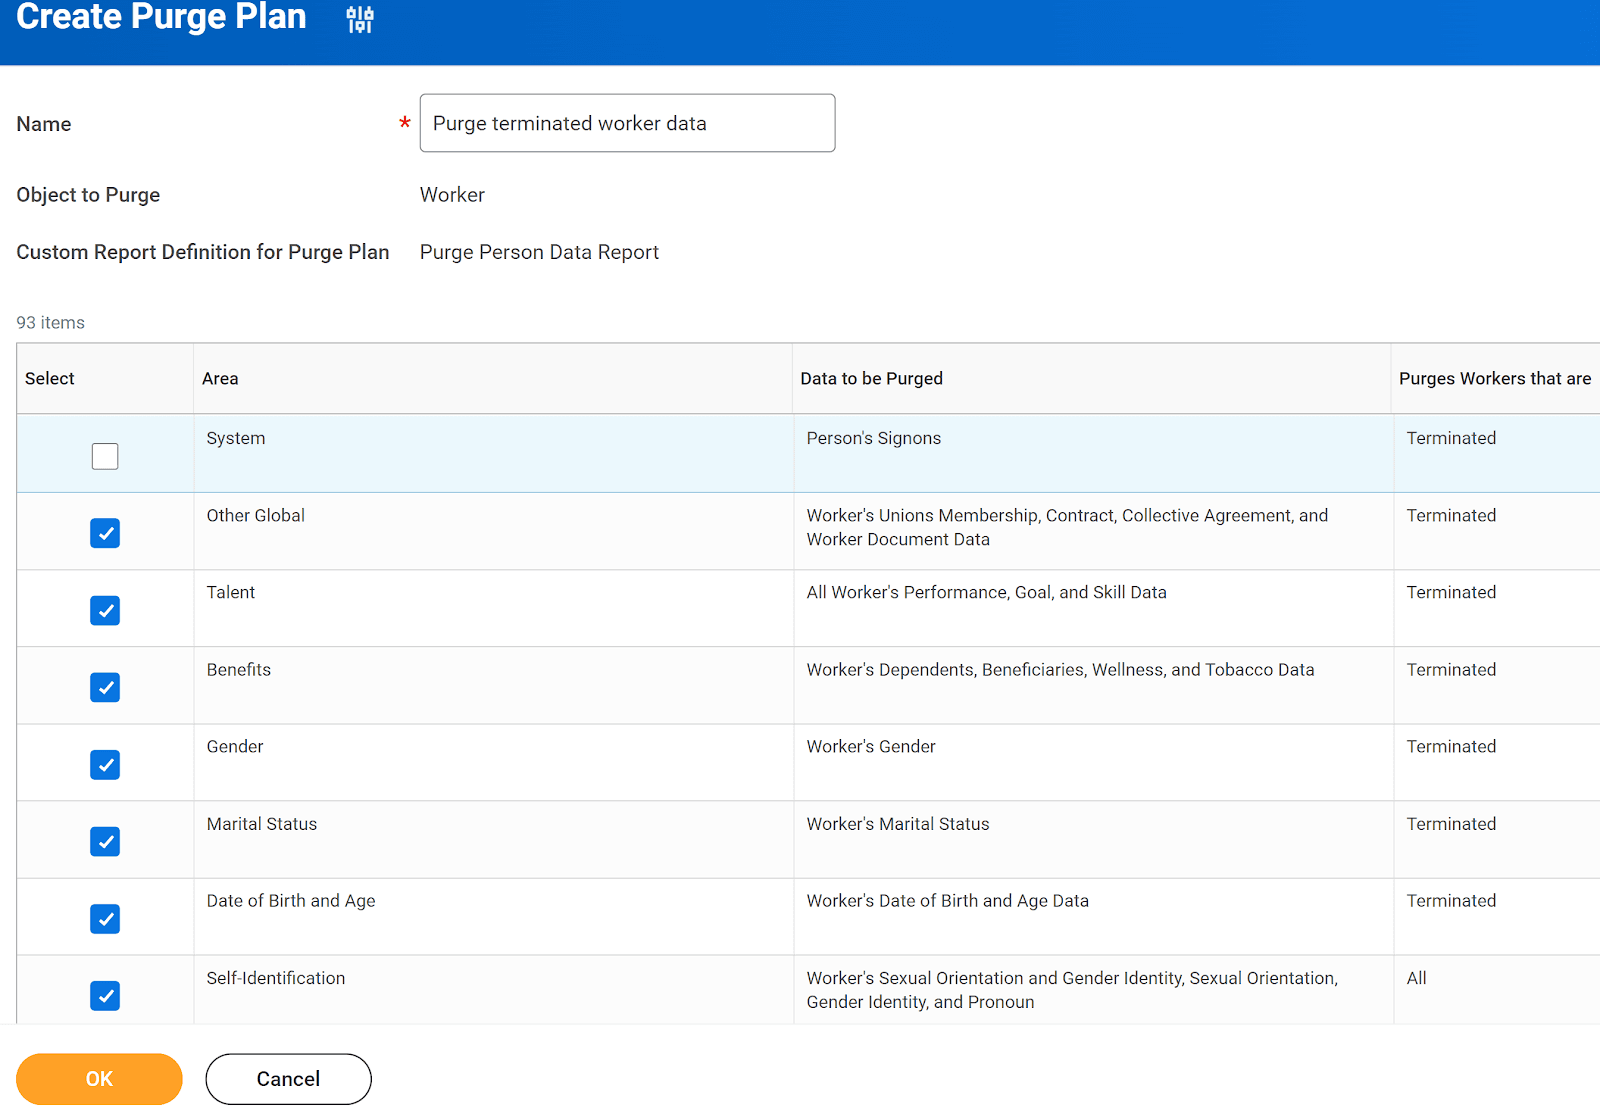
Press OK.
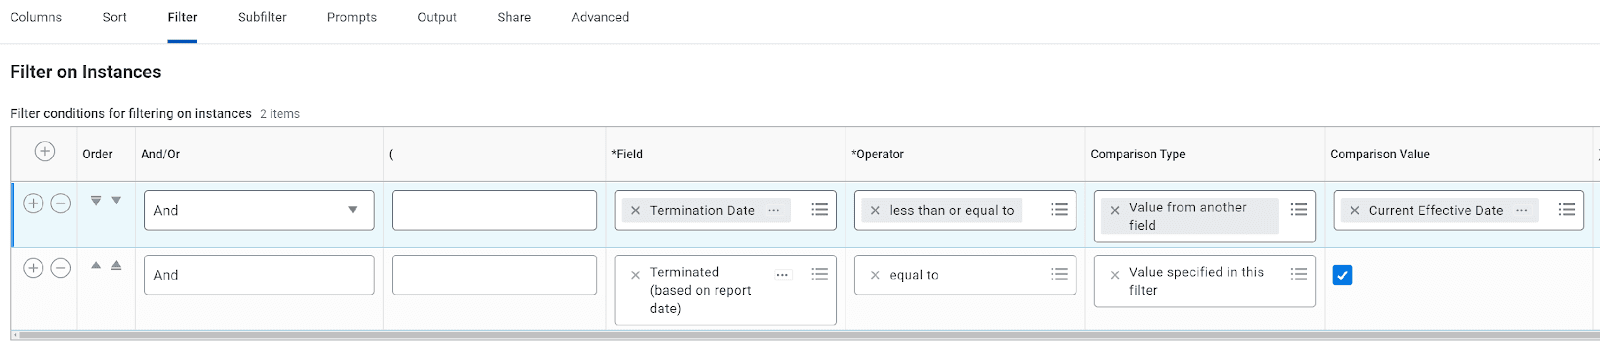
Search for the task “Edit Custom Report” and enter the report name “Purge Person Data Report”. Under the filter section, configure it to select the desired population you want to purge. E.g.,
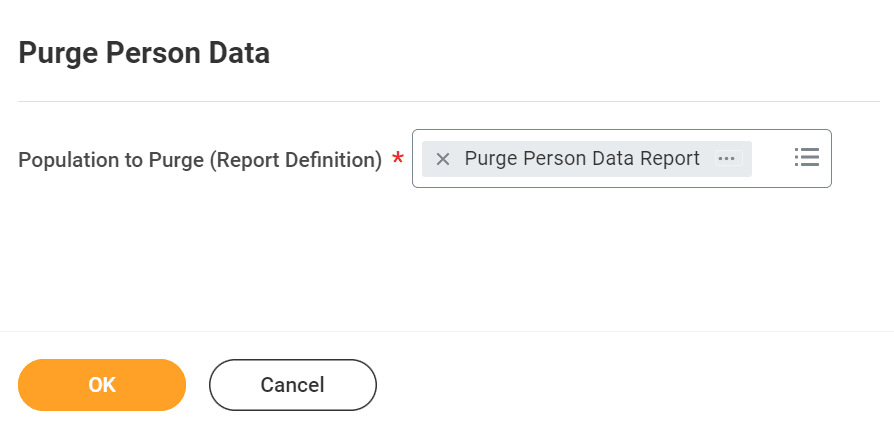
Search for the task “Purge Person Data” and select the report “Purge Person Data Report”.
Press OK. On the next page you can either select a predefined purge plan or manually select what data you would like to purge for the workers. Once you’ve made your selection, press OK. You will be prompted to review your selections and check confirm before pressing OK again. This is the point of no return. Press OK and the data selected will be purged for the workers defined by the filter of the Purge Person Data Report.
On the next page you will see a list of purged instances and any that were unsuccessful, as well as the data purged for the successful instances.